Did you know that baked tacos can achieve the same crispy texture as fried shells while using 70% less oil? These Baked Chicken Tacos deliver that perfect crunch you crave with juicy shredded chicken, melted cheese, and zesty Rotel tomatoes, all ready in just 30 minutes. The secret lies in generously spraying both sides of the tortillas before baking, which creates golden, crispy edges that hold up beautifully to your favorite toppings. I discovered this method on a busy weeknight when I needed dinner fast, and my family has been requesting these tacos weekly ever since. Using rotisserie chicken means zero cooking time for the protein, while the baking method lets you prepare 10-12 tacos simultaneously without standing over a hot stove. Whether you’re feeding picky eaters, hosting Taco Tuesday, or simply craving restaurant-quality tacos at home, this recipe delivers big flavor with minimal effort. Let’s dive into how you can create these irresistibly crispy baked chicken tacos in your own kitchen tonight.
Ingredients List
Gathering your ingredients takes just minutes, and most items are pantry staples you likely already have on hand. The beauty of this recipe lies in its simplicity and flexibility, allowing for easy substitutions based on what you have available.
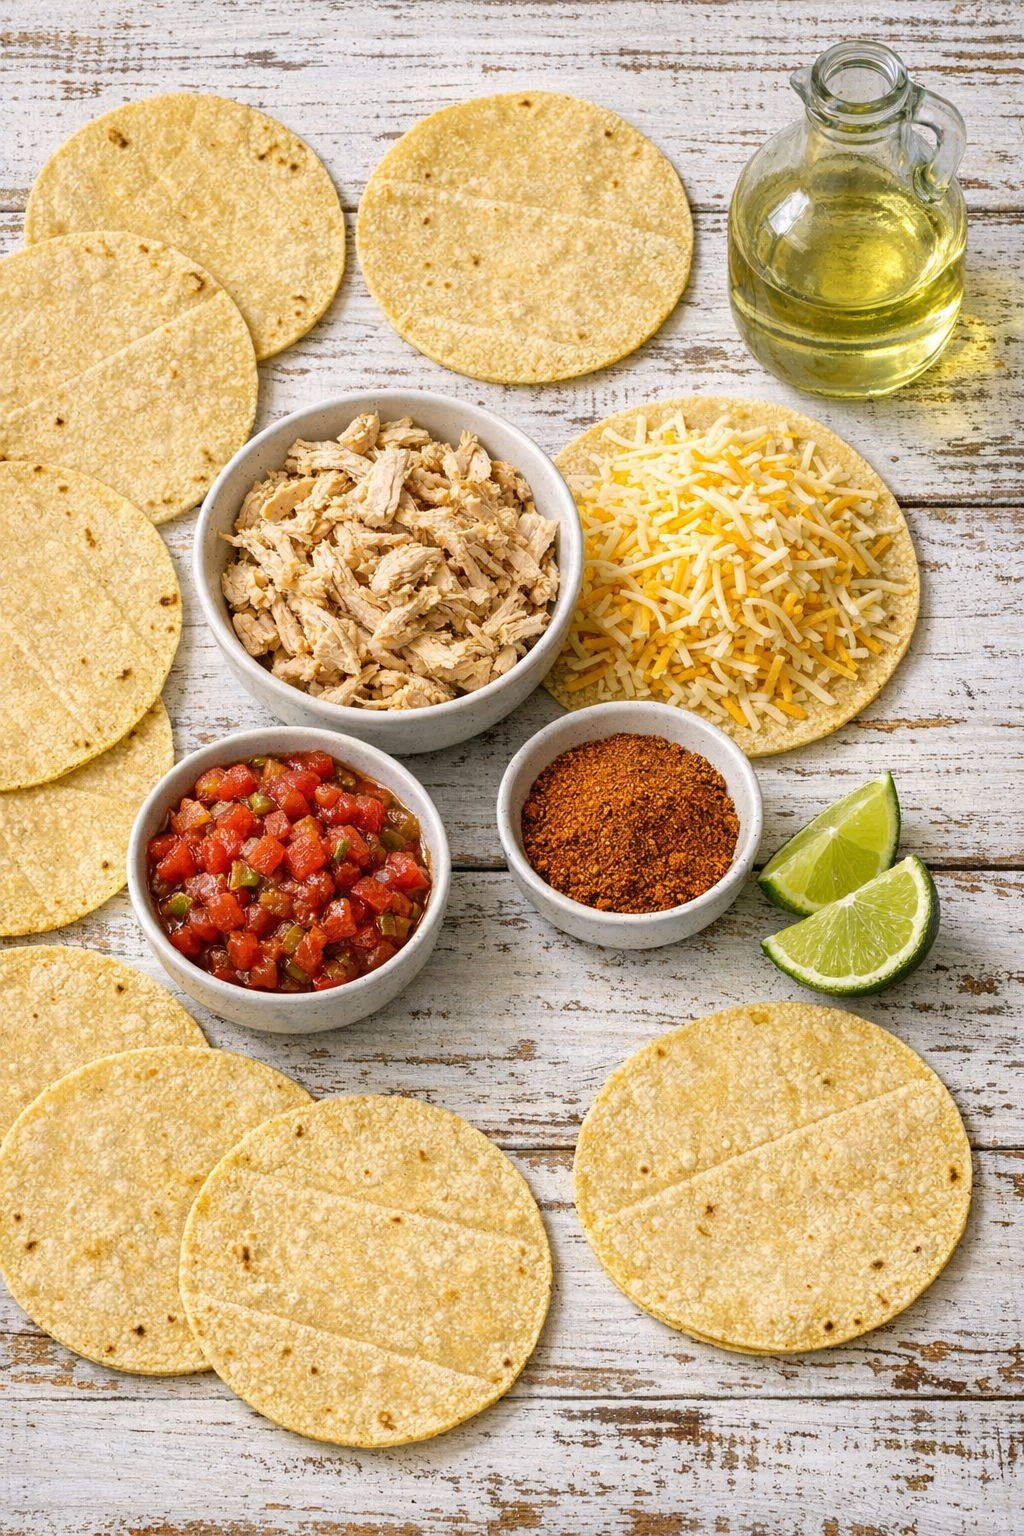
- 10-12 small corn tortillas (5-inch size preferred): Corn tortillas crisp up beautifully and provide authentic flavor. You can substitute flour tortillas if preferred, though they’ll be slightly softer.
- Cooking spray or neutral oil: Essential for achieving that crispy, golden shell. An oil sprayer gives the most even coverage.
- 2 cups Mexican-style shredded cheese: This blend typically includes cheddar, Monterey Jack, and sometimes queso quesadilla. You can substitute with sharp cheddar alone or pepper jack for extra kick.
- 2 cups shredded rotisserie chicken: About one small rotisserie chicken yields this amount. You can also use leftover cooked chicken breasts or thighs.
- 10 oz can Rotel tomatoes and green chiles: Drained well to prevent soggy tacos. Choose mild, original, or hot based on your spice preference.
- 2 tablespoons taco seasoning: Store-bought works perfectly, or use homemade for better control over sodium and spices.
- 1 tablespoon fresh lime juice: Brightens all the flavors. Roll the lime on your counter before cutting to extract maximum juice.
For toppings, consider having shredded lettuce, diced tomatoes, fresh cilantro, sour cream, and hot sauce ready. These additions transform your tacos from good to absolutely crave-worthy.
Step-by-Step Instructions
Step 1: Shred Your Chicken Efficiently
If using rotisserie chicken, remove and discard the skin and bones, then transfer the meat to a large mixing bowl. For the fastest shredding method, use a stand mixer with the paddle attachment on low speed for about 60 seconds. Alternatively, shred by hand or use two forks, which takes about 3-4 minutes. This step is significantly easier with rotisserie chicken compared to cooking and shredding raw chicken breasts, saving you approximately 20-25 minutes of active cooking time.
Step 2: Create the Flavorful Filling
Add the drained Rotel tomatoes to your shredded chicken, ensuring you’ve poured off excess liquid to maintain the right consistency. Sprinkle in 2 tablespoons of taco seasoning and 1 tablespoon of fresh lime juice. Stir thoroughly until every piece of chicken is evenly coated with the seasoning mixture. Let this sit for 5-10 minutes while you prepare the tortillas, allowing the flavors to meld together beautifully.
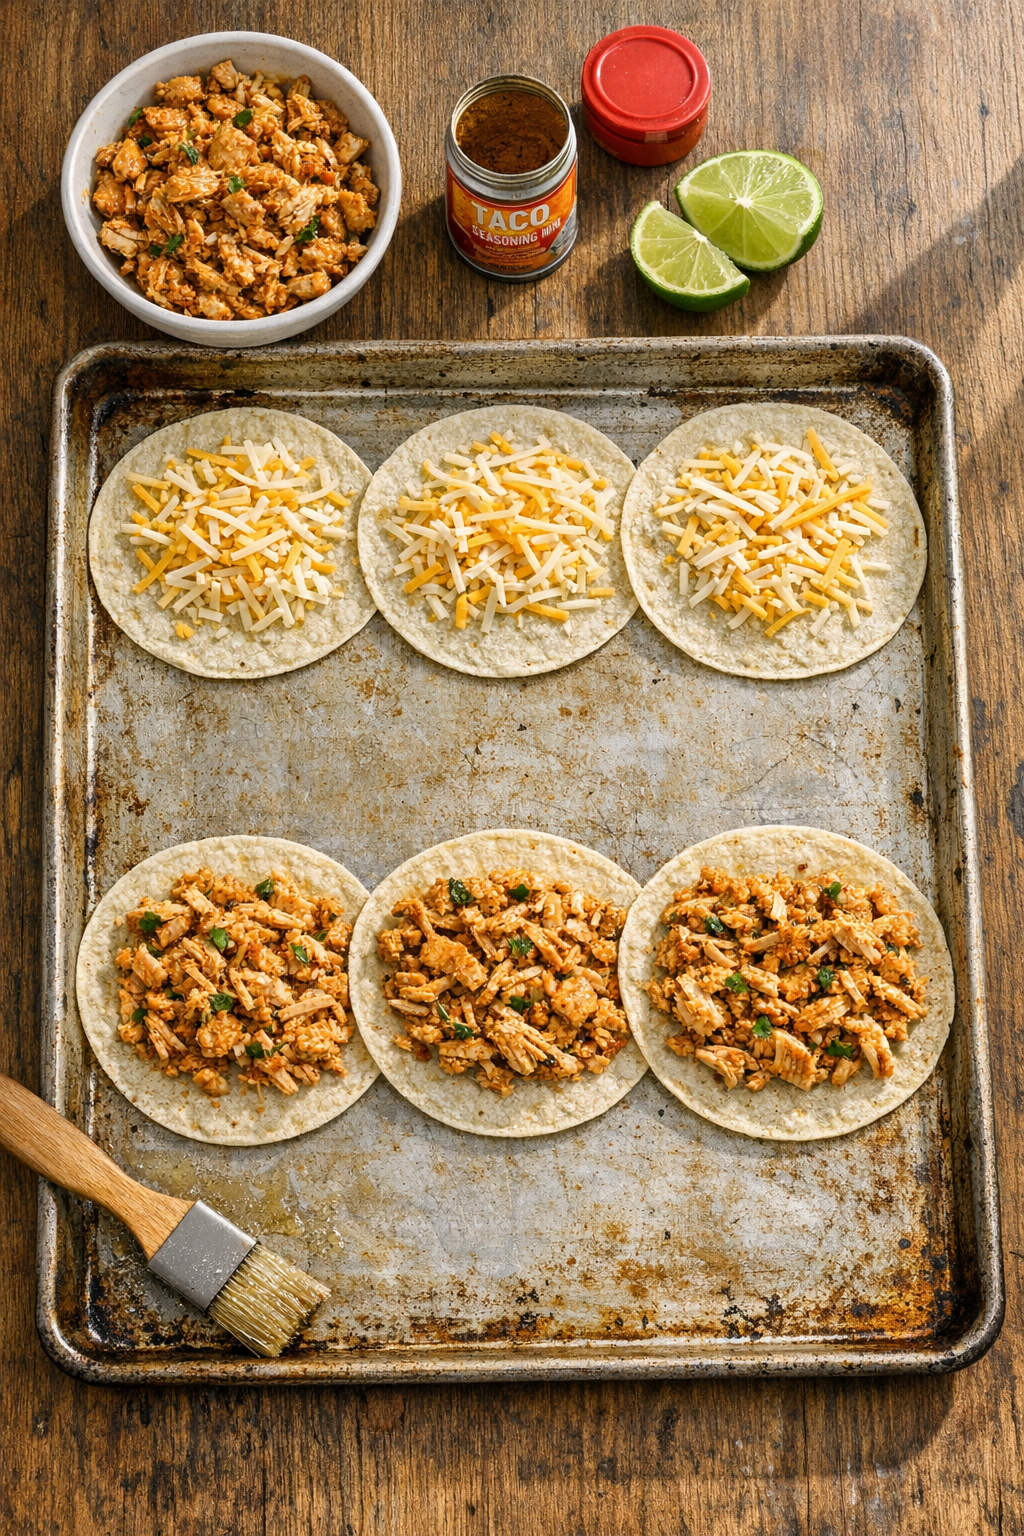
Step 3: Prepare the Tortillas for Maximum Crispiness
Preheat your oven to 425°F (220°C). Lay out 10-12 small corn tortillas on one large three-quarter sheet pan or two regular baking sheets. Generously spray or brush both sides of each tortilla with oil, as this is crucial for achieving that restaurant-quality crispy texture. Don’t skip this step or skimp on the oil, it makes all the difference in creating shells that crunch satisfyingly with every bite.
Step 4: Assemble Your Tacos
Sprinkle half of your Mexican cheese blend evenly across all the tortillas, creating a cheese base that helps bind the filling. Divide the seasoned chicken mixture among the tortillas, using about 1/4 cup per taco and leaving a small border around the edges. Top each taco with the remaining cheese, which will melt and create a delicious seal over the filling during baking.
Step 5: Bake to Golden Perfection
Bake uncovered for 10-12 minutes, or until the cheese is fully melted and bubbling and the edges of the tortillas turn golden brown and crispy. If using two baking sheets, rotate their positions halfway through baking to ensure even cooking. The exact timing may vary slightly depending on your oven, so watch for those golden edges as your visual cue.
Step 6: Fold While Hot
This step is time-sensitive and critical. As soon as you remove the tacos from the oven, use a spatula to quickly fold each taco in half while the tortillas are still hot and pliable. Working fast prevents the shells from breaking, as they become more brittle as they cool. The residual heat will help them hold their folded shape perfectly.
Step 7: Add Your Favorite Toppings
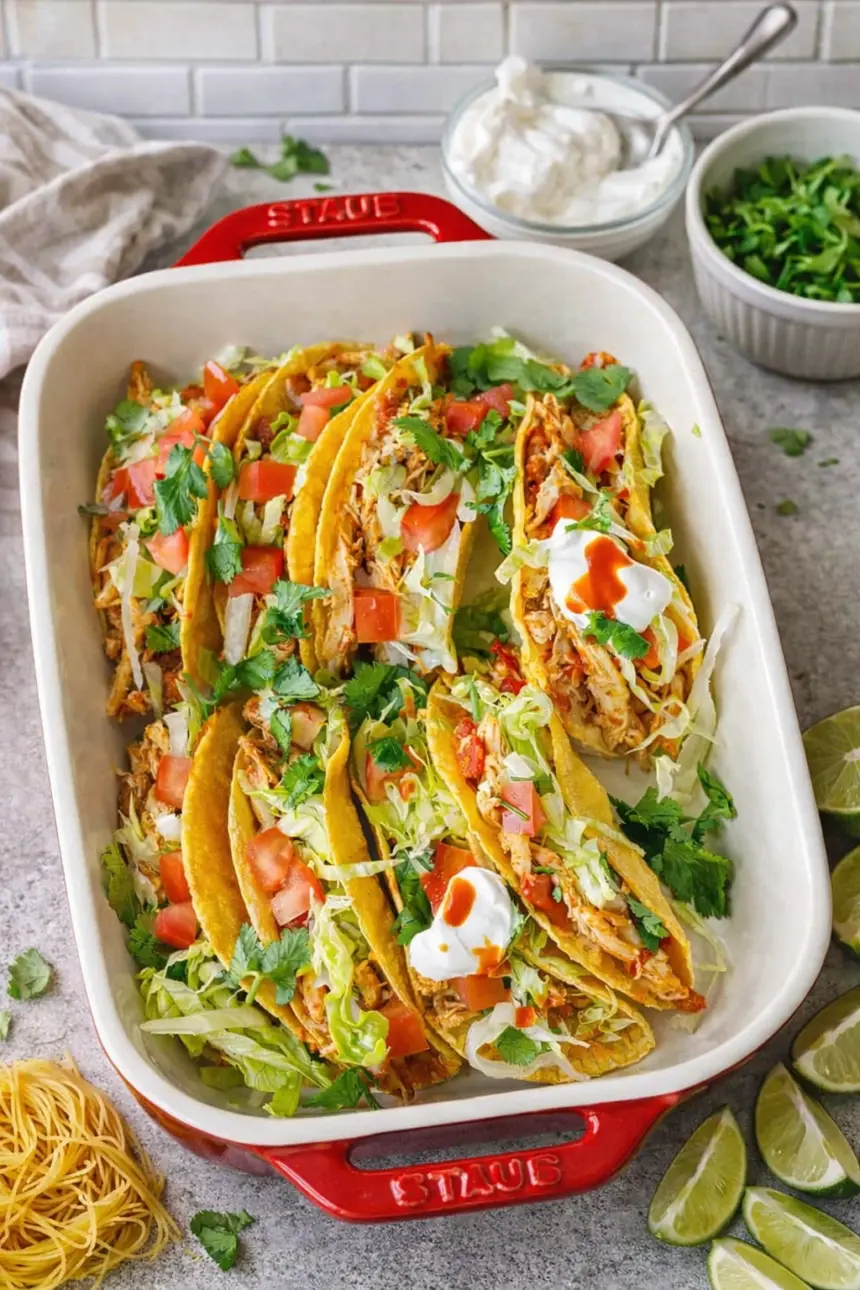
Transfer your beautifully folded tacos to a serving platter. Set out bowls of shredded lettuce, diced tomatoes, fresh cilantro, sour cream, and your favorite hot sauce. Allow everyone to customize their tacos to their preferences, creating a fun, interactive meal that pleases every palate at your table.
Healthier Alternatives for Baked Chicken Tacos
Making these tacos healthier doesn’t mean sacrificing flavor. Small modifications can significantly reduce calories and boost nutritional value while maintaining that irresistible taste.
- Use reduced-fat cheese: Cuts approximately 30-40 calories per taco while still providing plenty of melty goodness.
- Choose white meat chicken: Rotisserie chicken breast contains about 25% less fat than dark meat portions.
- Try whole grain or sprouted corn tortillas: These provide additional fiber and nutrients compared to regular corn tortillas.
- Load up on vegetables: Adding extra lettuce, tomatoes, onions, and peppers increases volume and nutrients without many calories.
- Use Greek yogurt instead of sour cream: Provides the same creamy texture with double the protein and half the fat.
- Make a vegetarian version with beans: Black beans or pinto beans seasoned with taco spices offer excellent protein at a fraction of the cost and with more fiber.
- Control sodium levels: Use homemade taco seasoning and rinse the Rotel tomatoes to reduce sodium by approximately 200mg per serving.
These modifications can reduce the calorie count from approximately 250-280 per taco to around 180-200, making this already reasonable meal even more diet-friendly.
Serving Suggestions
While these baked chicken tacos shine on their own, pairing them with complementary sides creates a complete, satisfying meal that everyone will remember.
- Mexican rice: The classic pairing, fluffy rice seasoned with tomatoes and spices absorbs any delicious taco drippings.
- Refried beans or black beans: Add protein and fiber while keeping the meal authentic and hearty.
- Fresh pico de gallo: Homemade pico adds brightness and freshness that enhances every bite. It takes just 5 minutes to prepare.
- Guacamole and tortilla chips: Perfect for guests to snack on while you’re finishing the tacos.
- Mexican street corn (elote): Creamy, tangy, and slightly spicy, this side complements the tacos beautifully.
- Simple side salad: A crisp green salad with cilantro-lime dressing balances the richness of the cheesy tacos.
- Lime wedges: Essential for squeezing over the finished tacos, adding that perfect citrus punch.
- Pickled jalapeños and onions: For those who love extra tang and heat.
For a buffet-style presentation, set out all the toppings and sides separately, allowing guests to build their perfect taco plate. This approach works wonderfully for parties, game days, or casual family dinners.
Common Mistakes to Avoid
Even with such a straightforward recipe, certain pitfalls can affect your results. Avoiding these common errors ensures perfect tacos every time.
- Not draining the Rotel thoroughly: Excess liquid makes the filling watery and prevents the tortillas from crisping properly. Pour off all liquid and even pat the tomatoes with a paper towel.
- Skimping on the oil spray: Insufficient oil results in tough, chewy tortillas instead of crispy ones. Be generous with your spraying or brushing.
- Waiting too long to fold: If the tortillas cool down, they’ll crack when you try to fold them. Work quickly while they’re still hot from the oven.
- Overfilling the tacos: Too much filling makes folding difficult and causes spillage. Stick to about 1/4 cup of filling per taco.
- Using cold chicken: If your rotisserie chicken is refrigerated, let it come to room temperature first, or warm it slightly before mixing with seasonings for better flavor distribution.
- Overcrowding the baking sheet: Tortillas need space for air circulation. Slight overlapping before filling is fine, but ensure they’re in a single layer once assembled.
- Forgetting to preheat the oven: Starting with a fully preheated oven ensures even cooking and proper crisping from the beginning.
- Using large flour tortillas: These don’t crisp as well as small corn tortillas and can become soggy. Stick with 5-6 inch corn tortillas for best results.
Awareness of these mistakes helps you troubleshoot if your first batch isn’t perfect, and most importantly, ensures consistent success with every taco night.
Storing Tips for Baked Chicken Tacos
Proper storage extends the life of your tacos and maintains their quality, though freshly baked tacos are always best. Here’s how to handle leftovers effectively.
- Store components separately when possible: If you’re meal prepping, keep the filling, cheese, and tortillas separate until ready to assemble and bake.
- Refrigerate assembled leftovers: Place cooled tacos in an airtight container and refrigerate for up to 3 days. Note that the shells will soften considerably.
- Reheat in the oven: To restore crispiness, reheat leftover tacos at 375°F for 5-7 minutes. The microwave will make them soggy.
- Freeze the filling separately: The chicken mixture freezes beautifully for up to 3 months. Thaw overnight in the refrigerator before using.
- Don’t freeze assembled tacos: The tortillas don’t freeze well once assembled and baked, becoming mushy upon thawing.
- Prep filling in advance: Make the chicken mixture up to 2 days ahead and store refrigerated, then assemble and bake when ready to eat.
- Keep toppings fresh: Store prepared toppings like shredded lettuce and diced tomatoes in separate containers with paper towels to absorb excess moisture.
For best results and maximum crispiness, plan to bake only what you’ll eat immediately. However, the make-ahead filling option makes weeknight dinners even faster, reducing your active time to just 15 minutes.
Conclusion
These Baked Chicken Tacos prove that weeknight dinners can be both incredibly easy and absolutely delicious. With minimal prep work, simple ingredients, and a hands-off baking method, you’ll have crispy, flavorful tacos on the table in under 30 minutes. The versatility of this recipe means you can customize it endlessly, whether you’re using ground beef, turkey, or beans instead of chicken, or adjusting the spice level to suit your family’s preferences. The crispy texture achieved through baking rivals any fried taco shell, but with far less mess and hassle. I encourage you to try these tacos for your next Taco Tuesday or busy weeknight, experiment with different toppings and proteins, and make this recipe your own. Once you experience how simple and satisfying these baked tacos are, they’ll become a regular rotation in your meal planning. Give them a try tonight and discover your new favorite way to make tacos!
Frequently Asked Questions
Can I use flour tortillas instead of corn tortillas?
Yes, you can substitute flour tortillas, though the texture will be slightly different. Flour tortillas tend to be softer and chewier even after baking, while corn tortillas achieve a crispier, more chip-like texture. If using flour tortillas, opt for the smaller fajita-size (6-inch) rather than burrito-size, and be extra generous with the oil spray to encourage browning and crisping.
How do I prevent the taco shells from breaking when folding?
The key is timing and temperature. Fold the tacos immediately when they come out of the oven while the tortillas are still hot and pliable. The shells become brittle as they cool, so work quickly. Using a wide spatula helps support the entire taco as you fold. If a few do crack, don’t worry, they’ll still taste delicious and the filling will hold them together.
Can I make these tacos ahead of time?
While these tacos are best served fresh from the oven, you can prepare the filling 1-2 days in advance and store it refrigerated. When ready to serve, simply assemble the tacos and bake as directed. Assembled tacos don’t hold well before baking as the moisture from the filling will soften the tortillas. For meal prep, store all components separately and assemble just before baking.
What other proteins work well in this recipe?
This recipe is incredibly versatile. Ground beef cooked with taco seasoning works wonderfully, as does ground turkey or ground chicken. Shredded beef, carnitas, or even seasoned black beans or pinto beans make excellent alternatives. For beans, use 2 cups of drained, rinsed beans mixed with 2 tablespoons taco seasoning and mash slightly for better texture.
Why are my tacos soggy instead of crispy?
Soggy tacos usually result from insufficient oil on the tortillas or excess moisture in the filling. Make sure to generously spray or brush both sides of the tortillas with oil. Additionally, drain the Rotel tomatoes very well and avoid adding wet toppings like salsa before baking. The cheese should form a moisture barrier, but too much liquid in the filling will still cause sogginess.
How many tacos does this recipe make?
This recipe yields 10-12 tacos depending on the size of your tortillas and how generously you fill them. This typically serves 4-5 people as a main course (2-3 tacos per person), or 10-12 people as an appetizer. The recipe is easily doubled if you’re feeding a larger crowd, just use additional baking sheets.
Can I freeze these baked chicken tacos?
Freezing the fully assembled and baked tacos isn’t recommended, as the tortillas become mushy when thawed. However, you can freeze the chicken filling for up to 3 months in an airtight container. Thaw overnight in the refrigerator, then proceed with assembling and baking fresh tacos. This approach gives you the convenience of make-ahead prep while maintaining the crispy texture.
Tools You’ll Need
Essential Kitchen Tools
Everything you need to make cooking easier and more enjoyable


Must Try Recipes
- Ground Turkey Tacos
Lean turkey tacos seasoned with spices for a healthier twist. - Buffalo Chicken Tacos
Spicy buffalo sauce and chicken combine for bold flavors. - Green Chile Chicken Enchiladas
Warm enchiladas filled with chicken and zesty green chiles. - Taco Soup
Hearty soup loaded with taco flavors, beans, and spices. - Flour Tortillas
Homemade tortillas perfect for soft, flexible tacos.

Want to save this recipe?
Want to save this recipe? Enter your email below, and we'll send it straight to your inbox. Plus, receive new recipes every week!
Crispy Baked Chicken Tacos
- Total Time: 20 minutes
Description
Flavorful taco-seasoned chicken and cheese fill crisp baked tortillas for an easy weeknight meal.
Ingredients
- 10–12 small corn tortillas (5-inch) or flour tortillas
- Cooking spray or neutral oil for brushing
- 2 cups Mexican-style shredded cheese
- 2 cups shredded chicken (rotisserie or cooked)
- 10 oz can Rotel tomatoes & green chiles, drained
- 2 Tbsp taco seasoning
- 1 Tbsp fresh lime juice
Instructions
- Preheat oven to 425°F (220°C). Arrange tortillas on a large rimmed baking sheet in a single layer and spray or brush both sides with oil.
- In a mixing bowl, combine shredded chicken, drained tomatoes & chiles, taco seasoning, and lime juice until evenly coated.
- Sprinkle half of the cheese over each tortilla, top with the chicken mixture leaving a small border, then finish with remaining cheese.
- Bake uncovered for 10–12 minutes until the cheese melts and edges turn golden and crisp, rotating sheets halfway if needed.
- Remove from the oven and fold each tortilla in half while warm. Serve with your favorite taco toppings.
- Prep Time: 10 minutes
- Cook Time: 10 minutes
- Category: Main Course
- Cuisine: Mexican
Nutrition
- Serving Size: 10 tacos
- Calories: 201 kcal
- Sugar: 1 g
- Sodium: 213 mg
- Fat: 10 g
- Saturated Fat: 5 g
- Unsaturated Fat: 4 g
- Trans Fat: 0 g
- Carbohydrates: 14 g
- Fiber: 2 g
- Protein: 14 g
- Cholesterol: 42 mg