Did you know that chocolate ganache requires just two simple ingredients and about 10 minutes to create one of the most versatile, luxurious dessert components in any baker’s arsenal? Whether you’re dreaming of a glossy chocolate drip cascading down a birthday cake, silky truffle centers that melt on your tongue, or a rich frosting that spreads like butter, ganache delivers restaurant-quality results with surprisingly little effort. The secret lies in understanding the ratio of chocolate to cream and mastering a few essential techniques that prevent the dreaded “broken” ganache. Once you’ve experienced the velvety texture and deep chocolate flavor of homemade ganache, you’ll wonder why you ever bought store-bought frosting. Moreover, this foolproof recipe is completely customizable with flavors like bourbon, coffee, or warming spices, making it perfect for both everyday treats and special occasions. Ready to transform your desserts with this elegant yet easy technique?
Ingredients for Perfect Chocolate Ganache
The beauty of chocolate ganache lies in its simplicity. Furthermore, you can easily scale this recipe up or down depending on your needs, making it ideal for both small projects and large celebrations.
Essential Ingredients
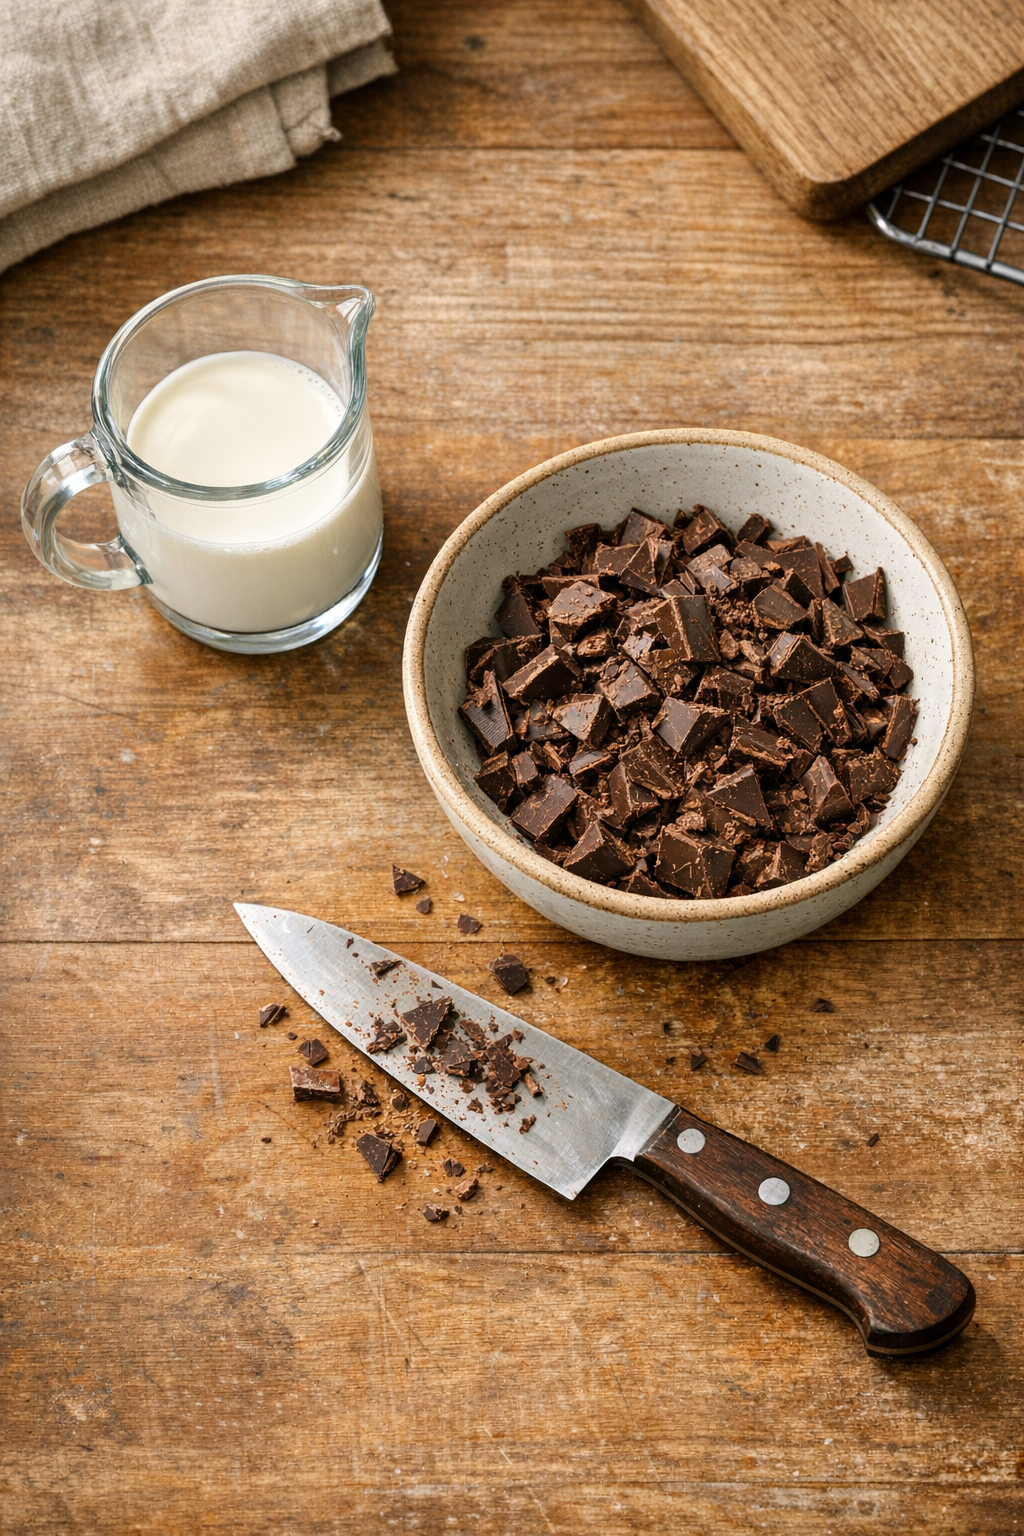
- 1 cup semi-sweet chocolate, chopped (180g): Semi-sweet chocolate strikes the perfect balance with enough cocoa content for rich flavor while remaining stable and less likely to break. Additionally, you can substitute with chocolate chips if that’s what you have on hand, though bar chocolate generally produces a smoother result.
- ½ cup heavy cream (120ml): Heavy cream creates that signature silky texture and luxurious mouthfeel. Alternatively, you can use hot water for a lighter, less rich ganache, or even hot coffee for a sophisticated mocha variation.
Optional Flavor Enhancements
- 1 teaspoon vanilla extract: Adds warmth and depth to the chocolate flavor
- 1-2 tablespoons bourbon, rum, or whiskey: Creates sophisticated spiked truffles perfect for adult gatherings
- ¼ teaspoon cinnamon, cardamom, or chili powder: Introduces interesting spice notes that complement the chocolate
- 2 tablespoons finely chopped nuts: Adds texture variation for truffle fillings
Consequently, the 2:1 ratio of chocolate to liquid produces a versatile medium-consistency ganache. However, you can adjust this ratio based on your intended use: more chocolate creates a thicker ganache ideal for truffles or piping, while more liquid results in a thinner glaze perfect for dipping or pouring.
Step-by-Step Instructions for Silky Chocolate Ganache
Step 1: Prepare Your Chocolate
Begin by chopping your chocolate into small, uniform pieces, approximately the size of chocolate chips. This critical step ensures even melting throughout the ganache. Indeed, any large chunks will refuse to melt completely, leaving you frustrated with lumps in an otherwise smooth mixture. As you chop, look out for any oversized pieces and break them down further. Place all the chopped chocolate into a medium-sized heatproof bowl and set aside while you prepare the cream.
Step 2: Heat Your Liquid
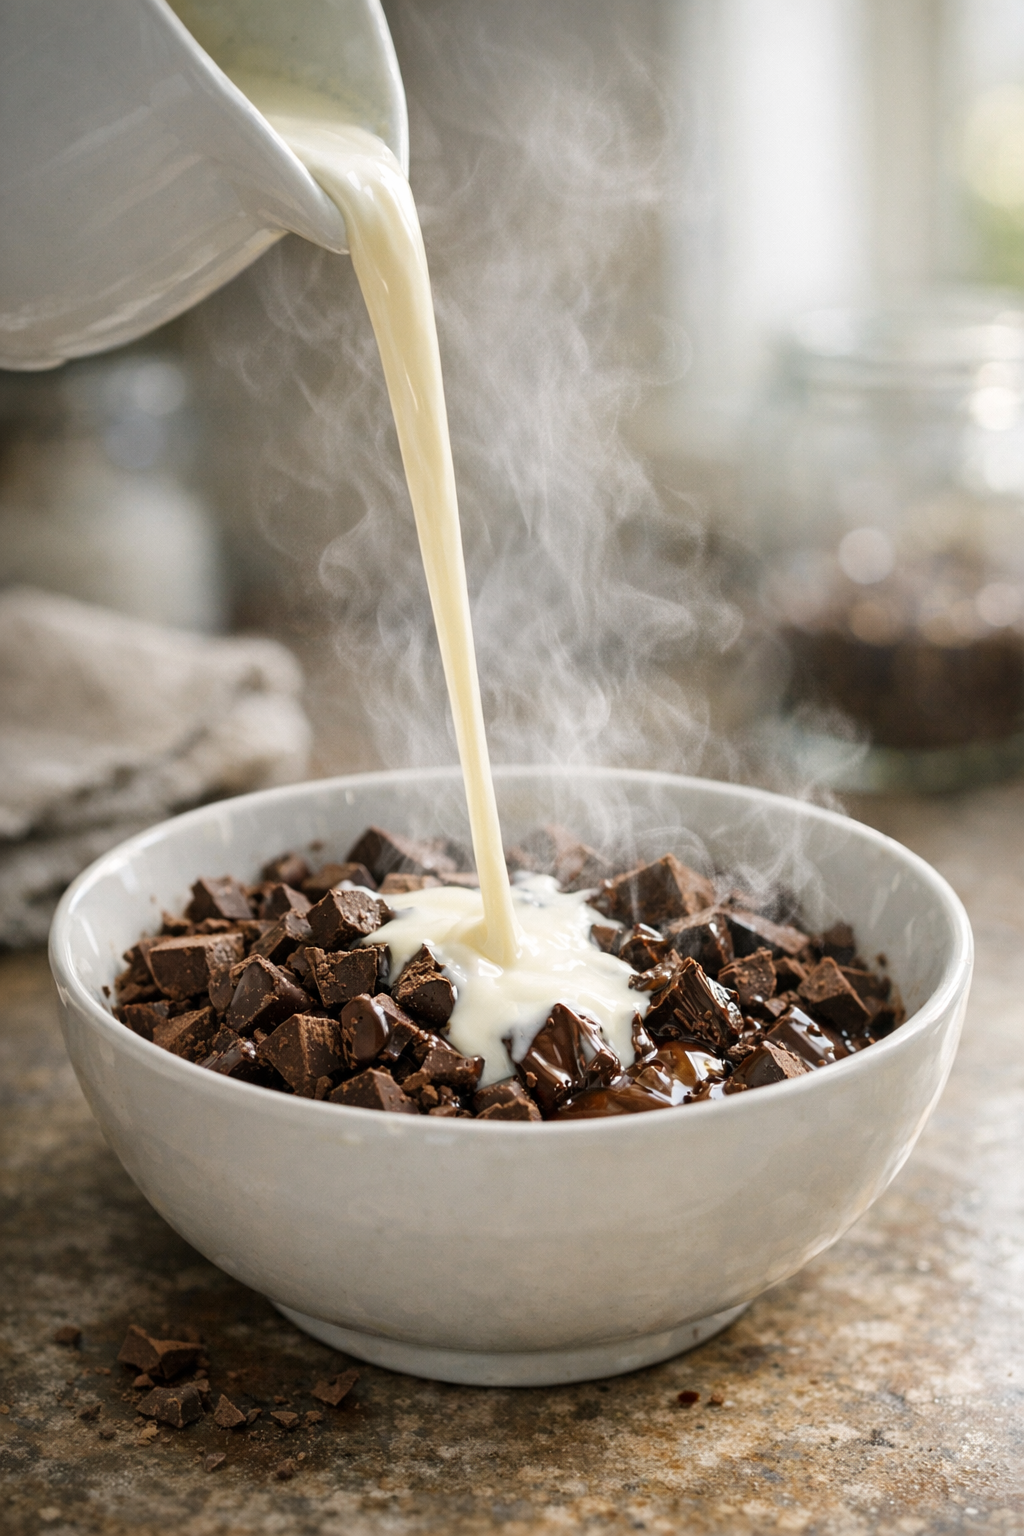
Pour the heavy cream into a small saucepan and place it over medium heat. Meanwhile, watch the cream carefully as it warms, looking for steam to rise from the surface. You want the cream to be very hot and steamy but not boiling, as boiling can scorch the cream and affect the final flavor. Alternatively, you can microwave the cream for 1-2 minutes until it reaches the same steamy, near-boiling temperature. This process typically takes about 3-4 minutes on the stovetop.
Step 3: Combine and Wait
Once the cream is properly heated, immediately pour it over the chopped chocolate in the bowl. Next, cover the bowl with a plate or plastic wrap to trap the heat inside. Then, resist the urge to stir right away! Instead, set the bowl aside for a full 5 minutes, allowing the residual heat from the cream to gently melt the chocolate. During this time, the chocolate pieces will soften completely, setting you up for the easiest stirring process. If your countertop is cold, place the bowl on a warm towel or trivet to maintain consistent temperature.
Step 4: Stir to Perfection
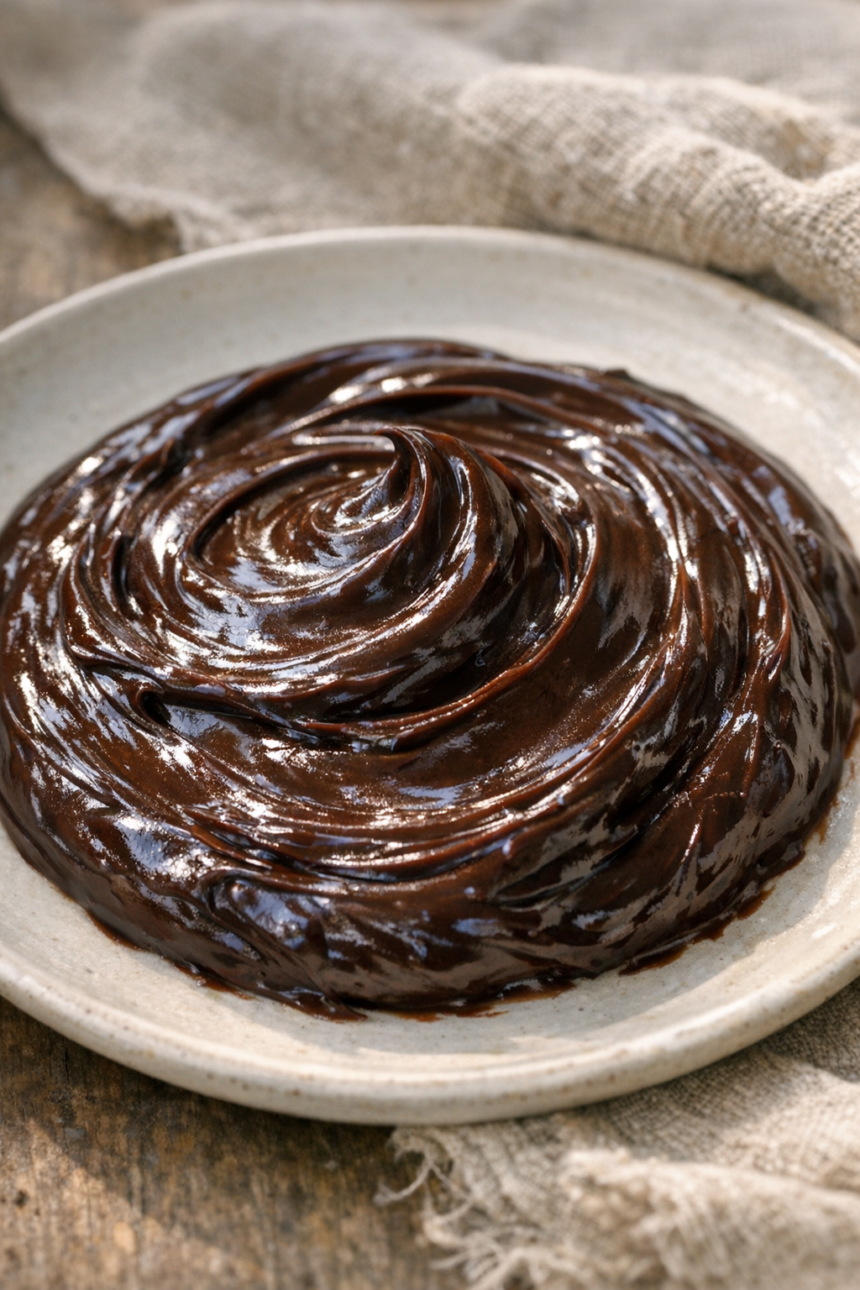
After 5 minutes have passed, uncover the bowl and stir the mixture with a wooden spoon or silicone spatula using smooth, circular motions from the center outward. Importantly, avoid using a whisk at this stage, as whisking incorporates air bubbles that create a less professional appearance. Continue stirring gently until the chocolate and cream fully combine into a glossy, smooth, homogeneous mixture. The ganache should look silky and flow easily from your spoon. If you notice a few stubborn chocolate pieces, microwave the ganache at 50% power for 10-second intervals, stirring between each, until completely smooth.
Step 5: Use or Store
At this point, you have several options depending on your needs. For an immediate chocolate drip or glaze, use the ganache while it’s still warm and pourable. Conversely, if you need a spreadable frosting or filling, press plastic wrap directly onto the surface of the ganache and let it cool at room temperature for about 4 hours until it reaches a firm, spreadable consistency. For truffle making, refrigerate the ganache until it’s scoopable. Properly stored ganache keeps in the refrigerator for up to 2 weeks, and you can gently rewarm it when needed.
Understanding Ganache Consistency and Ratios
The versatility of chocolate ganache comes from adjusting the chocolate-to-liquid ratio. Specifically, the standard 2:1 ratio (2 parts chocolate to 1 part liquid) produces a medium-consistency ganache suitable for most applications. However, understanding these variations empowers you to customize your ganache perfectly:
- 1:1 ratio: Creates a thin, pourable glaze ideal for dipping donuts, eclairs, or creating a smooth coating on cakes
- 2:1 ratio: The classic, all-purpose ganache that works for frostings, fillings, and moderate drips
- 3:1 ratio: Produces a thick, firm ganache perfect for truffles, piping decorations, or creating dramatic drips that hold their shape
Additionally, temperature dramatically affects consistency. A freshly made ganache flows like warm honey, while a fully chilled ganache becomes firm enough to scoop or even whip into fluffy frosting. Therefore, testing your ganache’s consistency before using it saves frustration later.
Testing Your Ganache for Drips
Before committing to decorating your cake, test the drip consistency using this simple method. First, dip a spoon into the ganache and hold it vertically over a plate or bench scraper. Then, observe how the ganache flows off the spoon. Ideally, it should create slow, deliberate drips that travel a few inches before stopping. If the ganache runs too quickly and pools at the bottom, it’s too thin and needs either more chocolate or more cooling time. Conversely, if it barely moves or holds completely to the spoon, warm it slightly or thin it with a teaspoon of warm cream.
Healthier Alternatives for Chocolate Ganache
While traditional chocolate ganache is undeniably indulgent, several modifications can lighten it without sacrificing that signature silky texture. Consequently, these alternatives let you enjoy ganache more frequently or accommodate various dietary preferences:
- Use dark chocolate (70% cacao): Higher-quality dark chocolate contains more antioxidants and less sugar, though it requires gentler handling to prevent breaking
- Substitute coconut cream for heavy cream: Creates a dairy-free ganache with subtle tropical notes that pairs beautifully with chocolate
- Try the water ganache method: Replacing cream entirely with hot water reduces calories by approximately 60% while maintaining smoothness
- Use half-and-half instead of heavy cream: Cuts fat content by roughly 40% with minimal texture difference
- Incorporate Greek yogurt: Mix 2 tablespoons of Greek yogurt into cooled ganache for added protein and tangy depth
- Sweeten with maple syrup or honey: Natural sweeteners let you reduce the chocolate quantity slightly while maintaining sweetness
- Add avocado for truffle bases: Blending ripe avocado into ganache creates incredibly creamy truffles with healthy fats
Furthermore, portion control makes any ganache healthier. A little goes a long way, especially when the chocolate quality is excellent and the flavor is intense.
Creative Serving Suggestions for Ganache
The remarkable versatility of chocolate ganache means you can use it in countless ways beyond simple cake frosting. Indeed, once you master the basic technique, these creative applications will inspire your dessert repertoire:
- Elegant cake drips: Pour slightly cooled ganache around the edges of a frosted cake, letting it drip naturally down the sides for a modern, professional look
- Truffle centers: Scoop chilled ganache into balls, then roll in cocoa powder, crushed cookies, chopped nuts, or powdered sugar for instant homemade truffles
- Donut glaze: Dip warm donuts into thin ganache for a bakery-quality chocolate coating that sets with a beautiful shine
- Fruit dipping: Serve warm ganache as a fondue with fresh strawberries, banana slices, or apple wedges for an interactive dessert
- Tart filling: Pour ganache into a pre-baked tart shell and refrigerate until set for a sophisticated chocolate tart
- Cookie sandwiches: Spread cooled ganache between two cookies to create Lindsor-style sandwich cookies
- Ice cream topping: Drizzle warm ganache over ice cream, where it hardens into a magic shell coating
- Cupcake filling: Inject cooled ganache into the center of cupcakes using a piping bag for a surprise molten center
- Hot chocolate base: Stir a spoonful of ganache into hot milk for the richest, most luxurious hot chocolate imaginable
Moreover, ganache makes an impressive edible gift when scooped into truffles and packaged in decorative boxes with personalized flavor variations.
Common Mistakes to Avoid When Making Ganache
Even though ganache seems foolproof, certain pitfalls can result in a grainy, separated, or broken mixture. Fortunately, understanding these common mistakes helps you prevent them entirely:
- Using ultra-dark chocolate (90%+ cacao): Extremely high-cacao chocolates lack sufficient sugar and lecithin to maintain a stable emulsion, making them prone to breaking. Instead, stick with semi-sweet or dark chocolate in the 55-70% range for reliable results.
- Allowing the cream to boil: Boiling cream becomes too hot and can scorch the chocolate, creating an unpleasant burnt flavor. Heat the cream until steamy and near-boiling, then remove it from heat immediately.
- Not chopping chocolate finely enough: Large chocolate chunks won’t melt completely in the time allotted, leaving frustrating lumps. Take the extra minute to chop everything uniformly small.
- Stirring too vigorously or whisking: Aggressive stirring incorporates air bubbles that create a less smooth appearance and shorter shelf life. Use gentle, smooth motions with a spoon instead.
- Adding cold liquid to chocolate: The temperature differential prevents proper melting and emulsification. Always ensure your liquid is very hot before combining.
- Working with cold chocolate: Chocolate straight from the refrigerator resists melting evenly. Let chocolate come to room temperature before chopping and using.
- Not waiting before stirring: Stirring immediately doesn’t give the chocolate enough time to melt, requiring excessive stirring that can break the emulsion. Patience is key; wait the full 5 minutes.
- Using chocolate chips without adjusting expectations: Chocolate chips contain stabilizers that help them hold their shape, making them slightly more resistant to melting smoothly. They work fine but may require a bit more stirring.
How to Fix Broken Ganache
If your ganache does break and looks grainy or separated, don’t despair! This common problem has several solutions. First, try adding 1-2 tablespoons of warm cream or melted butter while stirring vigorously. The additional fat helps re-emulsify the mixture. Alternatively, use an immersion blender to blend the ganache for 30-60 seconds, which forces the ingredients back together. As a last resort, gently reheat the ganache to about 90°F (32°C) and stir constantly until it comes back together.
Storing and Reheating Chocolate Ganache
Proper storage extends the life of your chocolate ganache and ensures it’s always ready when inspiration strikes. Follow these guidelines for optimal freshness and convenience:
Short-Term Storage
- Room temperature: Ganache can sit at room temperature for up to 2 days if pressed with plastic wrap directly on the surface to prevent a skin from forming
- Refrigeration: Store covered ganache in the refrigerator for up to 2 weeks, ensuring it’s in an airtight container to prevent it from absorbing other flavors
- For truffle making: Refrigerate ganache in a shallow container for easier scooping once it reaches the proper firm consistency
Long-Term Storage
- Freezing: Ganache freezes beautifully for up to 3 months when stored in a freezer-safe container with plastic wrap pressed to the surface
- Thawing: Move frozen ganache to the refrigerator overnight, then bring to room temperature before using
- Portioning: Freeze ganache in small portions (ice cube trays work perfectly) for easy single-serving access
Reheating Guidelines
- Microwave method: Heat refrigerated ganache at 50% power in 15-second intervals, stirring between each, until it reaches your desired consistency
- Double boiler method: Place the ganache bowl over a pot of barely simmering water, stirring occasionally until warmed and smooth
- Room temperature softening: For spreading applications, simply let refrigerated ganache sit at room temperature for 30-60 minutes until naturally softened
- Thinning if needed: Add warm cream 1 teaspoon at a time if reheated ganache seems too thick
Remember that reheated ganache may thicken slightly compared to freshly made ganache, so adjust the consistency as needed for your specific application.
Flavor Variations to Elevate Your Ganache
While classic chocolate ganache is magnificent on its own, adding complementary flavors transforms it into something extraordinary. These variations require minimal effort but deliver maximum impact:
Mocha Ganache
Replace the heavy cream with strong brewed coffee or add 1 tablespoon of espresso powder to the cream before heating. The coffee enhances the chocolate’s depth without making it taste overtly like coffee.
Bourbon Ganache
Stir 2 tablespoons of bourbon, rum, or whiskey into the finished ganache once it’s slightly cooled. This creates sophisticated adult truffles or an elevated cake filling.
Spiced Ganache
Add ¼ teaspoon of cinnamon, cardamom, cayenne pepper, or chai spice blend to the cream while heating. The warmth of spices pairs beautifully with chocolate’s richness.
Orange Ganache
Stir in 1 teaspoon of orange zest and 1 tablespoon of orange liqueur (Grand Marnier or Cointreau) for a classic chocolate-orange combination.
Peppermint Ganache
Add ½ teaspoon of peppermint extract to cooled ganache for a refreshing twist perfect for holiday desserts.
Salted Caramel Ganache
Stir 2 tablespoons of caramel sauce and ½ teaspoon of flaky sea salt into finished ganache for an irresistible sweet-salty combination.
Vanilla Bean Ganache
Scrape the seeds from one vanilla bean into the cream before heating, or stir in 1 teaspoon of high-quality vanilla extract after combining for enhanced depth.
These variations demonstrate how easily you can customize ganache to complement any dessert or match any flavor profile you’re creating.
Final Thoughts on Mastering Chocolate Ganache
Learning to make perfect chocolate ganache opens up a world of dessert possibilities that will impress family, friends, and yourself. The combination of just two ingredients creating such an elegant, versatile result feels almost magical. Moreover, once you understand the fundamental ratio and technique, you can confidently adjust consistency, experiment with flavors, and troubleshoot any issues that arise. Whether you’re frosting a simple sheet cake, crafting artisan truffles, or adding a professional drip to a celebration cake, ganache delivers restaurant-quality results at home. The key lies in quality chocolate, proper temperatures, and patient, gentle stirring. Now that you have all the knowledge, tips, and variations at your fingertips, it’s time to heat that cream and experience the silky, indulgent luxury of homemade chocolate ganache. Your desserts will never be the same, and neither will your confidence in the kitchen!
Frequently Asked Questions About Chocolate Ganache
Can I use milk chocolate or white chocolate for ganache?
Yes, you can make ganache with milk chocolate or white chocolate, but you’ll need to adjust the ratio. Both contain more sugar and less cocoa than semi-sweet chocolate, making them softer when set. Use a 3:1 ratio (3 parts chocolate to 1 part cream) for milk chocolate and a 4:1 ratio for white chocolate to achieve a similar consistency to semi-sweet ganache. Additionally, these chocolates are more sensitive to heat, so use cream that’s warm but not as hot as you would for dark chocolate.
Why did my ganache turn grainy or separate?
Ganache typically breaks or becomes grainy due to temperature issues or using very dark chocolate with high cacao content. The chocolate and cream need to emulsify properly, which requires the right temperature balance. If your ganache breaks, add 1-2 tablespoons of warm cream or melted butter while stirring vigorously to bring it back together. Alternatively, use an immersion blender to force the emulsion. Prevention is easier: use semi-sweet chocolate, ensure your cream is hot but not boiling, and stir gently without incorporating air.
Can I make ganache dairy-free or vegan?
Absolutely! Replace heavy cream with full-fat coconut cream (the thick part from a chilled can of coconut milk) for the best dairy-free results. Alternatively, use any plant-based cream with at least 15% fat content, such as oat cream or cashew cream. Ensure your chocolate is dairy-free as well, since many dark chocolates contain milk solids. The technique remains exactly the same, though coconut cream may add a subtle coconut flavor that pairs beautifully with chocolate.
How do I know when my ganache is the right consistency for drips?
The perfect drip consistency comes when ganache is slightly cooled and flows slowly off a spoon. Test it by dipping a spoon into the ganache and holding it vertically over a plate. The ganache should create slow, controlled drips that travel 2-3 inches before stopping. If it runs too quickly and pools at the bottom, it’s too thin and needs more cooling time or additional chocolate. If it barely moves, warm it slightly or add a teaspoon of warm cream. The ideal temperature for drips is typically around 85-90°F (29-32°C).
Can I whip ganache to make it fluffy?
Yes, whipped ganache creates a lighter, fluffier frosting with the same rich chocolate flavor. To make it, prepare ganache using the standard 2:1 ratio, then refrigerate it until completely firm (at least 4 hours or overnight). Once chilled and firm, use an electric mixer to beat the ganache on medium-high speed for 2-4 minutes until it lightens in color and becomes fluffy like buttercream. Whipped ganache is perfect for piping decorations, frosting cakes, or filling pastries, and it holds its shape beautifully at room temperature.
What’s the difference between ganache made with water versus cream?
Water ganache contains significantly fewer calories and no dairy, making it lighter and suitable for dairy-free or vegan diets. However, it lacks the richness and silky mouthfeel that cream provides. Water ganache works beautifully for thin glazes, chocolate drips, or coating applications where you want pure chocolate flavor without heaviness. Cream ganache is richer, more indulgent, and better suited for frostings, fillings, and truffles where texture and mouthfeel are paramount. Both methods create smooth, glossy results when made properly.
How far in advance can I make ganache?
Ganache is an excellent make-ahead component that actually improves slightly as flavors meld. You can make it up to 2 weeks in advance and store it covered in the refrigerator, or freeze it for up to 3 months. When you’re ready to use it, gently reheat refrigerated ganache in the microwave at 50% power in short intervals, stirring between each, until it reaches your desired consistency. For truffle making specifically, ganache is often better when made a day ahead, as it firms up perfectly overnight for easy scooping and shaping.
Must Try Recipes
- Pumpkin Chocolate Chip Muffins
Moist muffins with pumpkin and chocolate chips. - Chocolate Chip Shortbread
Buttery cookies loaded with chocolate chips. - Chocolate Bundt Cake
Rich bundt cake perfect for gatherings. - No Bake Mini Cheesecakes
Easy creamy cheesecakes without baking. - Chocolate Pudding
Comforting homemade pudding in minutes.
Tools You’ll Need
Essential Kitchen Tools
Everything you need to make cooking easier and more enjoyable


Want to save this recipe?
Want to save this recipe? Enter your email below, and we'll send it straight to your inbox. Plus, receive new recipes every week!
Silky Chocolate Ganache
- Total Time: 10 minutes
Description
Rich, creamy ganache made with just chocolate and cream for versatile dessert toppings.
Ingredients
- ½ cup heavy cream (120ml)
- 1 cup semi-sweet chocolate, chopped (180g)
Instructions
- Heat the cream until very hot and steamy, just before boiling.
- Place finely chopped chocolate in a bowl for even melting.
- Pour hot cream over chocolate, cover, and let sit 5 minutes.
- Stir until smooth and glossy, microwaving briefly to melt any bits.
- Use hot to drizzle or chill ganache 4 hours to set for spreading and piping.
- Prep Time: 5 minutes
- Cook Time: 5 minutes
- Category: Dessert
- Cuisine: American, French
Nutrition
- Serving Size: 1.5 cups
- Calories: 945 kcal
- Sugar: 45 g
- Sodium: 33 mg
- Fat: 73 g
- Saturated Fat: 44 g
- Unsaturated Fat: 24 g
- Trans Fat: 0.1 g
- Carbohydrates: 63 g
- Fiber: 9 g
- Protein: 9 g
- Cholesterol: 97 mg