
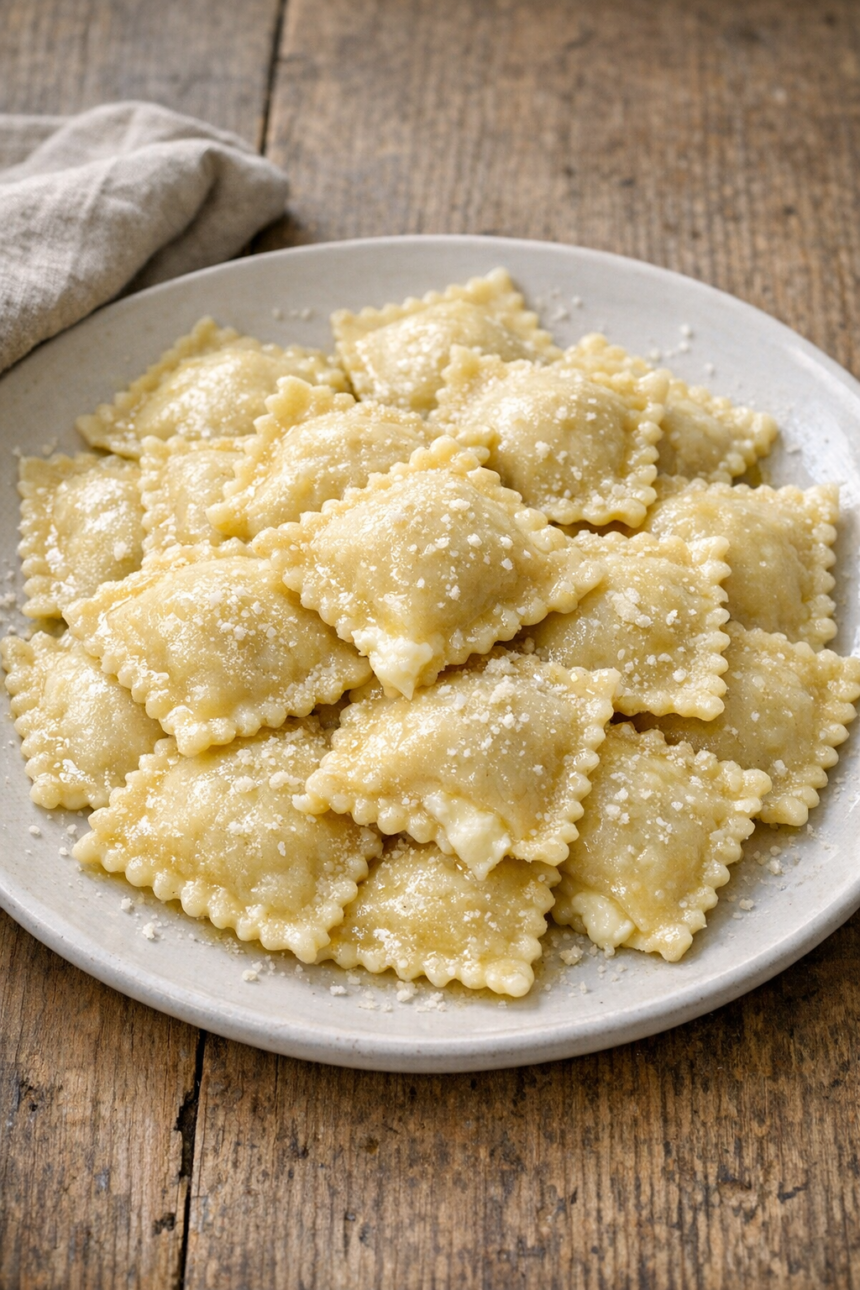
Did you know that homemade cheese ravioli tastes up to 50% more flavorful than store-bought versions, according to pasta enthusiasts who’ve made the switch? There’s something magical about biting into pillowy fresh pasta that cradles a rich, creamy cheese filling you crafted with your own hands. The delicate texture, the burst of nutmeg-scented ricotta, and the satisfaction of creating restaurant-quality Italian comfort food in your own kitchen make this recipe absolutely worth the effort.
I’ll never forget the first time I rolled out pasta dough and watched it transform from a shaggy mess into silky, translucent sheets. That moment when you pipe the cheese filling onto your homemade pasta and seal each little pocket feels like edible origami. This cheese ravioli recipe might seem intimidating at first glance, but I promise it’s more forgiving than you think. You don’t need fancy equipment or culinary school training, just a bit of patience and the willingness to get your hands a little floury.
What makes this recipe special? First, it uses just six simple ingredients for the pasta dough, most of which you probably already have in your pantry. Second, the three-cheese filling delivers layers of flavor that elevate this dish far beyond anything you’ll find in the refrigerated section. Third, once you master the technique, you can customize the filling endlessly with herbs, spices, or even seasonal ingredients like butternut squash. Ready to impress your family with the most delicious homemade ravioli they’ve ever tasted? Let’s dive in!
Ingredients for Cheese Ravioli
This cheese ravioli comes together with two distinct components: the fresh pasta dough and the creamy cheese filling. Each ingredient plays a crucial role in creating that perfect balance of tender pasta and luscious filling.
For the Pasta Dough
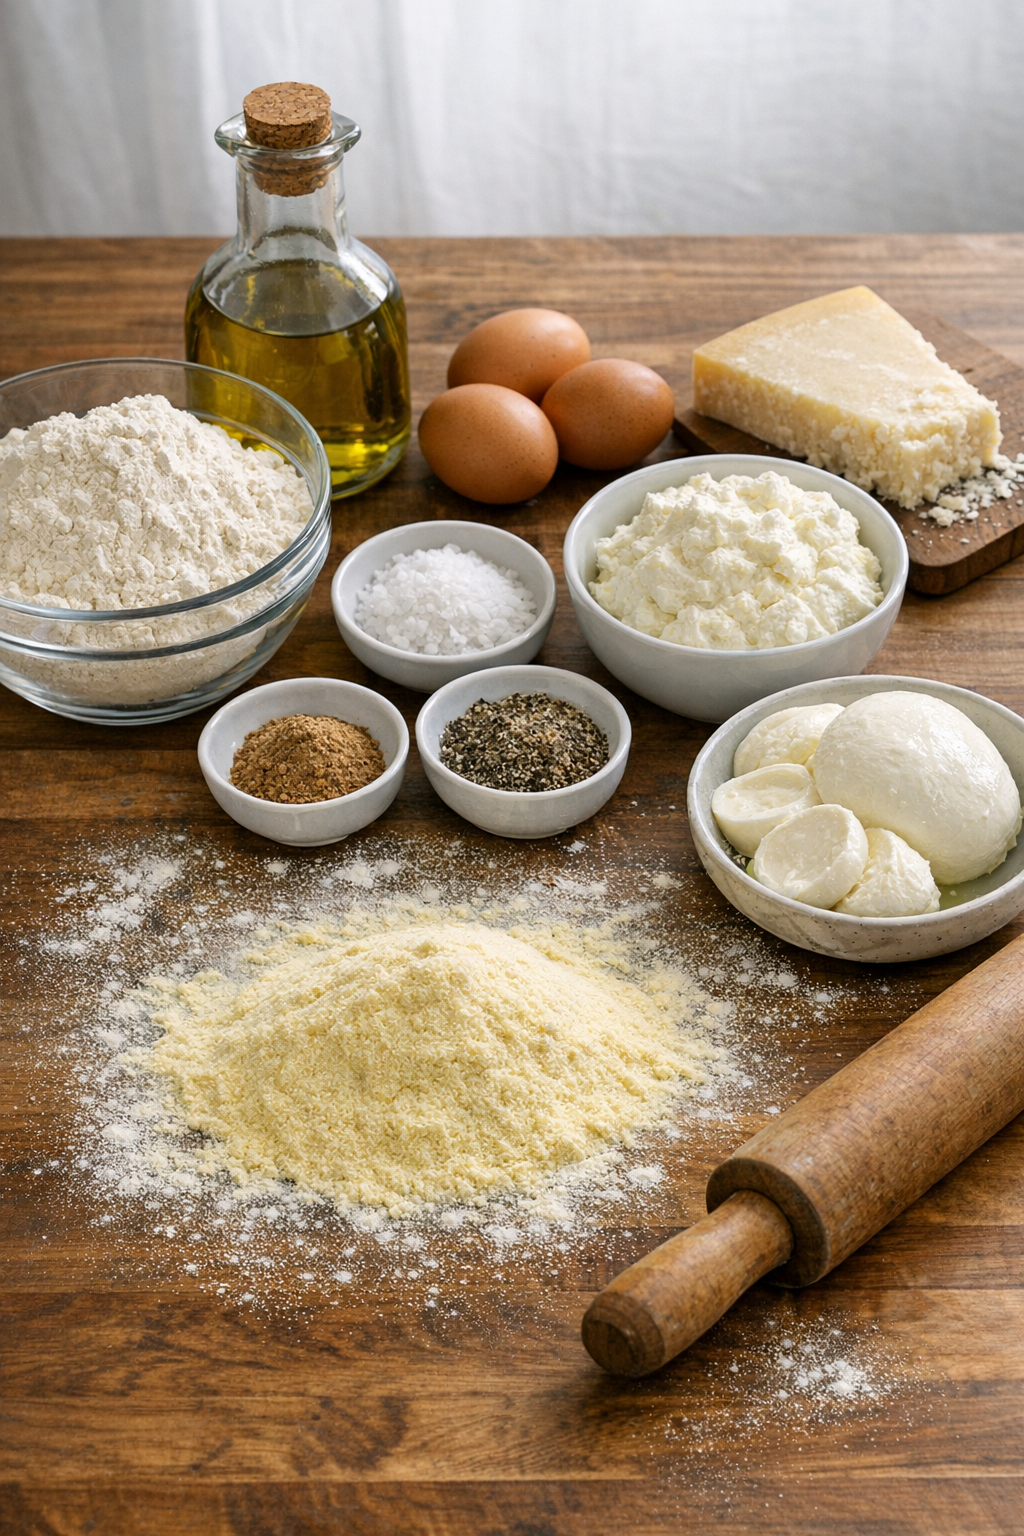
- 2¼ cups all-purpose flour (270g): The foundation of your pasta. You can substitute with 00 flour for an even silkier texture, though all-purpose works beautifully and is more accessible.
- 1 tablespoon olive oil: Adds subtle richness and helps keep the dough pliable during rolling.
- ½ teaspoon salt: Enhances the flavor of the pasta itself, so it’s not just a blank canvas for the sauce.
- 3 large eggs: The binding agent that brings everything together and gives fresh pasta its characteristic golden color.
- Semolina flour for dusting: Prevents sticking during rolling and assembly. Regular flour works in a pinch, but semolina is coarser and more effective.
For the Cheese Filling
- ⅔ cup whole milk ricotta (165g): The creamy base that holds everything together. Whole milk ricotta is essential for richness; don’t substitute with low-fat versions.
- ⅓ cup grated parmesan cheese (27g): Adds sharp, savory depth. Freshly grated tastes significantly better than pre-shredded.
- 3 ounces fresh mozzarella, small dice (84g): Provides stretchy texture and mild creaminess. Fresh mozzarella melts beautifully inside the ravioli.
- ¼ teaspoon ground nutmeg: The secret ingredient! Nutmeg adds warmth and complexity that elevates the cheese filling from good to exceptional.
- ¼ teaspoon kosher salt: Balances the richness of the cheeses.
- ¼ teaspoon ground black pepper: A touch of heat to round out the flavors.
Optional additions include fresh herbs like parsley or basil, minced garlic for extra punch, or even a pinch of red pepper flakes if you enjoy a subtle kick.
Step-by-Step Instructions for Making Cheese Ravioli
Step 1: Create the Pasta Dough Foundation
Begin by clearing a large, clean workspace on your countertop. Measure your flour and pour it directly onto the surface, shaping it into a mound. Using the back of a measuring cup or your fist, create a well in the center that’s wide enough to hold three eggs comfortably. Think of it as a flour volcano with a crater in the middle. This traditional method might feel messy at first, but it gives you better control over the dough’s texture than mixing in a bowl.
Add the tablespoon of olive oil and half teaspoon of salt into the well, then crack all three eggs directly into the center. The eggs should sit snugly in the flour well without immediately spilling over the edges. If your well is too shallow, gently build up the flour walls before proceeding.
Step 2: Mix and Incorporate the Ingredients
Grab a fork and start beating the eggs gently, as if you’re making scrambled eggs. Gradually begin pulling small amounts of flour from the inner walls of the well into the egg mixture. Work slowly and methodically, incorporating more flour with each circular motion. This gradual incorporation prevents lumps and creates a smoother final dough. You’ll notice the mixture transforming from liquid eggs to a thick, pale yellow paste.
Once the egg mixture has thickened considerably and can no longer spill, break down the walls of your flour well and begin mixing everything together more aggressively. Use a bench scraper or your hands to fold and scoop the shaggy mixture together. Don’t worry if it looks rough at this stage; that’s completely normal.
Step 3: Knead Until Smooth and Elastic
Now comes the therapeutic part: kneading. Press the dough forward with the heel of your palm, fold it back over itself, rotate a quarter turn, and repeat. This rhythmic motion develops the gluten structure that gives fresh pasta its characteristic chewiness. The dough will start out stiff and somewhat dry, but as you continue kneading, it will become more supple and smooth.
Knead for 10 to 15 minutes total until the dough transforms completely. You’ll know it’s ready when the surface becomes silky smooth and when you press your finger into it, the dough springs back instead of holding the indentation. This bounce-back test indicates that the gluten network has developed properly. If your hands get sticky during kneading, dust them lightly with flour, but avoid adding too much extra flour or your pasta will be tough.
Step 4: Rest the Dough
Wrap your beautiful dough ball tightly in plastic wrap or a beeswax-coated cloth. Let it rest at room temperature for at least 1 hour, up to 3 hours. This resting period is crucial because it allows the gluten strands to relax, making the dough much easier to roll out later. You can also refrigerate the wrapped dough for up to 24 hours, though you’ll want to let it come to room temperature before rolling. Don’t skip this step; trying to roll out dough immediately after kneading will result in a springy, uncooperative sheet that shrinks back constantly.
Step 5: Prepare the Cheese Filling
While your dough rests, make the filling. In a medium bowl, combine the ricotta, grated parmesan, and diced fresh mozzarella. Freshly grate your parmesan if possible; pre-grated cheese contains anti-caking agents that affect texture and melting quality. Add the nutmeg, salt, and pepper, then stir everything together until well combined. The mixture should be creamy but thick enough to hold its shape when piped.
Transfer the filling to a piping bag or a sturdy zip-top plastic bag. If using a plastic bag, snip off one corner to create a makeshift piping tip. Refrigerate the filling until you’re ready to assemble the ravioli. The filling can be made up to 24 hours in advance, making this recipe perfect for breaking the work into manageable stages.
Step 6: Divide and Prep for Rolling
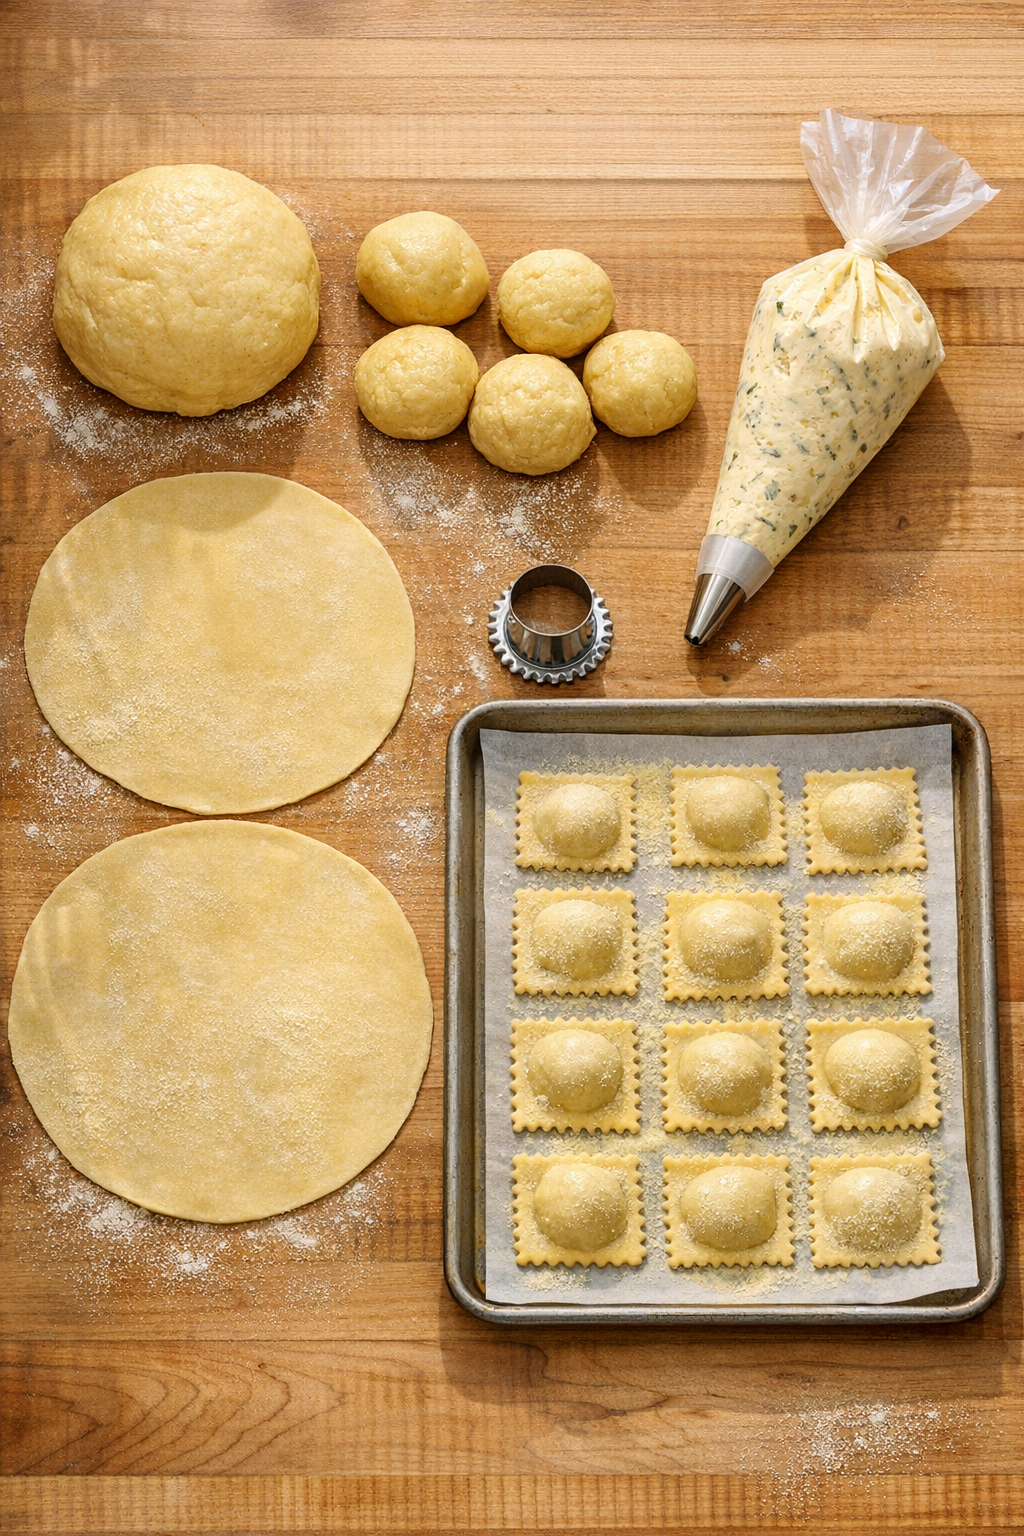
Once your dough has rested, unwrap it and divide it into four equal pieces using a bench scraper or knife. Keep three pieces loosely covered with plastic wrap to prevent them from drying out while you work with one portion at a time. Take your first piece and press it into a rough rectangle about ¼ inch thick. This initial shaping makes the rolling process smoother and helps you end up with more uniform pasta sheets.
Line a baking sheet with parchment paper and dust it generously with semolina flour. This is where your finished pasta sheets will rest, and the semolina prevents sticking far better than all-purpose flour.
Step 7: Roll the Pasta (With a Machine)
Set your pasta machine to its widest setting (typically #1). Lightly dust your dough rectangle with semolina flour and feed it through the rollers. Fold the resulting sheet in half and pass it through again at the same setting. Repeat this folding and rolling process one more time. This repetition creates layers within the dough and helps achieve a uniform texture.
Now pass the dough through the widest setting two more times without folding. The dough should be roughly the same width as your rollers. Adjust to the next setting (#2) and pass the dough through twice, dusting lightly with semolina if it feels sticky. Continue this process, moving to progressively thinner settings and passing the dough through twice at each level, until you reach the thinnest setting on your machine (usually #8). The final sheet should be almost translucent, delicate enough that you can see your hand through it.
If you notice air bubbles forming in the dough, simply pierce them with a knife tip and continue rolling. Handle the thin pasta gently to avoid tearing; gravity will pull on the long sheets, so support them with your hand as they emerge from the rollers.
Step 8: Roll the Pasta (By Hand Alternative)
If you don’t have a pasta machine, you can absolutely roll this dough by hand using a long rolling pin. It requires more elbow grease, but the results can be just as good. Start with your flattened rectangle and roll from the center outward, rotating the dough frequently to maintain an even thickness. Aim for sheets that are thin enough to see light through but thick enough to handle without tearing, approximately 1/16 inch thick.
Hand-rolling takes practice, so don’t be discouraged if your first attempts aren’t perfectly uniform. The beauty of homemade pasta is its rustic, irregular charm.
Step 9: Prepare for Assembly
Once you’ve rolled all four pieces of dough into long, thin sheets, dust each one lightly with semolina and gently fold them to fit on your prepared baking sheet. Cover with a clean tea towel to prevent drying while you prepare for assembly. The pasta sheets should rest for just a few minutes but not so long that they become brittle.
Clear your workspace and lay out two pasta sheets side by side lengthwise. Trim any uneven edges so both sheets are roughly the same size and shape. Brush away excess semolina flour from both sheets; too much flour between layers will prevent proper sealing.
Step 10: Pipe the Filling
On the first pasta sheet, pipe small mounds of cheese filling in two rows. Each dollop should be about 1½ teaspoons in size and spaced 1½ inches apart. Leave at least a half-inch border around all edges of the pasta sheet. Consistent sizing and spacing ensure even cooking and professional-looking ravioli. If you accidentally pipe filling in the wrong spot, simply scoop it up and reposition it; the filling is forgiving.
Step 11: Seal the Ravioli
Using a pastry brush or your fingertips, lightly brush the second pasta sheet with water. Don’t oversaturate; you need just enough moisture to act as glue. Immediately place this sheet, water-side down, over the sheet with the filling. Starting from one end, gently press down around each mound of filling, working methodically to eliminate air pockets. Air bubbles are the enemy of ravioli; they cause the pasta to burst during boiling.
Press firmly around each filling mound, then work your way around the entire sheet, sealing all the edges. If you notice any air trapped inside, you can carefully poke a small hole with a knife tip to release it, then press the hole closed again.
Step 12: Cut the Ravioli
Using a fluted pastry wheel, sharp knife, or ravioli cutter, trim the outer edges of your pasta sheet to create clean borders. Cut lengthwise down the center between your two rows of filling. Then make perpendicular cuts to separate each ravioli into individual squares or rectangles. A pastry wheel with a crimped edge creates those classic decorative edges and helps seal the pasta even better.
Transfer each finished ravioli to your semolina-dusted baking sheet, making sure they don’t touch each other. Sprinkle the tops with a bit more semolina. Repeat the entire assembly process with your remaining two pasta sheets.
Step 13: Rest Before Cooking
Allow the assembled ravioli to rest uncovered for 15 to 20 minutes before boiling. This brief drying period helps the pasta firm up slightly, which reduces the chances of them falling apart in the water. If you want to freeze them for later, let them dry for 30 to 45 minutes, then place the entire baking sheet in the freezer. Once frozen solid, transfer to a freezer bag where they’ll keep for up to 3 months. You can cook them directly from frozen; just add an extra minute or two to the cooking time.
Step 14: Boil the Ravioli
Bring a large pot of water to a rolling boil and add a generous amount of salt. The water should taste like the sea; this is your only opportunity to season the pasta itself. Reduce the heat to medium to maintain a gentle simmer rather than a vigorous boil, which could break delicate ravioli apart.
Working in batches to avoid overcrowding, carefully lower the ravioli into the water using a slotted spoon or spider. Cook for 3 to 4 minutes, stirring occasionally and gently to prevent sticking. Fresh ravioli are done when they float to the surface and the pasta achieves an al dente texture with a slight chew.
Step 15: Sauce and Serve
Have your sauce warm and ready before the ravioli finish cooking. Using a slotted spoon or spider strainer, transfer the cooked ravioli directly from the boiling water into your sauce. A little pasta water clinging to the ravioli will help the sauce adhere beautifully. Gently toss to coat, being careful not to break the delicate pasta pockets.
Serve immediately while hot, garnished with extra grated parmesan, fresh herbs, or a drizzle of quality olive oil. Fresh ravioli wait for no one; they’re at their absolute best within minutes of cooking.
Healthier Alternatives for Cheese Ravioli
While traditional cheese ravioli is already a relatively balanced dish with protein from eggs and cheese, you can make several modifications to boost nutrition or accommodate dietary needs without sacrificing flavor.
- Whole wheat pasta dough: Substitute half or all of the all-purpose flour with whole wheat flour for added fiber and nutrients. The dough will have a slightly nuttier flavor and may require an extra tablespoon of water to reach the right consistency.
- Reduced-fat cheese filling: Use part-skim ricotta and reduce the mozzarella to 2 ounces instead of 3. You’ll save about 50 calories per serving while maintaining a creamy texture.
- Vegetable boost: Mix finely chopped cooked spinach, kale, or roasted butternut squash into the cheese filling for added vitamins and minerals. Squeeze out excess moisture from greens before adding.
- Lighter sauce options: Instead of cream-based sauces, serve with a simple tomato sauce, brown butter and sage, or just olive oil with garlic and herbs. These options reduce calories while letting the ravioli flavor shine.
- Portion control: Serve 6 to 7 ravioli per person as a first course rather than a main dish, paired with a large salad for a more balanced meal.
- Egg substitute: For those avoiding eggs, you can make pasta dough using aquafaba (chickpea brine) or a commercial egg replacer, though the texture will be slightly different.
Serving Suggestions for Cheese Ravioli
The beauty of homemade cheese ravioli lies in its versatility. While delicious on its own, the right accompaniments can transform this dish from simple to spectacular.
- Classic marinara sauce: A bright, slightly acidic tomato sauce balances the richness of the cheese filling perfectly. Add fresh basil just before serving for aromatic freshness.
- Brown butter and sage: Melt butter until it turns golden and nutty, then fry fresh sage leaves until crisp. This simple sauce is traditional with cheese ravioli and takes just 5 minutes to prepare.
- Alfredo sauce: For ultimate indulgence, toss your ravioli in a creamy parmesan alfredo sauce. Add frozen peas in the last minute of cooking for color and sweetness.
- Pesto: Fresh basil pesto adds herbal brightness and works beautifully with the mild cheese filling. Thin the pesto with a bit of pasta cooking water for better coating.
- Roasted vegetables: Serve alongside or mixed with roasted cherry tomatoes, zucchini, bell peppers, or asparagus for added nutrition and visual appeal.
- Simple garlic and oil: Sauté minced garlic in quality olive oil until fragrant, toss with ravioli, and finish with red pepper flakes and fresh parsley for an easy weeknight option.
- Soup addition: Float several ravioli in a clear broth or minestrone soup for a comforting variation.
- Salad pairing: Serve with a crisp arugula or mixed green salad dressed with lemon vinaigrette to cut through the richness.
Common Mistakes to Avoid When Making Cheese Ravioli
Even experienced home cooks can encounter pitfalls when making fresh ravioli. Here are the most common errors and how to prevent them.
- Skipping the resting period: Trying to roll dough immediately after kneading results in springy, uncooperative pasta that shrinks back constantly. Always rest for at least 1 hour to allow gluten to relax.
- Over-flouring during rolling: While you need some flour to prevent sticking, using too much creates dry, tough pasta. Use semolina sparingly and brush off excess before assembly.
- Overfilling the ravioli: More filling isn’t better; it makes sealing difficult and causes bursting during cooking. Stick to the 1½ teaspoon guideline for best results.
- Not sealing properly: Trapped air pockets and insufficient pressing around the filling lead to ravioli that burst open in boiling water. Take time to press out all air and seal edges firmly.
- Rolling pasta too thick: Thick pasta won’t cook evenly and creates a doughy texture. Roll to the thinnest setting on your machine for delicate, tender ravioli.
- Boiling too vigorously: A rolling boil can break delicate ravioli apart. Maintain a gentle simmer instead.
- Overcrowding the pot: Cooking too many ravioli at once causes them to stick together. Work in batches, cooking no more than 12 to 14 at a time in a large pot.
- Under-salting the water: Fresh pasta needs well-salted cooking water since the dough itself isn’t heavily salted. The water should taste noticeably salty.
- Letting cooked ravioli sit: Fresh ravioli become sticky and clump together if left sitting after draining. Transfer immediately to warm sauce for best results.
Storing Tips for Cheese Ravioli
Proper storage techniques ensure you can enjoy your homemade ravioli at peak quality, whether you’re making them ahead or preserving leftovers.
- Uncooked fresh ravioli: Store on a semolina-dusted baking sheet, covered loosely with a tea towel, for up to 4 hours at room temperature. They’ll begin to dry and oxidize if left longer.
- Refrigerating uncooked ravioli: Place the semolina-dusted baking sheet in the refrigerator, uncovered, for up to 24 hours. The slight drying actually helps them hold their shape during cooking.
- Freezing uncooked ravioli: This is the best long-term storage method. Let ravioli dry for 30 to 45 minutes, then freeze on the baking sheet until solid (about 2 hours). Transfer to freezer bags, removing as much air as possible. Properly frozen ravioli keep for up to 3 months. Cook directly from frozen without thawing.
- Cooked leftovers: Store in an airtight container with a small amount of sauce or olive oil to prevent sticking. Refrigerate for up to 3 days. Reheat gently in sauce over low heat or in the microwave at reduced power.
- Pasta dough storage: Wrapped tightly, unrolled dough keeps in the refrigerator for up to 2 days or in the freezer for up to 1 month. Thaw frozen dough overnight in the refrigerator before using.
- Cheese filling storage: The prepared filling keeps in an airtight container in the refrigerator for up to 3 days, making it easy to prep components ahead.
Bringing It All Together
Making cheese ravioli from scratch transforms a simple meal into a memorable culinary experience. Yes, it requires time and attention, but the process itself is meditative and rewarding, and the results speak for themselves. Each bite of tender, silky pasta encasing that creamy, perfectly seasoned cheese filling reminds you why handmade food matters. This isn’t just about feeding your family; it’s about creating something beautiful with your own hands and sharing that love through food.
The techniques you’ve learned here extend far beyond this single recipe. Once you’ve mastered fresh pasta dough and ravioli assembly, you can experiment with countless filling variations: butternut squash and sage, spinach and ricotta, mushroom and truffle, or even lobster for special occasions. The pasta-making skills transfer to fettuccine, pappardelle, and other shapes too.
Don’t be discouraged if your first batch isn’t perfect. Like any worthwhile skill, pasta-making improves with practice. Your second attempt will be better than your first, and by your third or fourth, you’ll be rolling and filling with confidence. Embrace the rustic, homemade appearance; those slight irregularities prove these were made with care, not stamped out by a machine.
I encourage you to gather your family or friends and make this a shared activity. There’s something wonderful about working together to create a meal, and extra hands make the assembly process much faster. Pour some wine, put on good music, and enjoy the process as much as the final dish. That’s what Italian cooking is really about: taking time to savor both the creation and the consumption of good food.
Frequently Asked Questions About Cheese Ravioli
Can I make ravioli without a pasta machine?
Absolutely! While a pasta machine makes the process easier and produces more uniform results, you can roll pasta dough by hand using a long rolling pin. It requires more physical effort and practice to achieve thin, even sheets, but the technique has been used successfully for centuries. Roll from the center outward, rotating frequently, until you can nearly see through the dough. Hand-rolled pasta may be slightly thicker and have a more rustic texture, but it’s perfectly delicious.
How do I prevent my ravioli from bursting during cooking?
Bursting typically happens due to trapped air or inadequate sealing. Carefully press around each filling mound to eliminate all air pockets before sealing. Make sure your pasta sheets are properly moistened where they overlap, and press firmly along all edges. Additionally, maintain a gentle simmer rather than a rolling boil when cooking, as aggressive bubbling can break delicate pasta. Finally, don’t overfill; too much filling stretches the pasta thin and creates weak spots.
What’s the best sauce for cheese ravioli?
The best sauce depends on personal preference, but traditional pairings include marinara, brown butter with sage, or a simple olive oil and garlic sauce. Since the cheese filling is already rich, lighter sauces often work best to avoid overwhelming the dish. Brown butter with crispy sage leaves is particularly traditional and allows the ravioli flavor to shine through. For special occasions, a light cream sauce with peas or a pesto thinned with pasta water are excellent choices.
Can I freeze homemade ravioli?
Yes, and freezing is actually one of the best ways to preserve homemade ravioli. Let the assembled ravioli dry for 30 to 45 minutes on a semolina-dusted baking sheet, then freeze them on the sheet until solid. Once frozen, transfer to freezer bags where they’ll keep for up to 3 months. Cook frozen ravioli directly from the freezer without thawing, adding just one to two extra minutes to the cooking time. Freezing in a single layer first prevents them from sticking together in storage.
Why does my pasta dough feel too dry or too wet?
Flour’s moisture content varies based on humidity, storage conditions, and type, which means you may occasionally need to adjust the dough. If it’s too dry and crumbly, wet your hands slightly and knead until it comes together, or add water a teaspoon at a time. If it’s too sticky and wet, knead in small amounts of flour until you reach a smooth, slightly tacky consistency. The dough should be soft and pliable but not stick to your hands or the work surface.
Tools You’ll Need
Essential Kitchen Tools
Everything you need to make cooking easier and more enjoyable


Must Try Recipes
- Pesto Chicken Pasta
Creamy pesto sauce tossed with pasta and juicy chicken. - Chicken Fettuccine Alfredo
Rich Alfredo sauce coating fettuccine and chicken. - Pasta Primavera
Bright veggies and pasta in a light garlic sauce. - Gnocchi
Soft potato dumplings perfect with Italian sauce. - Pesto Pasta Salad
Chilled pasta tossed in fresh basil pesto.

Want to save this recipe?
Want to save this recipe? Enter your email below, and we'll send it straight to your inbox. Plus, receive new recipes every week!

Homemade Cheese Ravioli
- Total Time: 2 hours 36 minutes
Description
Soft pasta sheets stuffed with ricotta, Parmesan, and mozzarella for a comforting Italian main course.
Ingredients
- 2¼ cups all-purpose flour (270g)
- 1 tablespoon olive oil
- ½ teaspoon salt
- 3 large eggs
- Semolina flour (for dusting)
- ⅔ cup whole milk ricotta (165g)
- ⅓ cup grated Parmesan cheese (27g)
- 3 ounces fresh mozzarella, diced (84g)
- ¼ teaspoon ground nutmeg
- ¼ teaspoon kosher salt
- ¼ teaspoon ground black pepper
Instructions
- Mound flour on a clean surface, make a well, then add olive oil, salt, and eggs.
- Beat the eggs, gradually incorporating flour until a thick dough forms.
- Knead the dough by hand for 10–15 minutes until smooth, wrap, and rest 1–3 hours.
- Mix ricotta, Parmesan, mozzarella, nutmeg, salt, and pepper in a bowl; refrigerate in a piping bag.
- Prepare a parchment-lined sheet and dust with semolina flour.
- Divide dough into 4 portions; roll each to ¼-inch thick rectangles, dusting with semolina.
- Pass each sheet through pasta rollers from setting 1 to 8, folding twice only on setting 1.
- Layer two sheets, pipe filling in 1½-teaspoon mounds on the bottom sheet.
- Brush the top sheet with water, place it over the filling, press to seal and remove air.
- Cut around and between the mounds to form individual ravioli; dust with semolina and dry 15–20 minutes.
- Boil salted water, reduce to simmer, and cook ravioli 3–4 minutes in batches.
- Drain with a slotted spoon, transfer to sauce, and serve immediately.
- Prep Time: 150 minutes
- Cook Time: 6 minutes
- Category: Main Course
- Cuisine: Italian
Nutrition
- Serving Size: 4 servings (28 ravioli)
- Calories: 512 kcal
- Sugar: 1 g
- Sodium: 805 mg
- Fat: 20 g
- Saturated Fat: 9 g
- Unsaturated Fat: 9 g
- Trans Fat: 0.01 g
- Carbohydrates: 57 g
- Fiber: 2 g
- Protein: 24 g
- Cholesterol: 185 mg