


Homemade cheese ravioli sounds intimidating until you realize the process is mostly about patience, not skill. Store-bought versions can taste flat and gummy, leaving you wondering why pasta night feels like a letdown. This from-scratch cheese ravioli recipe by John Kanell changes that completely, using just 11 simple ingredients to produce pillowy, golden pasta parcels stuffed with a three-cheese filling that genuinely tastes like something from a proper Italian kitchen. Each serving delivers 512 kcal with 24g of protein, and the whole batch yields 28 ravioli, enough for four generous portions.
Why This Works Before You Touch a Single Ingredient
The reason homemade ravioli beats anything in a frozen bag comes down to two things: fresh egg pasta dough and a filling you control entirely. The dough here uses whole eggs for richness and structure, while olive oil adds a subtle suppleness that makes rolling easier. The filling combines ricotta, parmesan, and fresh mozzarella, each doing a specific job.
Ricotta acts as the creamy binder that holds everything together. Parmesan brings sharp, salty depth. Fresh mozzarella, diced small, creates little pockets of melt that make each bite stretch slightly. A pinch of nutmeg ties the cheeses together in a way that is hard to place but immediately noticeable when it is missing.
The same three-cheese logic that makes this filling so satisfying is what drives other cheesy comfort dishes too. That balance is exactly what Baked Mac and Cheese explores in depth, if you want to understand how layering different cheese textures builds flavor.
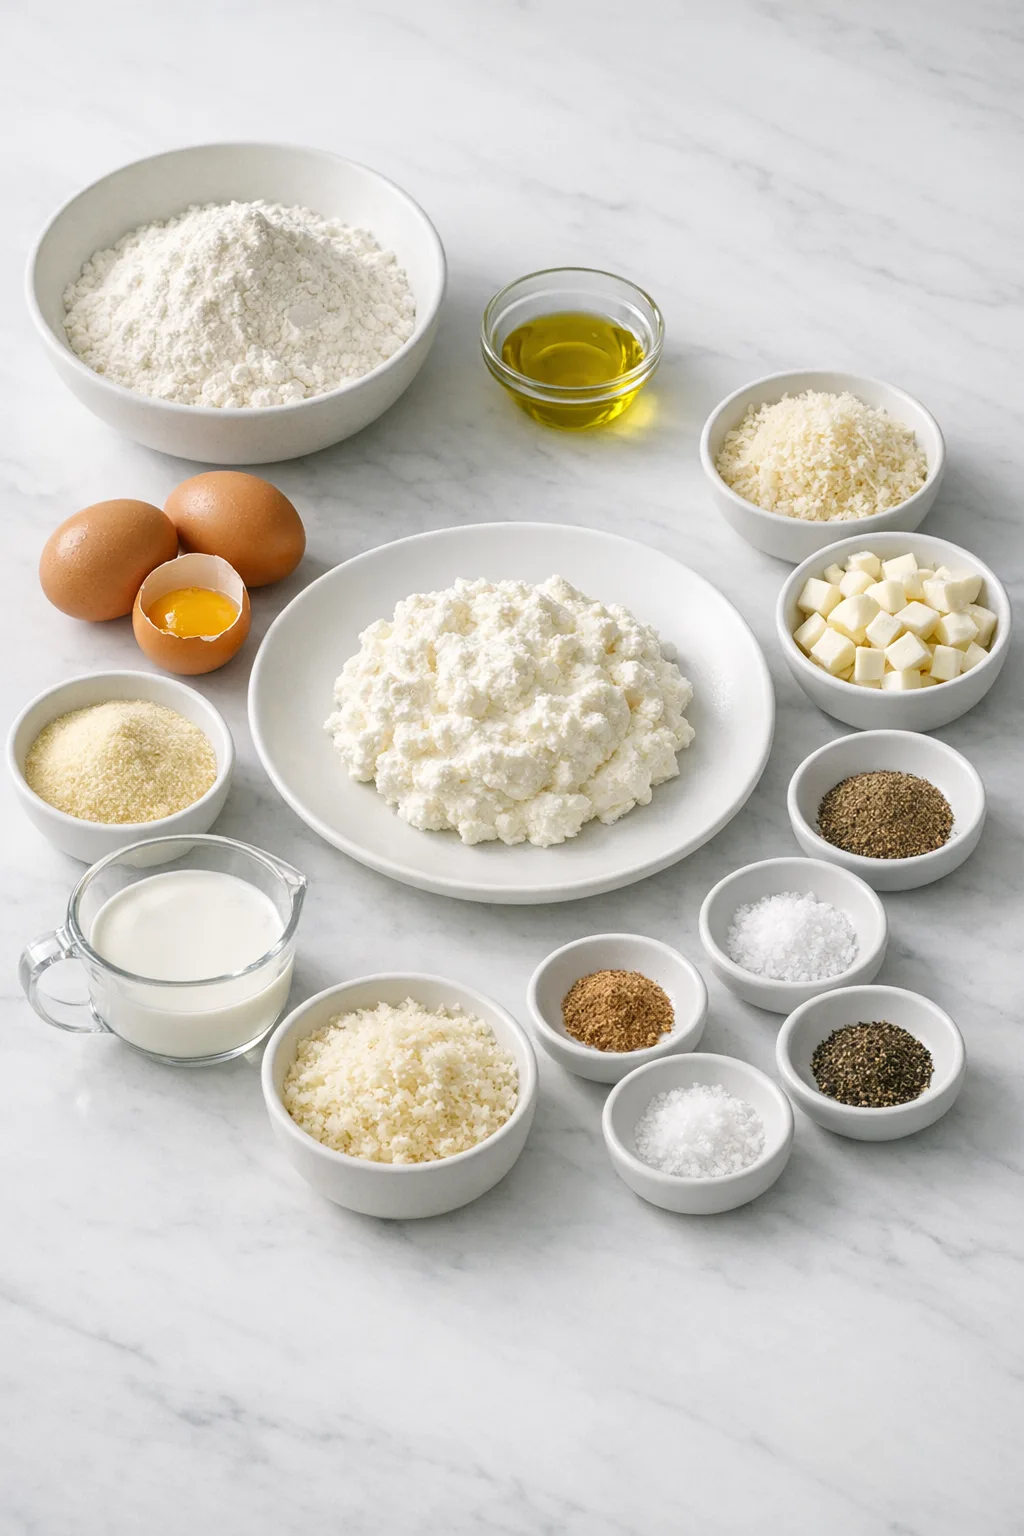
Ingredients for Cheese Ravioli
For the Pasta Dough
- 2¼ cups all-purpose flour (270g), plus semolina flour for dusting
- 3 large eggs
- 1 tablespoon olive oil
- ½ teaspoon salt
For the Three-Cheese Filling
- ⅔ cup whole milk ricotta (165g) — whole milk only, the part-skim version is too watery
- ⅓ cup grated parmesan cheese (27g)
- 3 ounces fresh mozzarella, small dice (84g)
- ¼ teaspoon ground nutmeg
- ¼ teaspoon kosher salt
- ¼ teaspoon ground black pepper
A quick substitution note: if you prefer 00 flour over all-purpose, it works beautifully and produces an even silkier dough. For the mozzarella, avoid the low-moisture block kind here — fresh mozzarella melts differently and gives the filling a creamier texture when cooked.
Why Most Homemade Ravioli Fails (and How to Fix It)
Before the steps, it helps to know where things typically go wrong. Most failed batches trace back to one of four issues.
- Skipping the dough rest: Fresh pasta dough is full of tension right after kneading. Rolling it immediately causes it to snap back and tear. The gluten needs at least one hour at room temperature to relax before it will cooperate.
- Rolling the dough too thick: Thick pasta sheets mean your ravioli will feel doughy and heavy. You need to reach the thinnest setting on your pasta roller for the right texture.
- Trapping air bubbles: Air pockets inside the ravioli expand during boiling and burst the seams. Press firmly around each mound of filling and use a knife tip to vent any visible bubbles before sealing.
- Boiling at a rolling boil: A furious boil batters delicate fresh pasta. Once the ravioli go in, reduce the heat to medium and simmer gently.
- Not having sauce ready: Fresh ravioli stick together the moment they leave the water. Your sauce must be warm and waiting so the pasta goes directly in without sitting exposed.
Step-by-Step Instructions
Step 1: Build the Pasta Dough on the Counter
Pour the flour onto a clean work surface and shape it into a mound. Use the back of a rounded bowl to press a wide, shallow well into the center, large enough to hold the wet ingredients without spilling. Add the olive oil and salt, then crack all three eggs directly into the well.
Using a fork, beat the egg mixture slowly, pulling flour in from the inner edges gradually. You will know you are on track when the mixture thickens and turns a pale, uniform yellow before the well breaks. If the well collapses too early and flour floods in unevenly, use a bench scraper to gather everything back into a rough mound and continue mixing by hand.
Step 2: Knead Until the Dough Springs Back
Once all the flour is incorporated into a shaggy mass, use a Mixing Bowl or your clean hands and a bench scraper to fold and press the dough together. Begin kneading using the heel of your palm: push forward, fold, rotate, repeat. The dough will feel stiff and almost resistant at first.
Knead for 10 to 15 minutes until the surface is smooth and the dough springs back slowly when you poke it. One thing to watch: if the dough tears rather than stretches during kneading, it is too dry. Wet your hands lightly rather than adding water directly to the surface.
Step 3: Rest the Dough So It Rolls Without Fighting You
Wrap the dough tightly in plastic wrap and leave it at room temperature for at least 1 hour and up to 3 hours. The dough will visibly relax, spreading slightly into a softer, less tense shape. This is not optional. The first time I made fresh pasta, I tried rolling after 20 minutes and the sheet kept shrinking back to half its size no matter what I did.
If you want to prep ahead, the wrapped dough can rest in the refrigerator overnight. Do not leave it longer than that, as it will begin to oxidize and discolor.
Step 4: Mix the Three-Cheese Filling
While the dough rests, combine the ricotta, parmesan, diced fresh mozzarella, nutmeg, salt, and pepper in a small bowl. Stir until evenly mixed. The filling should look creamy and cohesive, not wet or runny. Transfer it to a piping bag (or a zip-lock bag with one corner snipped) and refrigerate until needed.
Freshly grating your parmesan makes a real difference here. Pre-grated cheese is coated with cellulose to prevent clumping, which means it does not melt or incorporate as smoothly into the filling. The flavor difference is noticeable. This cheese combination is also what makes dishes like Savory Egg and Cheese-Filled Piroshki so satisfying, though that dough is enriched differently and uses a yeasted wrap rather than egg pasta.
Step 5: Roll the Pasta Sheets to the Thinnest Setting
Line a Baking Sheet with parchment paper and dust lightly with semolina flour. Divide the rested dough into 4 equal pieces and keep the unused pieces loosely covered so they do not dry out.
Press one piece into a rough rectangle about ¼ inch thick and dust with semolina. Using a Pasta Roller on its widest setting (setting 1 on a KitchenAid), pass the dough through. Fold it in half and pass through again. Repeat this fold-and-roll process once more, then pass through the widest setting two more times without folding.
Move to setting 2, dust lightly with semolina, and pass through twice. Continue incrementally through each setting, passing through twice at each level, until you reach the thinnest setting (setting 8 on a KitchenAid). The sheet will become long and almost translucent. Fold gently onto the prepared baking sheet and cover with a tea towel. Repeat with the remaining three dough pieces.
Step 6: Assemble and Seal the Ravioli
Lay one pasta sheet lengthwise on a clean work surface and place a second sheet directly above it, parallel. Trim the edges so both sheets are the same size. Brush away any excess semolina flour from both sheets — semolina prevents sticking during rolling, but it will also prevent the sheets from sealing if left on the surface.
Pipe two rows of filling onto the first sheet in roughly 1½-teaspoon mounds, spacing them about 1½ inches apart and leaving at least a ½-inch border around the edges. Brush the second sheet lightly with water on one side, then immediately flip it water-side-down over the first sheet. Press firmly around each mound to push out air, working from the center outward. You will know the seal is good when the pasta feels firmly bonded with no soft, air-filled gaps between the mounds.
Using a pastry cutter or knife, trim the outer edges, cut lengthwise between the two rows, then cut vertically to separate individual ravioli. Transfer to the semolina-dusted baking sheet. Repeat with the remaining pasta sheets. Allow the ravioli to rest uncovered for 15 to 20 minutes before boiling.
Step 7: Simmer Gently in Well-Salted Water
Bring a large pot of water to a boil and salt it heavily. Reduce the heat to medium. Working in two batches, carefully lower the ravioli into the water and simmer for 3 to 4 minutes, stirring gently and occasionally. The ravioli are ready when they float and the pasta edges look slightly translucent but firm, not doughy. Remove with a slotted spoon and transfer directly into your warm sauce. Serve immediately.
What Separates Good Cheese Ravioli from a Great Batch
- Use semolina generously but brush it off before sealing. Semolina keeps the pasta from sticking to surfaces during rolling, but any left on the sealing surface will prevent the two sheets from bonding properly.
- Work in pairs when assembling. Filling and sealing one pair of sheets at a time prevents the pasta from drying out and cracking at the edges before you can seal it.
- Freeze before boiling if you want to meal prep. Let the assembled ravioli dry on the baking sheet for 30 to 45 minutes, then freeze solid before transferring to a freezer bag. Boil directly from frozen when needed.
- Taste one ravioli before serving the rest. Fresh pasta cooks faster than dried, and thickness varies slightly across a handmade batch. One quick taste tells you more than any timer.
- Have your sauce warm and waiting. I personally prefer a brown butter sauce with a few fried sage leaves over a red sauce for this filling. The nuttiness of the butter amplifies the parmesan in a way that tomato sauce cannot quite match.
Serving Suggestions
These ravioli pair well with a simple brown butter and sage sauce, a classic marinara, or a light Alfredo. The richness of the three-cheese filling means the sauce does not need to be heavy. A drizzle of good olive oil with freshly cracked pepper works surprisingly well for a weeknight option.
For a starter or side that complements the meal without competing, a warm bowl of Fresh Broccoli Cheese Soup rounds out the table nicely when you want something that echoes the cheesy warmth of the ravioli without duplicating it.
A simple arugula salad dressed with lemon and olive oil also cuts through the richness well, especially if you are serving the ravioli with a butter-based sauce.
Storage and Make-Ahead Options
Uncooked ravioli can be refrigerated on a semolina-dusted tray, loosely covered, for up to 24 hours. Beyond that, they begin to absorb moisture and the pasta softens unevenly.
For longer storage, freeze the assembled ravioli in a single layer until solid, then transfer to a freezer bag. They keep well frozen for up to 2 months. Boil directly from frozen, adding about 1 to 2 extra minutes to the cook time.
Cooked ravioli do not store as well. They tend to stick together and the texture softens significantly when reheated. If you must reheat them, warm gently in a pan with a splash of water and your sauce over low heat until just heated through. You will know they are ready when the sauce begins to bubble lightly around the edges of the pan.
FAQs
Can I make the pasta dough without a pasta roller?
Yes. Roll each piece of dough by hand using a rolling pin, working from the center outward, until the sheet is thin enough to see your hand through it. It takes more effort but the result is the same. The key is to keep rotating the dough so it stretches evenly rather than thinning in just one direction.
Why does my ravioli burst when boiling?
Air trapped inside the ravioli expands rapidly in boiling water and pushes through the sealed edges. Press firmly around each mound of filling before cutting, and use a knife tip to pierce any visible bubbles. Also make sure the water is at a gentle simmer rather than a rolling boil once the ravioli go in.
Can I add spinach or herbs to the cheese filling?
Absolutely. Thawed, well-drained spinach works particularly well stirred into the ricotta mixture. Make sure to squeeze out as much moisture as possible from the spinach first, otherwise the filling becomes too wet and the ravioli may not seal cleanly.
How do I know when the pasta dough is kneaded enough?
Press two fingers into the dough and release. If the indentation springs back within a second or two, the gluten is developed and the dough is ready to rest. If it stays dented, keep kneading for another 2 to 3 minutes and test again.
Can I use part-skim ricotta instead of whole milk?
Whole milk ricotta is strongly recommended here. Part-skim versions tend to release more liquid during cooking, which can make the filling watery and cause the pasta to soften unevenly. If whole milk ricotta is unavailable, drain part-skim ricotta in a cheesecloth-lined strainer for 30 minutes before using.
How many ravioli does this recipe make?
This recipe yields approximately 28 ravioli, which serves 4 people. Prep time is 150 minutes (including the dough rest), and cook time is 6 minutes.
A Recipe Worth the Time
Homemade cheese ravioli is one of those projects that feels ambitious until you are actually doing it, and then it just feels satisfying. The dough comes together with basic pantry ingredients, the filling takes five minutes to mix, and the rolling process is genuinely enjoyable once you find a rhythm.
The result is pasta that tastes nothing like anything from a bag or a box. The filling is creamy, the pasta is tender with a slight chew, and the whole thing carries a freshness that is hard to replicate any other way.
Give this one a try on a weekend when you have a couple of hours and want something that actually feels worth making. Chances are you will find yourself doubling the batch next time just so there is something in the freezer for the week ahead.
Essential Kitchen Tools
Making Cheese Ravioli? Most failed attempts come from using the wrong pan or heat setup — not the recipe itself.

Want to save this recipe?
Want to save this recipe? Enter your email below, and we'll send it straight to your inbox. Plus, receive new recipes every week!

Comforting Cheese Ravioli
- Total Time: 2 hours 36 minutes
- Yield: 4 servings (28 ravioli) 1x
Description
Savor the creamy richness of homemade cheese ravioli. The blend of ricotta, mozzarella, and parmesan creates a comforting taste, perfect for special occasions.
Ingredients
Pasta Dough:
- 2¼ cups all-purpose flour ((270g))
- 1 tablespoon olive oil
- ½ teaspoon salt
- 3 large eggs
- Semolina flour (for dusting)
Filling:
- ⅔ cup whole milk ricotta ((165g))
- ⅓ cup grated parmesan cheese ((27g))
- 3 ounces fresh mozzarella (small dice (84g))
- ¼ teaspoon ground nutmeg
- ¼ teaspoon kosher salt
- ¼ teaspoon ground black pepper
Instructions
For the Pasta Dough:
- On a clean, flat surface, form a mound with the flour. Create a well in the center that is wide enough for the wet ingredients, ensuring the edges can support them. Pour in the olive oil and salt, then crack the eggs into the well.
- Begin whisking the eggs with a fork, slowly incorporating flour from the edges without breaking the well. Once the mixture thickens and turns pale yellow, mix in the remaining flour.
- Using a bench scraper or your hands, combine the mixture until a dough forms. Knead the dough by hand for about 10 to 15 minutes until it is smooth and springs back when poked. It will initially be stiff but will soften as you knead.
- Tightly wrap the dough in plastic wrap and let it rest at room temperature for a minimum of 1 hour and up to 3 hours.
For the Filling:
- In a small bowl, combine the cheeses, nutmeg, salt, and pepper. Transfer this mixture to a piping bag and refrigerate until needed.
For Rolling the Dough:
- Prepare a baking sheet by lining it with parchment paper and dusting it lightly with semolina flour.
- Divide the dough into four equal portions and cover them loosely with plastic wrap. Take one portion and flatten it into a rectangle about ¼ inch thick, then sprinkle with semolina flour.
- Set the pasta rollers to the widest setting (#1 on a KitchenAid) and pass the dough through. Fold it in half and pass it through again. Repeat this step one more time.
- Pass the dough through the widest setting two additional times without folding, ensuring it fits the width of the rollers.
- Change the rollers to the next widest setting (#2 on a KitchenAid), sprinkle the dough with semolina flour, and pass it through twice.
- Adjust the rollers to the next setting and pass the dough through twice. Continue this process until the rollers are set to the thinnest setting (#8 on a KitchenAid).
- Dust the pasta sheet with semolina flour and gently fold it to fit the prepared baking sheet. Cover it with a tea towel to prevent drying.
- Repeat this process with the remaining three pieces of dough.
For the Assembly:
- On a clean surface, lay one pasta sheet lengthwise. Place another sheet directly above it, ensuring they are parallel. Trim any uneven edges to match their sizes and brush off excess semolina flour.
- On the first sheet, pipe two rows of filling into mounds of about 1½ teaspoons, spaced 1½ inches apart, leaving a ½-inch border around the edges.
- Lightly brush the second pasta sheet with water. Place it, water-side down, on top of the first sheet. Press down around each mound to seal, ensuring to push out any trapped air to avoid breakage during boiling.
- Using a pastry cutter or knife, carefully trim the outer edges of the pasta sheet. Cut lengthwise between the filling rows, then cut vertically to separate into individual ravioli. Place them on the prepared baking sheet and sprinkle with semolina flour. Repeat these steps with the remaining pasta sheets. Allow the ravioli to rest uncovered for about 15 to 20 minutes to dry slightly before boiling.
For Boiling:
- Bring a large pot of water to a rolling boil and add a generous amount of salt. Lower the heat to medium.
- In two batches, gently drop the ravioli into the boiling water. Simmer for 3 to 4 minutes, stirring occasionally. Use a slotted spoon to remove the ravioli and transfer them directly to your chosen sauce. Serve right away.
Notes
TECHNIQUE TIP: Use a pasta roller for even thickness and tender ravioli sheets.
STORAGE: Refrigerate unused filling in a covered container until ready to use.
SUBSTITUTION: Replace mozzarella with gouda for a different flavor twist.
- Prep Time: 2 hours 30 minutes
- resting time: 3 hours
- Cook Time: 6 minutes
- Category: Main Course
- Cuisine: Italian
Nutrition
- Serving Size: 4 servings (28 ravioli)
- Calories: 512 kcal
- Sugar: 1 g
- Sodium: 805 mg
- Fat: 20 g
- Saturated Fat: 9 g
- Unsaturated Fat: 9 g
- Trans Fat: 0.01 g
- Carbohydrates: 57 g
- Fiber: 2 g
- Protein: 24 g
- Cholesterol: 185 mg

