


Homemade hand pies have a reputation for being intimidating, and egg cheese piroshki are no exception. The dough needs time, the filling needs balance, and if you rush either one, you end up with something dense and disappointing instead of the light, creamy, golden pockets these are meant to be. This recipe from Tatyana’s Everyday Food solves exactly that problem with clear steps, a forgiving yeast dough, and a filling so good it genuinely brings people back to the table for seconds.
Why This Recipe Works Before You Even Start
The filling here combines farmer’s cheese (tvorog) with hard-boiled eggs, mozzarella, and fresh herbs. That combination matters more than it might seem at first glance. The farmer’s cheese provides a dry, crumbly base that holds its shape inside the dough, while the mozzarella melts into stretchy, gooey ribbons. Together they create a filling that is creamy without being wet, which is exactly what keeps the dough from going soggy.
The egg in the filling is not just filler. It acts as a binder, holding the cheese and herbs together so the filling stays put when you bite in rather than spilling out. Fresh dill and green onions cut through the richness with brightness. That contrast is what makes these feel satisfying rather than heavy.
If you love egg-based dishes and want to explore more ways to use eggs as a main component, Mediterranean Sheet Pan Baked Eggs takes that same egg-forward approach in a completely different direction, worth having in your rotation.
What You Need for Egg Cheese Piroshki
For the Yeast Dough
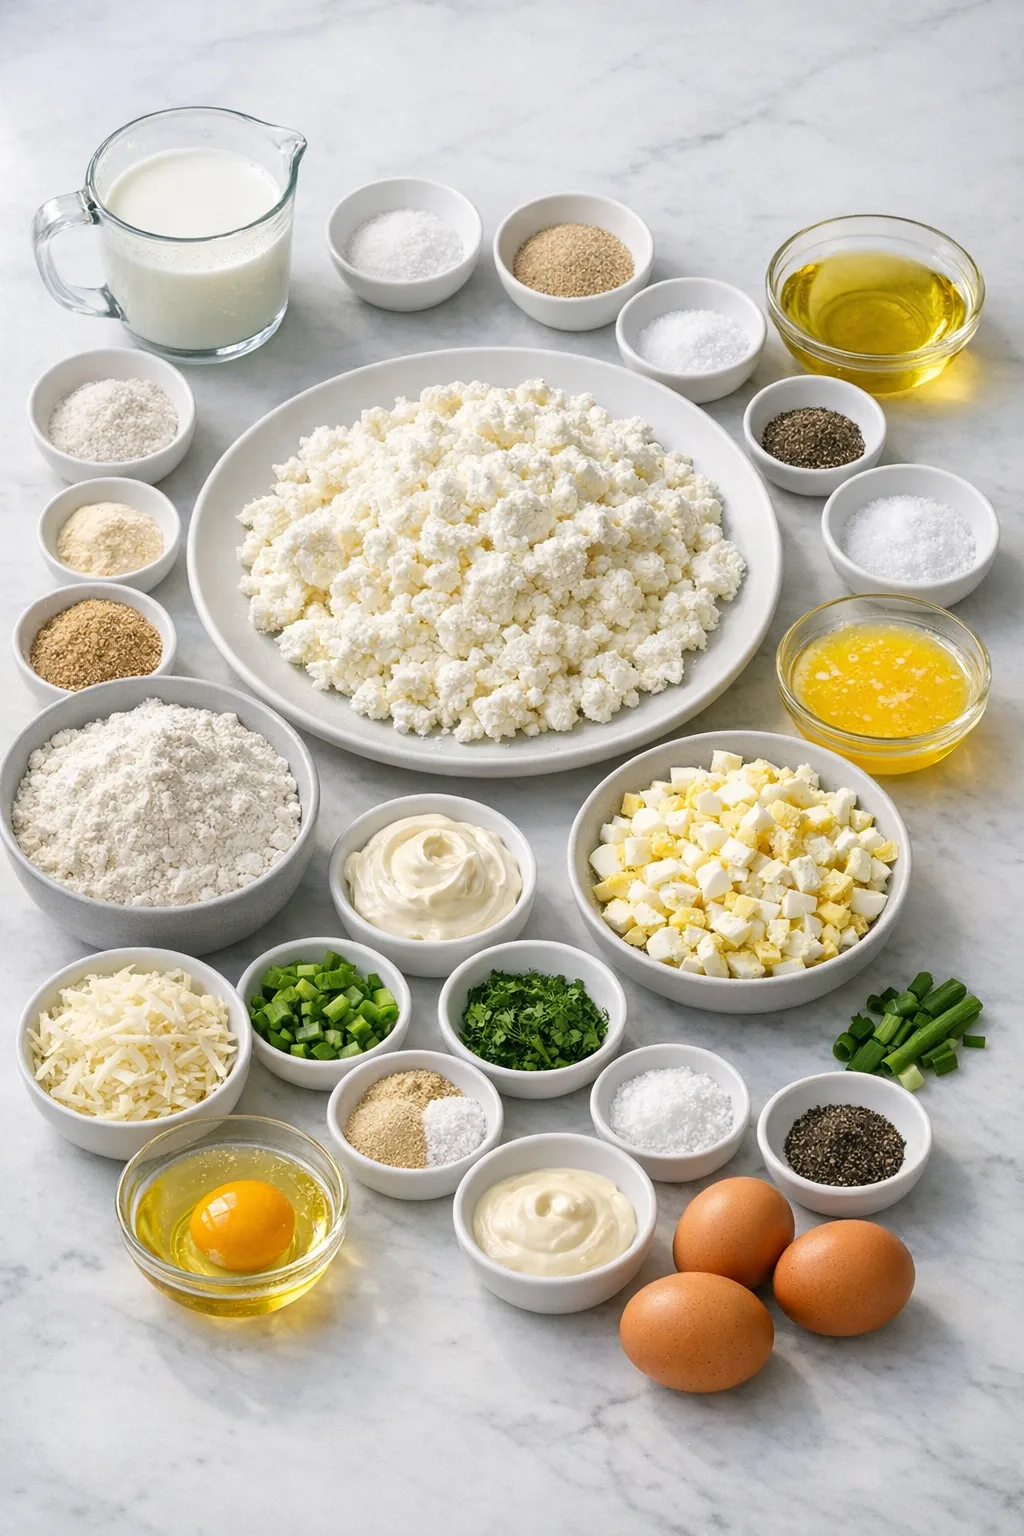
- 1 cup whole milk
- 2 tsp white sugar
- 1 tbsp dry active yeast
- 1 tsp sea salt
- 1/3 cup butter, melted
- 1 large egg
- 3 cups all-purpose flour
For the Cheese and Egg Filling
- 6 large eggs, hard-boiled and diced
- 1/3 cup mayonnaise
- 1 cup grated mozzarella cheese
- 3 green onions, diced (green parts only)
- 2 tbsp fresh chopped parsley
- 1/4 cup fresh chopped dill
- 1 tsp dried garlic powder
- 1 tsp dried onion powder
- 2 tsp sea salt
- Ground black pepper to taste
- 1 large egg
- 2 1/2 cups farmer’s cheese (tvorog)
For Cooking
- 3 to 5 cups canola oil (for frying)
- 1 large egg, beaten (for baking only)
Substitution note: If you cannot find farmer’s cheese or tvorog at a local Eastern European market, cottage cheese works as a substitute. Rinse it through a cheesecloth and let the liquid drain completely before using, otherwise the filling will be too wet to hold together.
Why Most Homemade Piroshki Fails (and How to Fix It)
The most common failure point is the dough. Either the milk is too hot and kills the yeast, or the dough gets over-floured and turns stiff. Both problems produce piroshki with a tough, bready shell instead of the light, pillowy exterior you want.
The second failure is sealing. If any filling touches the seam edges, the dough will not stick properly and will burst open during frying or baking. The filling spills into the oil, makes a mess, and the piroshki deflate. Keep the filling centered and your fingers clean while pinching.
The third issue is oil temperature. Too hot and the outside burns before the dough cooks through. Too cool and the piroshki absorb excess oil and turn greasy. A digital thermometer takes all the guesswork out of this step.
Step-by-Step Instructions
Step 1: Activate the Yeast Without Killing It
Heat 1 cup of whole milk in your microwave or on the stovetop until it reaches between 120°F and 130°F. This temperature range is specific for a reason: too cold and the yeast stays dormant, too hot and it dies entirely. Pour the milk into a large Mixing Bowl, whisk in 2 tsp of white sugar, then sprinkle 1 tbsp of dry active yeast over the top.
Pat the yeast down gently so it is fully submerged. Let it stand for about 5 minutes. You will know the yeast is working when the surface looks foamy and slightly domed, almost like a soft cloud forming on top of the milk.
Step 2: Build a Soft, Elastic Dough Foundation
Once the yeast is proofed, add 1 tsp sea salt, 1/3 cup melted butter (cooled slightly so it does not scramble the egg), and 1 large egg. Whisk until the egg is fully beaten into the mixture. Gradually add the flour, starting with a whisk and switching to a spatula as the batter thickens.
Once a rough dough ball forms, turn it out onto a floured surface. Continue kneading for 4 to 6 minutes, adding flour as needed, until the dough is smooth and elastic but still soft to the touch. One thing to watch: if you add too much flour chasing a non-sticky surface, the dough will tighten up and lose its softness. Stop adding flour the moment it stops sticking to your hands.
If you enjoy working with yeast doughs and want another Ukrainian baked good to try alongside this one, Blueberry and Cheese Vatrushka Buns use a similar soft dough with a sweet cheese filling, a completely different result from the same technique.
Step 3: Proof the Dough Until Doubled
Place the kneaded dough back into your mixing bowl and cover with a clean towel. Set it in a warm corner of your kitchen, near the stove works well, and allow it to proof for 1 to 1 1/2 hours until doubled in size. The dough is ready when it looks visibly puffed and springs back slowly when you press a finger into it.
Step 4: Create the Cheesy Egg Filling
Place 6 hard-boiled, diced eggs into a large bowl. Add 1/3 cup mayonnaise, 1 cup grated mozzarella, 1 large egg, and 2 1/2 cups farmer’s cheese. Then add 3 diced green onions, 2 tbsp fresh parsley, 1/4 cup fresh dill, 1 tsp garlic powder, 1 tsp onion powder, 2 tsp sea salt, and black pepper to taste.
Mix everything together until you have a uniform, cohesive filling. It should look thick and hold its shape on a spoon rather than spreading loosely. Letting the filling sit at room temperature while the dough proofs actually helps the flavors come together, so do not refrigerate it during this time.
Step 5: Divide and Shape the Piroshki Pockets
Gently punch down the proofed dough and transfer it to a floured surface. Using a Chef Knife or bench scraper, divide the dough into 12 pieces for larger piroshki or 16 for smaller ones. Keep the unused pieces covered with a towel so they do not dry out while you work.
Roll each piece into a 6-inch circle (4-inch for smaller ones). Place about 1/3 to 1/2 cup of filling in the center. Bring four corners of the dough up to meet at the top and pinch the seams tightly together. Make absolutely sure no filling has touched the seam edges before you pinch, or the seal will not hold. Flip the shaped piroshki over and pat gently into a square shape. Place them on a Baking Sheet dusted with flour.
Step 6: Fry to a Deep Golden Brown
Allow the shaped piroshki to proof on the baking sheet for approximately 30 minutes until the dough looks fluffy and pillowy again. Pour about 1/2 inch of canola oil into a deep pan and heat over medium heat until the oil reaches between 275°F and 300°F.
Place the piroshki seam side down first and fry 2 to 3 at a time. Do not crowd the pan. Fry until golden brown on the first side, then carefully turn and fry the other side. The outside should look deep amber with a slight sheen, and you should hear a steady, gentle sizzle rather than an aggressive spatter. Remove to a wire rack with paper towels underneath to catch excess oil.
Step 7 (Alternative): Bake for a Lighter Result
Preheat the oven to 350°F and line two large baking sheets with parchment paper. Space the piroshki seam side up, making sure they do not touch. Brush each one with a beaten egg using a pastry brush. Sprinkle sesame seeds or fresh dill over the top if desired.
Allow them to proof for 30 to 45 minutes until visibly fluffy, then bake at 350°F for 28 to 35 minutes until golden brown on top. The baked version has a softer, more bread-like exterior compared to the crispy shell you get from frying.
What Separates a Good Piroshki from a Great One
- Milk temperature is non-negotiable. Use a thermometer the first time you make these. Between 120°F and 130°F is the window where yeast activates reliably.
- Do not skip the second proof. After shaping, the piroshki need 20 to 30 minutes to puff up again. Skipping this step produces dense, bready results instead of light, airy pockets.
- Keep the filling at room temperature. Cold filling makes the dough contract and can cause the seams to crack during cooking.
- Fry seam side down first. This seals the seam with heat immediately and reduces the chance of the piroshki opening up in the oil.
- Cool before eating. The filling is extremely hot straight from the oil or oven. Allow at least 10 to 15 minutes before biting in.
I personally prefer the fried version here. The contrast between the crispy outer shell and the soft, gooey interior is something the baked version comes close to but never quite matches.
Serving Suggestions
These piroshki work as a snack, a lunch, or a starter at a larger meal. Serve them warm alongside a simple green salad or a bowl of light soup to balance the richness of the filling.
They also hold up well as part of a spread for gatherings. The cheese filling is rich and indulgent in a way that satisfies on its own, though if you are building a full cheesy comfort food table, the layered richness of Baked Mac and Cheese takes a completely different approach to that same craving, oven-baked and scoopable rather than hand-held and portable.
A small dish of sour cream on the side is a traditional accompaniment and works beautifully with the dill and green onion notes in the filling.
Make It Once, Use It All Week
Store leftover piroshki in a covered container in the refrigerator. They keep well and are genuinely good eaten cold, the cheese filling sets up and thickens as it chills, which gives it a different but equally satisfying texture.
To reheat, use the microwave for about 30 seconds for a quick option, or the oven at 425°F for 7 to 9 minutes to bring back some of the exterior crispness. The oven method is worth the extra time if you fried them originally. You will know they are ready when the outside feels firm again and the center is warm all the way through.
FAQs
Can I make egg cheese piroshki ahead of time?
Yes. You can shape the piroshki and refrigerate them (covered) before the second proof. Pull them out about an hour before cooking to let them come to room temperature and finish proofing. They should look visibly puffed before going into the oil or oven.
What is the best substitute for farmer’s cheese?
Cottage cheese is the most accessible swap. Drain it thoroughly through a cheesecloth to remove excess liquid before using. The texture will be slightly softer than tvorog, but the filling will still hold together well once mixed.
How do I know when the frying oil is at the right temperature?
A digital thermometer is the most reliable method. The target range is 275°F to 300°F. If you do not have one, drop a small piece of dough into the oil. It should sizzle steadily and rise to the surface within a few seconds without browning immediately.
Why did my piroshki burst open during frying?
The most likely cause is filling on the seam edges. Even a small amount of moisture or cheese on the seam prevents the dough from bonding properly. Wipe your fingers clean between each piroshki and press the seams firmly before flipping.
Can I freeze piroshki?
Yes, both fried and baked piroshki freeze well. Let them cool completely, then freeze in a single layer before transferring to a container. Reheat from frozen in the oven at 425°F for about 12 to 15 minutes until heated through and the exterior is firm again.
How many piroshki does this recipe make?
This recipe yields 12 piroshki when divided into larger pieces, or 16 smaller ones. Each serving size listed in the recipe is based on 1 fried pie at 454 kcal, 15g protein, and 26g carbohydrates.
Worth Every Minute
These piroshki take time. The dough needs to proof twice, the filling needs to be made from scratch, and you cannot rush the frying without sacrificing the result. That is the honest truth of it.
But what comes out on the other side is something genuinely special: a crispy, golden shell giving way to a warm, creamy, herb-flecked filling that tastes like it came from someone’s grandmother’s kitchen. Give this one a try on a weekend when you have the afternoon free. You might find yourself making a double batch the second time around.
Essential Kitchen Tools
Making egg cheese piroshki? Most failed attempts come from using the wrong pan or heat setup — not the recipe itself.

Want to save this recipe?
Want to save this recipe? Enter your email below, and we'll send it straight to your inbox. Plus, receive new recipes every week!

Comforting Egg Cheese Piroshki Recipe
- Total Time: 3 hours
- Yield: 12 piroshki 1x
Description
Dive into a comforting egg cheese piroshki, featuring a golden crust enveloping a savory filling of hard-boiled eggs, mozzarella, and fresh herbs. Relish the nostalgic flavors of Ukrainian tradition with every bite.
Ingredients
- 1 cup whole milk
- 2 tsp white sugar
- 1 tbsp dry active yeast
- 1 tsp sea salt
- 1/3 cup butter, melted
- 1 large egg
- 3 cups all-purpose flour
- 6 large eggs, hard-boiled and diced
- 1/3 cup mayonnaise
- 1 cup grated mozzarella cheese
- 3 green onions, diced (green parts only)
- 2 tbsp fresh parsley, chopped
- 1/4 cup fresh dill, chopped
- 1 tsp each: dried garlic, dried onion powder
- 2 tsp sea salt
- ground black pepper, to taste
- 1 large egg
- 2 1/2 cups farmer’s cheese (tvorog)
- 3 to 5 cups canola oil, for frying
- 1 large egg, beaten (for baking only)
Instructions
- Heat the milk in a microwave or on the stovetop until it reaches a temperature between 120°F and 130°F. If it’s too cold or too hot, the yeast won’t activate.
- Transfer the milk to a large mixing bowl, whisk in the sugar, and then sprinkle the yeast on top. Let it sit for about 5 minutes until it becomes foamy and fluffy. After that, incorporate the egg, cooled melted butter, and salt, whisking until the egg is fully blended.
- Begin adding the flour gradually, starting with a whisk and then switching to a spatula. Once a dough ball forms, place it on a floured surface.
- Continue adding flour until a soft, non-sticky dough is achieved. Knead the dough for 4 to 6 minutes until it becomes smooth and elastic.
- Return the kneaded dough to the mixing bowl and cover it with a clean towel.
- Position the bowl in a warm area of your kitchen and let the dough rise until it doubles in size, which should take about 1 to 1 ½ hours. A spot near the stove is usually warmer.
Making the Filling
- Place the eggs in a pot filled with cold water. Heat on the stovetop until the water begins to boil. Add salt and set a timer for 10 minutes.
- After cooking, remove the eggs from the heat, drain the boiling water, and fill the pot with cold water and ice to cool the eggs quickly. Peel them once they are cool.
- Chop the cooled eggs and add them to a large mixing bowl. Then, mix in the mayonnaise, egg, mozzarella cheese, and farmer’s cheese.
- Incorporate the fresh dill, parsley, diced green onions, salt, pepper, garlic powder, and onion powder. Stir everything together until well combined.
Shaping the Piroshki
- Gently deflate the risen dough and move it to a floured work surface. Use a knife or bench scraper to cut the dough into 12 or 16 pieces; the piroshki will be smaller if you opt for 16. Cover the pieces with a towel to prevent drying.
- With a floured rolling pin, roll each piece into a circle about 6 inches in diameter (4 inches for smaller piroshki). Add a generous portion of filling to the center, approximately 1/3 to ½ cup.
- Carefully bring the corners of the dough together at the top and pinch the seams to seal, ensuring no filling escapes onto the seams. Refer to the video tutorial for guidance.
- Flip the piroshki over and gently pat them into square shapes. Arrange them on a baking sheet that has been dusted with flour.
Frying Instructions
- Let the piroshki rise for about 30 minutes until the dough is fluffy again.
- Pour about ½ inch of canola oil into a deep pan or pot. Heat the oil over medium heat until it reaches between 275°F and 300°F.
- Carefully place the piroshki seam side down in the hot oil and fry for a few minutes until they turn golden brown on one side. Gently flip them over and fry the other side. Fry 2 to 3 piroshki at a time to avoid overcrowding.
- Transfer the fried piroshki to a wire rack to cool, placing paper towels underneath to absorb excess oil.
Baking Instructions
- Another excellent method for preparing these cheese piroshki is baking. Preheat your oven to 350°F and line two large baking sheets with parchment paper or silicone mats.
- Arrange the piroshki seam side up on the baking sheets, ensuring they do not touch. Beat an egg in a small bowl and brush it over the tops of the piroshki. Optionally, sprinkle sesame seeds or fresh dill on top for garnish.
- Allow the piroshki to rise for 30 to 45 minutes until they become fluffy. Bake them at 350°F for 28 to 35 minutes until they are golden brown on top.
Serving & Storing
- These cheesy piroshki will be very hot right after frying or baking, so let them cool for at least 10 to 15 minutes before serving.
- Store any leftovers in the refrigerator in a covered container or tray. Chilled cheese piroshki are also tasty! Reheat them in the microwave for 30 seconds or in the oven at 425°F for about 7 to 9 minutes.
Notes
TECHNIQUE TIP: Ensure your dough is well-proofed and light before shaping piroshki for a fluffy texture.
STORAGE: Store baked piroshki in an airtight container at room temperature for up to 2 days.
SUBSTITUTION: If tvorog is unavailable, use cottage cheese; rinse and drain well before use.
- Prep Time: 1 hour
- Proofing Time: 90 minutes
- Cook Time: 30 minutes
- Category: Appetizers
- Method: Baked
- Cuisine: Russian/Ukrainian
Nutrition
- Serving Size: 1fried pie
- Calories: 454 kcal
- Sugar: 2 g
- Sodium: 911 mg
- Fat: 32 g
- Saturated Fat: 9 g
- Unsaturated Fat: 21 g
- Trans Fat: 0.3 g
- Carbohydrates: 26 g
- Fiber: 1 g
- Protein: 15 g
- Cholesterol: 161 mg

