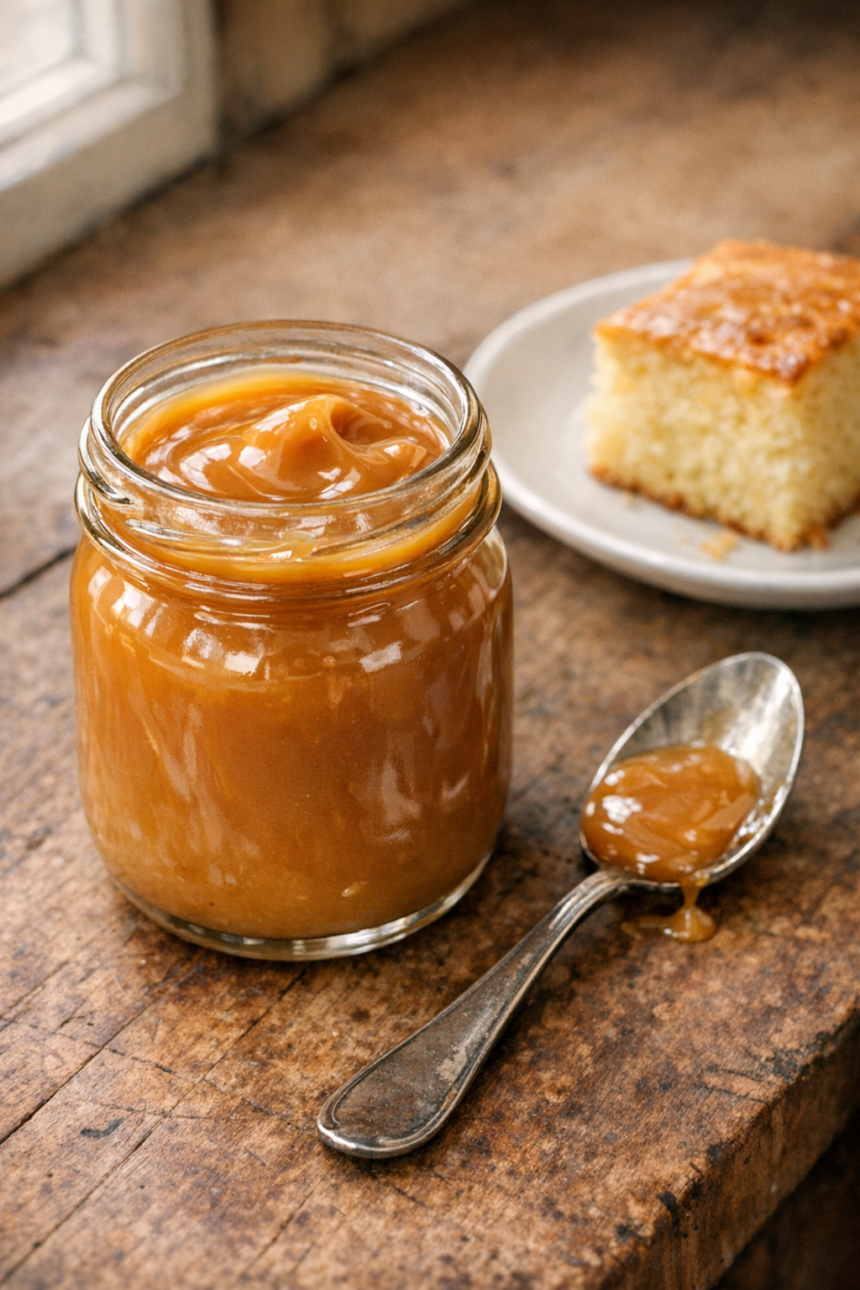
Did you know that you can create restaurant-quality caramel sauce at home without a candy thermometer or any complicated equipment? This foolproof, homemade caramel sauce transforms just five simple ingredients into a thick, buttery, and glossy topping that puts every store-bought version to shame. Moreover, it stays fresh in your refrigerator for up to two weeks, making it the perfect make-ahead treat for busy weeknights and special occasions alike.
I still remember the first time I made caramel sauce from scratch. Consequently, I was amazed at how something so decadent could be so surprisingly simple. The rich, deep caramel aroma filled my kitchen, and I knew immediately that I’d never buy jarred caramel again. Additionally, when you look at the ingredient list on most store-bought versions, corn syrup is often the first ingredient, followed by mysterious “natural flavors” that leave you wondering what you’re really eating.
This homemade caramel sauce recipe offers three incredible advantages: first, it requires no special equipment or candy-making skills; second, it uses only real, recognizable ingredients you probably already have in your pantry; and third, it delivers that irresistible, buttery flavor with a perfect drizzling consistency that works beautifully on everything from ice cream to apple slices. Furthermore, as it cools, it thickens naturally, so you can adjust the consistency based on whether you want a pourable sauce or a thicker dip for caramel apples. Let’s dive into this easy recipe that will become your new go-to dessert topping.
Ingredients for Perfect Homemade Caramel Sauce

Creating silky caramel sauce requires just five essential ingredients that work together to produce that signature rich flavor and smooth texture. Interestingly, the quality of your ingredients directly impacts the final result, so choose the best you can afford.
- 1 cup granulated sugar: The foundation of your caramel, white granulated sugar melts and caramelizes to create that distinctive amber color and complex sweetness. Meanwhile, avoid using brown sugar or alternatives, as they can interfere with the caramelization process.
- 1/3 cup water: This helps dissolve the sugar evenly and prevents crystallization during the initial cooking phase. Subsequently, the water evaporates as the sugar caramelizes.
- 6 tablespoons unsalted butter (softened, cut into cubes): Adds luxurious richness and creates that velvety mouthfeel. Furthermore, softening the butter beforehand ensures it incorporates smoothly without shocking the hot caramel.
- 1/2 cup heavy cream (warmed): Creates the signature creamy texture and stops the cooking process. Additionally, warming it prevents the mixture from seizing when you add it to the hot sugar.
- 1 teaspoon pure vanilla extract: Enhances the caramel’s depth with sweet, aromatic notes that complement the butter and sugar beautifully.
- 1 teaspoon sea salt (or to taste): Balances the sweetness and amplifies all the flavors. Indeed, salted caramel has become wildly popular for good reason.
These straightforward ingredients combine to make between 1 cup and 1 1/4 cups of homemade caramel sauce, with each tablespoon serving containing approximately 112 calories. Therefore, a little goes a long way in adding spectacular flavor to your favorite desserts.
Step-by-Step Instructions for Foolproof Caramel Sauce
Follow these detailed instructions to create perfect caramel sauce every single time. Importantly, patience is your greatest ally in this process, so resist the urge to rush or increase the heat too quickly.
Step 1: Melt the Sugar Without Stirring
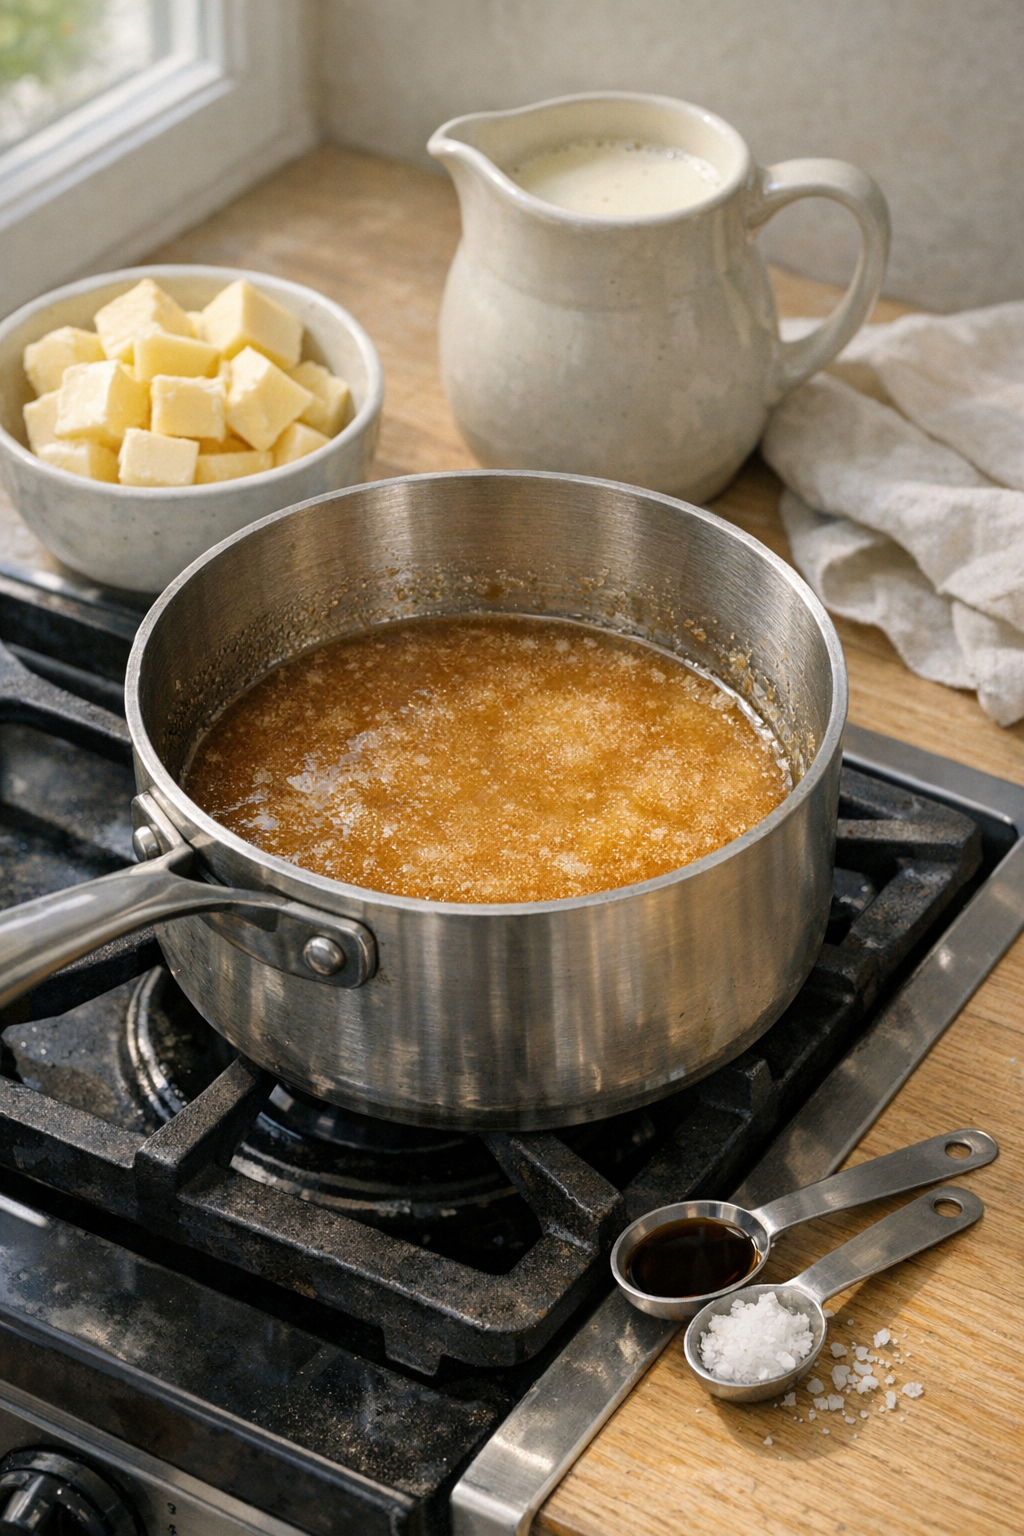
Add the sugar to the bottom of a heavy-bottomed medium saucepan and shake the pan gently to distribute it evenly across the surface. Drizzle the water over the sugar and let it sit for about one minute to fully moisten all the sugar crystals. Critically, do not stir at this point because you don’t want sugar to splash onto the sides of the pan where it can crystallize. Set the pan over medium-low heat and, without stirring, let the sugar dissolve completely until the mixture turns clear, which takes approximately 5 minutes. The mixture should be completely transparent and the sugar fully dissolved before it begins to simmer.
Step 2: Simmer and Swirl Until Light Amber
Without stirring, bring the mixture to a simmer and increase the heat to medium. If you notice crystals forming on the sides of the pan, simply cover with a lid for 30 to 60 seconds; the steam will help dissolve them. Once the caramel starts to take on a little color, swirl the pan occasionally until it reaches a light amber or honey color, which typically takes 5 to 8 minutes. Importantly, avoid letting it brown too much or it will develop a bitter taste. As you swirl toward the end, those stubborn sugar crystals stuck to the sides should melt into the sauce naturally.
Step 3: Add the Butter Gradually
Reduce the heat to medium-low and carefully whisk in half of the softened butter cubes. Then, stir in the remaining butter. The mixture will bubble vigorously and dramatically at this stage, which is completely normal and expected. Keep whisking continuously until the butter is fully incorporated and the mixture becomes smooth. If the sauce separates or looks broken, simply remove it from the heat and whisk energetically until it comes back together.
Step 4: Stream in the Warm Cream
Slowly stream in the warm heavy cream while whisking constantly and steadily. Again, the mixture will bubble up intensely and release hot steam, so be cautious. Keep whisking until the sauce becomes completely smooth and homogenous. If you want to double-check doneness with a thermometer, the caramel sauce is ready when it reaches 220 degrees Fahrenheit.
Step 5: Finish with Vanilla and Salt
Turn off the heat completely and whisk in the vanilla extract and sea salt. Taste the sauce carefully (it’s hot!) and adjust the salt according to your preference. Some people love a more pronounced salted caramel flavor, while others prefer a subtler hint.
Step 6: Cool and Store Properly
Let the sauce cool slightly before using it. Remember, it will thicken considerably as it cools to room temperature. Transfer to an airtight container and store in the refrigerator for up to two weeks. When refrigerated, it will firm up significantly, so re-warm it gently in the microwave or on the stovetop when you’re ready to drizzle it over your favorite treats.
Healthier Alternatives for Caramel Sauce
While traditional caramel sauce is undeniably indulgent, you can make several thoughtful modifications to lighten it up without sacrificing too much of that beloved flavor. Consequently, these alternatives allow you to enjoy caramel more often while being mindful of your health goals.
- Use coconut sugar instead of white sugar: Coconut sugar has a lower glycemic index and adds a subtle caramel-like flavor naturally. However, it will produce a darker sauce with slightly different flavor notes.
- Replace heavy cream with half-and-half or whole milk: This reduces the fat content while still providing creaminess. Nevertheless, the sauce will be slightly thinner and less rich.
- Try coconut cream for a dairy-free version: Full-fat coconut cream creates a luscious dairy-free alternative that works beautifully for vegan diets. Additionally, it adds a subtle tropical note that many people love.
- Reduce the butter to 4 tablespoons: You’ll still get a smooth sauce with noticeably less saturated fat. Furthermore, adding an extra tablespoon of cream can help compensate for the reduced richness.
- Use a natural sugar substitute like allulose or monk fruit sweetener: These alternatives caramelize differently, so results may vary. Therefore, expect some experimentation to achieve the right consistency and flavor.
- Add a pinch of cinnamon or espresso powder: These additions boost flavor complexity without adding calories, making each spoonful taste even more decadent.
Keep in mind that any substitutions will alter the final texture and taste somewhat. Therefore, I recommend making the classic version first to establish a baseline before experimenting with healthier modifications.
Creative Serving Suggestions for Caramel Sauce
One of the best aspects of homemade caramel sauce is its remarkable versatility. Indeed, once you have a jar in your refrigerator, countless dessert possibilities open up instantly. Here are some of my favorite ways to enjoy this liquid gold:
- Classic ice cream topping: Drizzle warm caramel over vanilla, chocolate, or butter pecan ice cream for an instant sundae upgrade. Moreover, add some chopped nuts and whipped cream for an extra-special treat.
- Apple slices with caramel dip: This makes an incredibly satisfying after-school snack or healthy dessert alternative. Similarly, try it with pear slices or banana coins for variety.
- Coffee and latte enhancer: Stir a spoonful into your morning coffee or drizzle it over the foam of your latte for a homemade caramel macchiato. Furthermore, it’s significantly better than any coffee shop syrup.
- Cheesecake and cake drizzle: Transform plain cheesecake, pound cake, or angel food cake into something extraordinary with elegant caramel ribbons. Consequently, your guests will think you spent hours on presentation.
- Caramel apple creation: In the fall, use thickened caramel to coat whole apples on sticks for classic caramel apples. Additionally, roll them in chopped nuts, mini chocolate chips, or crushed cookies.
- Stuffed date filling: Fill pitted Medjool dates with a small amount of caramel and top with a pecan half for an elegant, naturally sweet treat.
- Pancake and waffle topping: Replace maple syrup with warm caramel sauce on weekend pancakes or Belgian waffles. Indeed, your family will request this combination again and again.
- Brownie and cookie dip: Serve warm caramel alongside fresh-baked brownies or cookies for an interactive dessert experience at parties.
- Yogurt parfait layer: Swirl caramel into Greek yogurt with granola and fresh fruit for a breakfast that feels like dessert.
The possibilities are truly endless, and you’ll quickly discover your own favorite combinations once you start experimenting with this versatile caramel sauce.
Common Mistakes to Avoid When Making Caramel
Even though this is a foolproof recipe, certain pitfalls can still occur if you’re not careful. Therefore, awareness of these common mistakes will help you achieve perfect results every time you make caramel sauce.
- Stirring during the initial melting phase: This is the number one mistake beginners make. Stirring can cause sugar crystals to splash onto the pan sides where they’ll crystallize and create a grainy texture. Instead, simply swirl the pan gently once the mixture starts to color.
- Using high heat to speed things up: High heat causes uneven caramelization and increases the risk of burning. Consequently, you’ll end up with bitter spots and potentially ruined caramel. Patience truly pays off here.
- Letting the caramel get too dark: Once sugar passes that light amber stage, it quickly develops bitter, burnt flavors. Therefore, watch carefully and remove from heat as soon as you see honey-colored tones.
- Adding cold cream or butter: This causes the caramel to seize up and can create lumps. Always warm your cream and soften your butter to room temperature beforehand.
- Panicking when it bubbles vigorously: The violent bubbling when you add butter and cream is normal and expected. Simply keep whisking and it will calm down and smooth out.
- Not using a heavy-bottomed pan: Thin pans create hot spots that lead to uneven cooking and burning. Invest in a quality heavy-bottomed saucepan for consistent results.
- Skipping the salt: Salt isn’t optional; it’s essential for balancing the sweetness and enhancing all the other flavors. Without it, your caramel will taste one-dimensional.
- Tasting or touching hot caramel: Caramel reaches extremely high temperatures and can cause serious burns. Always let it cool adequately before tasting or touching utensils.
By avoiding these common pitfalls, you’ll create smooth, perfectly flavored homemade caramel sauce that rivals any professional pastry kitchen.
Storing Tips for Homemade Caramel Sauce
Proper storage ensures your caramel sauce stays fresh, flavorful, and ready to use whenever a craving strikes. Fortunately, caramel stores exceptionally well when handled correctly.
- Refrigerator storage: Transfer cooled caramel to an airtight glass jar or container and store in the refrigerator for up to two weeks. Glass works better than plastic because it doesn’t absorb flavors or odors.
- Expect thickening when cold: Refrigerated caramel becomes quite firm and thick. This is completely normal and doesn’t indicate any problem with your sauce.
- Reheating methods: Warm refrigerated caramel gently in the microwave in 15-second intervals, stirring between each, or place the jar in a bowl of hot water until it reaches your desired consistency. Alternatively, warm it in a small saucepan over low heat.
- Freezer storage for longer keeping: Caramel freezes beautifully for up to three months. Portion it into smaller containers or ice cube trays so you can thaw only what you need.
- Thawing frozen caramel: Move it to the refrigerator overnight to thaw slowly, then rewarm as needed. Consequently, it will taste just as fresh as the day you made it.
- Avoid cross-contamination: Always use a clean spoon when scooping out caramel to prevent introducing bacteria that could shorten its shelf life.
- Check for freshness: If you notice any off smells, mold, or separation that won’t come together with stirring, it’s time to discard and make a fresh batch.
With these storage techniques, you can always have restaurant-quality caramel sauce ready to elevate any dessert at a moment’s notice.
Why This Caramel Sauce Recipe Works Every Time
The beauty of this homemade caramel sauce lies in its thoughtfully developed technique that eliminates the guesswork and stress typically associated with candy-making. Unlike recipes that require precise temperature monitoring and split-second timing, this method uses visual cues and gentle heat to guide you to success.
Starting with medium-low heat gives the sugar crystals time to dissolve completely before caramelization begins. Consequently, you avoid the crystallization problems that plague many home cooks. Additionally, the water acts as insurance against burning by creating a buffer that allows for more gradual, even cooking.
The technique of adding softened butter in stages prevents temperature shock that causes separation. Similarly, warming the cream beforehand ensures it incorporates smoothly without causing the mixture to seize. These small but crucial details transform a potentially finicky recipe into one that even beginners can master on their first attempt.
Furthermore, this recipe creates a sauce with the ideal consistency for multiple uses. When warm, it’s perfectly pourable for drizzling over desserts. As it cools, it thickens into a luxurious dip. Therefore, you don’t need different recipes for different applications; this single versatile version does it all.
Bringing It All Together
Making homemade caramel sauce from scratch is genuinely one of the most rewarding kitchen projects you can undertake. With just five simple ingredients and about 15 minutes of your time, you’ll create a luxurious topping that outshines anything you can buy at the store. Moreover, once you taste the difference, you’ll understand why homemade is always worth the minimal effort.
This foolproof recipe eliminates the intimidation factor of candy-making by relying on simple visual cues rather than thermometers and precise temperatures. Consequently, both beginners and experienced cooks achieve consistent, restaurant-quality results every single time. The thick, glossy texture, deep caramel aroma, and perfectly balanced sweet-salty flavor make this sauce irresistible on everything from ice cream to fresh apple slices.
Remember that caramel thickens considerably as it cools, stores beautifully in the refrigerator for up to two weeks, and can even be frozen for longer keeping. Therefore, you can make a batch whenever you have a few spare minutes and enjoy it throughout the week on various desserts and snacks.
I encourage you to try this recipe soon and discover for yourself just how easy and delicious homemade caramel sauce truly is. Once you do, please come back and share your experience in the comments below. What did you drizzle it over first? Did you prefer it as a thin sauce or thicker dip? Your feedback helps other readers and creates a wonderful community of home cooks supporting each other. Happy cooking, and enjoy every buttery, caramel-y spoonful!
Frequently Asked Questions About Caramel Sauce
Can I make caramel sauce without a candy thermometer?
Absolutely! This recipe is specifically designed to work perfectly without a thermometer. Instead of relying on precise temperature readings, you’ll watch for visual cues like the mixture turning clear, then gradually taking on a light amber or honey color. Simply swirl the pan and monitor the color change, removing it from heat once it reaches that beautiful golden hue. Consequently, you’ll achieve perfect results every time without any special equipment.
Why did my caramel sauce crystallize and turn grainy?
Crystallization typically occurs when sugar crystals on the sides of the pan fall back into the mixture or when you stir too early in the process. To prevent this, avoid stirring during the initial melting phase and instead gently swirl the pan. If crystals do form on the sides, cover the pan with a lid for 30 to 60 seconds so the steam dissolves them. Additionally, make sure all your sugar is completely dissolved before the mixture begins to simmer.
How can I fix separated or broken caramel sauce?
If your caramel separates when you add the butter or cream, don’t panic! Simply remove the pan from heat immediately and whisk vigorously and continuously until it comes back together. The separation usually happens due to temperature shock, so ensuring your butter is softened and your cream is warmed beforehand prevents this issue. Furthermore, adding the butter in two stages rather than all at once helps maintain a stable emulsion.
What’s the best way to reheat thickened caramel sauce?
Refrigerated caramel becomes quite firm, but it’s easy to bring back to the perfect drizzling consistency. Microwave it in a microwave-safe container in 15-second intervals, stirring between each burst, until it reaches your desired texture. Alternatively, place the sealed jar in a bowl of hot water for several minutes, or warm it gently in a small saucepan over low heat while stirring. Consequently, you’ll have smooth, pourable caramel in just moments.
Can I make this caramel sauce dairy-free or vegan?
Yes, you can create a delicious dairy-free version by substituting full-fat coconut cream for the heavy cream and using vegan butter or coconut oil instead of regular butter. The texture will be slightly different, and you’ll notice a subtle coconut flavor, but it’s still wonderfully rich and satisfying. Moreover, this adaptation works perfectly for those with dairy allergies or following a plant-based diet.
How long does homemade caramel sauce last?
When stored properly in an airtight container in the refrigerator, your homemade caramel sauce will stay fresh for up to two weeks. For even longer storage, you can freeze it for up to three months. Always use a clean utensil when scooping out caramel to avoid introducing bacteria. If you notice any off odors, visible mold, or unusual separation, it’s best to discard it and make a fresh batch.
What can I do if my caramel tastes burnt or bitter?
Unfortunately, once caramel has burnt, there’s no way to fix it; you’ll need to start over. Burnt caramel develops when the sugar cooks beyond the light amber stage into dark brown territory. To prevent this, watch the color carefully and remove the pan from heat as soon as you see that honey-colored hue. Remember, the caramel continues cooking from residual heat even after you remove it from the burner, so err on the side of slightly lighter rather than darker.
Can I reduce the sugar in this recipe to make it less sweet?
While you technically can reduce the sugar slightly, caramel is fundamentally a candy made from caramelized sugar, so dramatically reducing it will change the entire nature of the recipe. The chemistry of caramelization requires sufficient sugar to work properly. Instead of reducing sugar, I recommend increasing the salt slightly to create a more pronounced salted caramel that balances the sweetness. Additionally, serving smaller portions allows you to enjoy the full flavor while consuming less sugar overall.
Tools You’ll Need
Essential Kitchen Tools
Everything you need to make cooking easier and more enjoyable


Must Try Recipes
- 15-Minute Salted Caramel Sauce
Quick, salted caramel sauce in just 15 minutes. - Apple Fries With Caramel Dip
Crispy apple fries paired with sweet caramel dip. - Whipped Cream
Light and fluffy topping perfect for desserts. - Lemon Curd
Tangy spread that brightens muffins and scones. - Homemade Nutella
Creamy chocolate-hazelnut spread made from scratch.

Want to save this recipe?
Want to save this recipe? Enter your email below, and we'll send it straight to your inbox. Plus, receive new recipes every week!
Easy Homemade Caramel Sauce
- Total Time: 20 minutes
Description
A rich and silky caramel sauce made in minutes with sugar, butter, cream, vanilla, and salt.
Ingredients
- 1 cup granulated sugar
- 1/3 cup water
- 6 Tbsp unsalted butter, softened and cubed
- 1/2 cup warm heavy cream
- 1 tsp pure vanilla extract
- 1 tsp sea salt (or to taste)
Instructions
- Heat sugar and water: In a heavy-bottomed saucepan, spread sugar evenly and drizzle water over it. Let sit for 1 minute without stirring.
- Dissolve and simmer: Place over medium-low heat. Let sugar dissolve fully until clear, about 5 minutes. Without stirring, bring to a simmer on medium heat, swirling occasionally. Cook until light amber, 5–8 minutes.
- Incorporate butter: Reduce heat to medium-low. Whisk in half of the butter cubes, then add the rest. Continue whisking until fully combined.
- Add cream: Slowly pour in warm cream while whisking constantly. Cook until smooth, then remove from heat.
- Finish sauce: Stir in vanilla and salt. Taste and adjust seasoning as needed.
- Cool and store: Let the sauce cool slightly—it will thicken as it cools. Store in an airtight container in the refrigerator for up to 2 weeks. Rewarm gently before serving.
- Prep Time: 5 minutes
- Cook Time: 15 minutes
- Category: Condiment
- Cuisine: American
Nutrition
- Serving Size: 1 Tablespoon
- Calories: 112 kcal
- Sugar: 13 g
- Sodium: 148 mg
- Fat: 7 g
- Saturated Fat: 4 g
- Unsaturated Fat: 2.3 g
- Trans Fat: 0.2 g
- Carbohydrates: 13 g
- Fiber: 0 g
- Protein: 0.3 g
- Cholesterol: 20 mg