


Making lemon curd at home sounds intimidating until you realize it comes together in about 25 minutes with five ingredients you likely already have. The store-bought version is convenient, but once you taste the difference, there is no going back. This recipe produces a lemon curd that is bright, buttery, and silky smooth, with a texture that coats a spoon and a flavor that genuinely tastes like sunshine in a jar.
Why This Lemon Curd Works (Before You Even Start)
Most beginner attempts at lemon curd go wrong in one of two places: the heat is too high, or the butter is added warm. Both mistakes produce a grainy, curdled mess instead of that glossy, velvety spread you are after.
The cold butter finish is the real secret here. Adding cold, cubed butter off the heat does two things at once: it cools the mixture quickly to stop the eggs from overcooking, and it emulsifies into the curd to create that signature silky mouthfeel. Warm butter simply melts in without integrating properly.
The lemon zest and sugar are rubbed together before anything hits the stove. This step pulls the essential oils from the zest into the sugar, which means more concentrated lemon flavor in every bite, not just tartness from the juice.
What You Need: Lemon Curd Ingredients
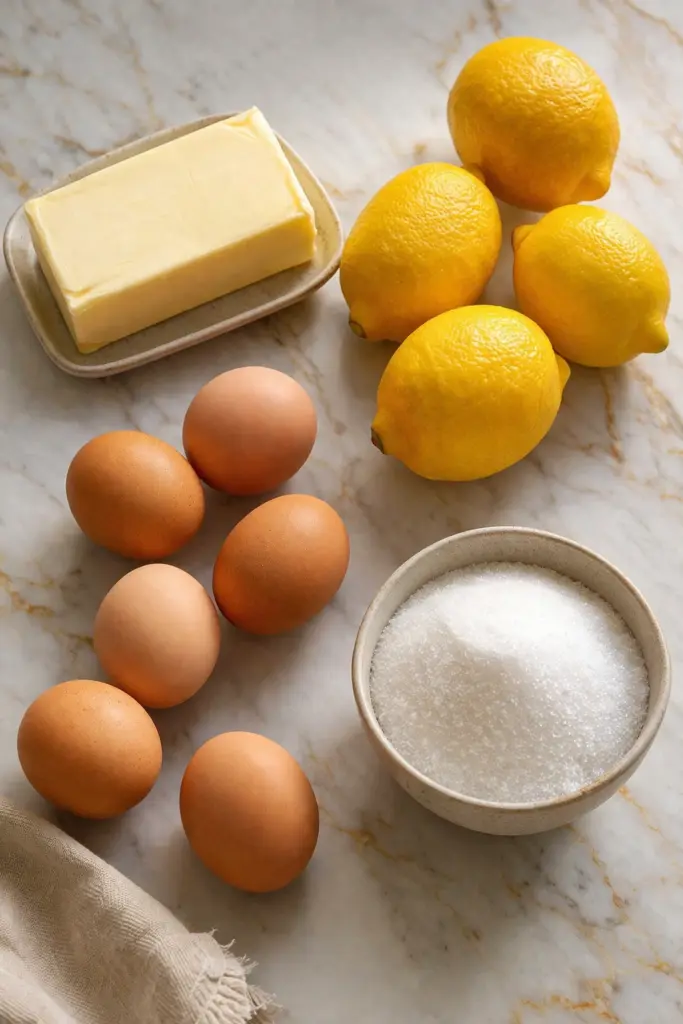
- 1 cup (200g) granulated sugar – the base that balances the tartness and helps the curd set
- 2 tablespoons lemon zest (from about 2 lemons) – where most of the aromatic lemon flavor actually lives
- 6 large egg yolks – these thicken the curd and give it that beautiful golden color
- 7 tablespoons (100mL) fresh lemon juice – always fresh, never bottled
- ½ cup (113g) unsalted butter, cold – cold is non-negotiable for the right texture
If you only have salted butter on hand, it will still work, though the flavor will be slightly different. For the egg yolks, the deeper orange the yolk, the richer and more golden your finished curd will look. Duck eggs, if you can find them, produce an especially rich result.
Why Most Homemade Lemon Curd Fails (and How to Fix It)
Before walking through the steps, it helps to know where things typically go sideways. These are the most common mistakes, and all of them are avoidable.
- Cooking on too-high heat: The egg yolks scramble instead of thickening gradually. Keep the burner on low the entire time, no shortcuts.
- Skipping the zest-sugar rub: You lose a significant amount of lemon flavor. Even two minutes of rubbing by hand makes a real difference in the final taste.
- Adding warm butter: The curd will not emulsify properly and may look greasy. Always use cold butter, cut into tablespoon-sized cubes, added off the heat.
- Not straining the egg yolks: The chalaza (that white stringy bit attached to the yolk) will cook into an unpleasant texture in the finished curd. Strain the yolks before they go in.
- Covering without plastic wrap touching the surface: A skin forms on top as it cools. Press plastic wrap directly onto the surface of the curd before refrigerating.
Step-by-Step Instructions
Step 1: Extract Maximum Lemon Flavor from the Zest
Wash your lemons thoroughly, then zest two of them until you have about 2 tablespoons of zest. Add the zest to 1 cup (200g) of granulated sugar and either pulse them together in a food processor or rub them between your fingers for a couple of minutes. You will know this step is working when the sugar looks slightly damp and takes on a pale yellow color, and the smell shifts from plain sugar to something intensely lemony.
One thing to watch: if you are rubbing by hand, use clean, dry hands. Any moisture on your hands can cause the sugar to clump unevenly.
Step 2: Juice the Lemons to Measure Precisely
Roll the lemons firmly on the counter before cutting them open. This breaks down the internal membranes and makes juicing much easier. Squeeze until you reach 7 tablespoons (100mL) of juice, then strain out any seeds. Set the juice aside separately from your lemon sugar.
Step 3: Build a Smooth, Stable Egg Base
Strain 6 large egg yolks directly into a saucepan. Straining removes the chalaza before cooking, which prevents any unwanted texture in the finished curd. Using a whisk, beat the yolks lightly, then add the lemon sugar and whisk until the mixture looks pale and slightly thickened. Drizzle in the lemon juice gradually while stirring, so the acid incorporates evenly rather than shocking the yolks.
Step 4: Cook Low and Slow Until the Curd Coats a Spoon
Place the saucepan over low heat and whisk constantly. Do not walk away, and do not turn up the heat to speed things along. After several minutes, you will notice the color deepening slightly and the texture shifting from watery to something that clings to the whisk. Dip a wooden spoon into the mixture: if a line drawn through the coating holds its shape cleanly, the curd is ready. If it slides off immediately, keep going.
If the mixture starts to look foamy and frothy, that is normal. Keep whisking. It will come together as it thickens. If you see any solid bits forming at the edges of the pan, your heat is too high. Pull the pan off immediately and whisk vigorously.
Step 5: Finish with Cold Butter Off the Heat
Remove the pan from the heat. Cut ½ cup (113g) of cold unsalted butter into tablespoon-sized cubes and add them to the hot curd. Stir until every piece has melted and the mixture looks glossy and smooth. The curd will loosen slightly at this stage, which is expected. As the butter cools, it will thicken the curd back up and give it that velvety, melt-on-your-tongue quality that makes this recipe worth making.
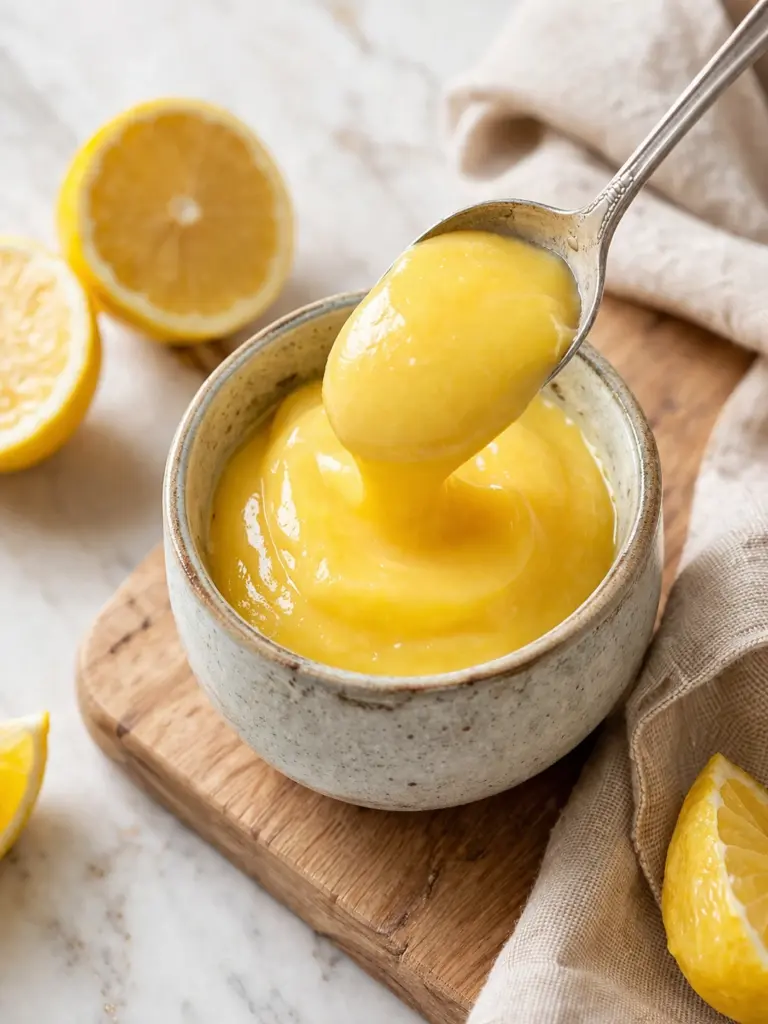
Step 6: Strain for a Silky Finish (Optional but Recommended)
Pour the curd through a fine mesh strainer into a mixing bowl. This removes any bits of zest and any egg that may have cooked slightly faster than the rest. The result is a curd so smooth it almost looks like it came from a professional kitchen. Personally, I never skip this step when I plan to pipe the curd into cakes or tarts, because the texture difference is immediately noticeable.
Step 7: Cool Properly to Set the Texture
Transfer the strained curd to a sealable container or a wide bowl. If using a bowl, press plastic wrap directly onto the surface of the curd to prevent a skin from forming. Allow it to cool at room temperature for an hour or two before using, or refrigerate it. The curd will thicken considerably as it chills, reaching that spreadable, spoonable consistency you are after.
What Separates a Good Lemon Curd from a Great One
- Use fresh lemon juice every time. Bottled juice lacks the brightness that makes this recipe stand out. The difference is immediately noticeable in the final flavor.
- Rub the zest into the sugar properly. Even if you skip the food processor, spend at least two minutes rubbing by hand. The oils released at this stage are what give the curd its depth.
- Keep the heat low throughout. Lemon curd is not a recipe that rewards impatience. Low and slow is the only way to get a smooth, creamy result.
- Use a wide, shallow bowl to cool. More surface area means the curd cools faster and sets more evenly. A pie dish works well if you do not have a large shallow bowl.
- Taste before straining. If you want a more pronounced tartness, you can stir in an extra splash of lemon juice at this stage, before the curd sets.
Ways to Use Your Lemon Curd
Spread it on scones with clotted cream for a classic pairing where the richness of the cream balances the bright acidity of the curd. Layer it between cake tiers for a filling that stays moist and flavorful without being heavy. Spoon it over pavlova, where the crisp meringue and soft center create a contrast that makes the lemon flavor pop even more.
It also works beautifully stirred into buttercream for a lemon frosting that actually tastes like lemon, not just sugar. Fill tart shells, macarons, or sandwich cookies with it. Or, honestly, eat it straight from a spoon. No judgment.
Make It Once, Use It All Week
Once cooled, lemon curd keeps in a sealed container in the refrigerator for up to one week. For longer storage, it freezes well for up to two months. Thaw overnight in the refrigerator rather than at room temperature to preserve the texture.
You will know the curd has stored correctly when it still looks glossy and smooth after chilling. If it looks separated or watery, it was likely stored without the plastic wrap touching the surface. A quick stir will usually bring it back together if the separation is minor.
A Bright, Zingy Spread Worth Making Again
Lemon curd is one of those recipes that feels far more impressive than the effort it actually requires. Five ingredients, about 25 minutes of active time, and you end up with something genuinely special. The first time I made this, I was skeptical that such a short ingredient list could produce something so rich and layered in flavor. It did, and I have made it regularly ever since.
Give this one a try the next time you have a few lemons on hand. You might find yourself making excuses to bake things just so you have a reason to use it.
FAQs
Why did my lemon curd turn out lumpy or grainy?
This usually means the heat was too high and the egg yolks began to scramble before the mixture thickened evenly. Always cook on low heat and whisk constantly. If you catch it early, strain the curd immediately through a fine mesh strainer, which can rescue a slightly grainy batch before it sets.
Can I use bottled lemon juice instead of fresh?
Technically yes, but the flavor will be noticeably flatter. Fresh lemon juice has a brightness and complexity that bottled juice lacks. For a recipe this simple, fresh juice makes a significant difference in the finished result.
How do I know when the lemon curd is thick enough to take off the heat?
Dip a wooden spoon into the curd and draw a line through the coating with your finger. If the line holds its shape cleanly without the curd running back together, it is ready. The mixture will also look slightly deeper in color and cling to the whisk rather than dripping off freely.
Can I make lemon curd with whole eggs instead of just yolks?
You can, but the texture will be slightly less rich and the color less golden. Egg yolks contain more fat than whites, which is what gives lemon curd its characteristic creaminess. Yolk-only recipes tend to produce a smoother, more luxurious result.
How long does homemade lemon curd last?
Stored in a sealed container in the refrigerator, it keeps for up to one week. In the freezer, it lasts up to two months. Always press plastic wrap directly onto the surface before sealing to prevent a skin from forming during storage.
Can this recipe be used to make lime or orange curd?
Yes, and it works beautifully. Substitute the lemon zest and juice with an equal amount of lime or orange zest and juice. Lime curd will be more tart and slightly less sweet, while orange curd will be milder and more floral. The method stays exactly the same.
Essential Kitchen Tools
Making Lemon Curd? Most failed attempts come from using the wrong pan or heat setup — not the recipe itself.
Must Try Recipes
- Best Ever Lemon Cheesecake (Easy, Creamy & Foolproof) — A creamy pairing that complements the zesty lemon curd.
- Fresh Lemon Ricotta Pancakes — Perfect for a brunch spread with a citrusy twist.
- Strawberry Lemonade Bars: How to Make the Ultimate Sweet Treat — Enhance these bars with an extra lemony kick.

Want to save this recipe?
Want to save this recipe? Enter your email below, and we'll send it straight to your inbox. Plus, receive new recipes every week!

Beginner-Friendly Lemon Curd Recipe
- Total Time: 2 hours 25 minutes
- Yield: 1.5 cups 1x
Description
This easy lemon curd recipe is creamy, delicious and so refreshing. Perfect for dessert or breakfast! Ready in under 15 minutes.
Ingredients
- granulated sugar, 1 cup (200g)
- lemon zest, 2 tablespoons (from 2 lemons)
- large egg yolks, 6
- lemon juice, 7 tablespoons (100mL)
- unsalted butter, ½ cup (cold, 113g)
Instructions
- Zest the lemons. If you have a food processor, pulse the lemon zest with the sugar to extract the oils, though this step is optional.
- Juice the lemons until you have approximately half a cup of juice, ensuring to strain out any seeds.
- In a pot, strain the egg yolks and lightly beat them with a wire whisk. Gradually whisk in the sugar until the mixture lightens in color, then slowly stir in the lemon juice.
- Heat the mixture on low, stirring continuously with a wire whisk until it thickens, begins to bubble, and coats the back of a wooden spoon.
- Remove the pot from the heat and add the cold, cubed butter, mixing until it melts completely.
- Optionally, strain the final mixture to eliminate any bits of zest, resulting in a silky smooth curd.
- Transfer the curd to a sealable container or bowl. If using a bowl, cover the surface with plastic wrap to prevent a skin from forming.
Notes
Technique Tip: Stir continuously to prevent curdling and achieve a smooth texture.
Storage and Shelf Life: Store in an airtight container in the fridge for up to two weeks.
Substitution or Scaling: Substitute lime juice for a tangier twist or double the ingredients to make a larger batch.
- Prep Time: 15 minutes
- Cook Time: 10 minutes
- Category: Dessert
- Cuisine: American
Nutrition
- Calories: 1307 kcal
- Sugar: 136 g
- Sodium: 45 mg
- Fat: 81 g
- Saturated Fat: 46 g
- Unsaturated Fat: 29 g
- Trans Fat: 2 g
- Carbohydrates: 142 g
- Fiber: 1 g
- Protein: 12 g
- Cholesterol: 940 mg

