
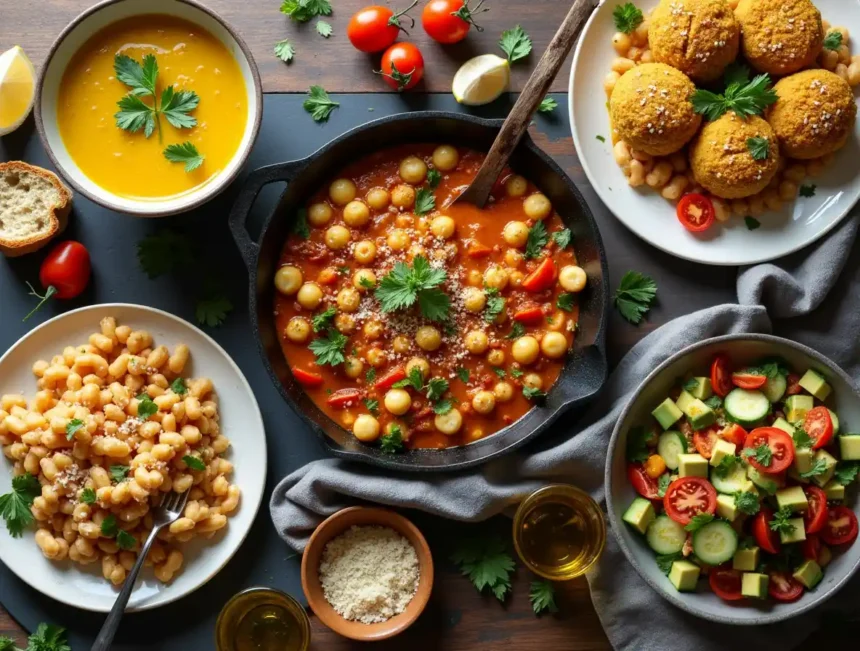
There’s something truly magical about vegetarian cooking, especially when it’s infused with the vibrant flavors of the Mediterranean. Whether you’re craving a comforting bowl of soup, crispy falafel patties, or a refreshing chickpea salad, these five vegetarian recipes are here to inspire your next meatless meal. Packed with wholesome ingredients like fresh herbs, spices, and nutrient-rich vegetables, these dishes prove that vegetarian food can be as satisfying as it is healthy. Let’s dive into this collection of Mediterranean-inspired vegetarian recipes that will elevate your weeknight dinners, lunches, and even snack times!
If you’re looking for ways to incorporate more plant-based meals into your diet, these recipes are perfect. From hearty soups to vibrant salads, each dish celebrates the beauty of vegetarian cooking while offering simplicity, nutrition, and bold flavors.
1. Mediterranean Detox Cabbage Soup: A Bowl of Comfort and Health

This Mediterranean Detox Cabbage Soup is where health meets comfort in a bowl. Made with warming spices like turmeric, cumin, and coriander, this soup is as nourishing as it is flavorful. The star ingredient? Cabbage! Known for the health benefits of cabbage , this superfood supports digestion, boosts immunity, and adds a silky texture to this hearty soup.
Key Ingredients:
- Cabbage: Green cabbage is preferred for its mild sweetness and soft texture when cooked. It’s packed with fiber and antioxidants, making it a nutritional powerhouse.
- Aromatics: Onions, garlic, and ginger add layers of flavor and digestive benefits.
- Spices: Turmeric, cumin, and coriander give the soup warmth and depth, while Aleppo pepper adds mild heat.
- Vegetable Broth: Low-sodium broth enhances the soup’s flavor while keeping it light.
- Lemon Juice & Zest: Brightens the dish and balances the spices.
- Fresh Herbs: Parsley and green onions add a fresh finish.
Detailed Instructions:
- Sauté the Aromatics: Heat 2 tablespoons of extra virgin olive oil in a large Dutch oven or cooking pot over medium heat. Once the oil shimmers, add the chopped onion and cook, stirring occasionally, until softened, about 3–4 minutes. Add the minced garlic and continue to sauté for another minute, ensuring the garlic doesn’t burn. Adjust the heat as needed to prevent browning.
- Soften the Vegetables: Add the chopped cabbage, celery, carrots, and seasonings; cook until softened. Cover the pot partially to allow the cabbage to wilt and soften, which should take about 5–7 minutes. Stir occasionally to prevent sticking.
- Add the Spices: Sprinkle in the turmeric, cumin, coriander, and Aleppo pepper. Stir well to coat all the vegetables evenly with the spices. This step helps release the oils in the spices, enhancing their flavor.
- Simmer the Soup: Pour in the diced tomatoes (with their juices) and the vegetable broth. Increase the heat to bring the mixture to a boil. Once boiling, reduce the heat to medium-low and cover the pot partially, leaving a small opening at the top. Let the soup simmer gently for 20–25 minutes, or until the vegetables are tender and the flavors have melded together.
- Finish and Serve: Turn off the heat and stir in the chopped parsley, sliced green onions, grated ginger, lemon zest, and lemon juice. Taste and adjust the seasoning if needed. Ladle the soup into bowls and serve hot. Pair it with crusty bread for an extra cozy touch.
Key Preparation Tips:
- Start by heating the olive oil until it shimmers before adding the aromatics. This ensures the onions and garlic cook evenly without burning.
- Chop the cabbage, celery, and carrots into uniform pieces to ensure they cook evenly.
- Cover the pot partially while softening the vegetables to trap steam, which helps the cabbage wilt faster.
- Stir the spices into the softened vegetables to toast them slightly, releasing their essential oils and maximizing flavor.
- Simmer the soup uncovered for the last 5 minutes to reduce excess liquid and concentrate the flavors.
Serving Suggestions:
- Serve the soup with slices of warm whole-grain bread or sourdough for dipping.
- Top each bowl with a dollop of Greek yogurt or a drizzle of extra virgin olive oil for added richness.
- Pair the soup with a side of mixed greens tossed in a light vinaigrette for a complete meal.
Storage & Reheating Tips:
- Allow the soup to cool completely before transferring it to an airtight container. Store it in the refrigerator for up to 4 days.
- For longer storage, freeze the soup in portion-sized containers for up to 3 months. Thaw overnight in the fridge before reheating.
- When reheating, warm the soup on the stovetop over low heat. Add a splash of vegetable broth or water if the soup has thickened during storage.
- Avoid freezing the soup with fresh herbs or lemon juice, as these ingredients lose their vibrancy. Add them after reheating for the best flavor.
This vegetarian soup is perfect for detoxifying your body while keeping your taste buds happy. It’s vegan, gluten-free, and packed with nutrients—what more could you ask for?
2. Garlic Parmesan White Beans: Creamy and Flavorful in Minutes
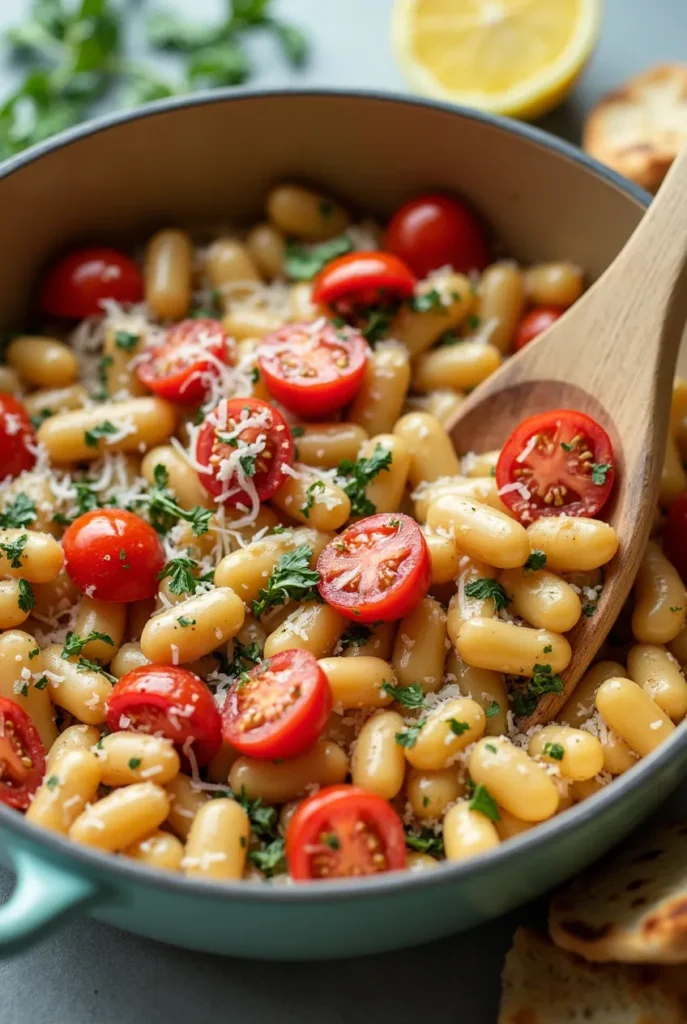
When you need a quick yet impressive vegetarian dish, these Garlic Parmesan White Beans are your answer. Ready in just 15 minutes, this recipe combines creamy cannellini beans, juicy cherry tomatoes, and bold Mediterranean spices for a dish that’s both comforting and elegant.
Key Ingredients:
- White Beans: Cannellini or Great Northern beans are best for their creamy texture.
- Garlic: Fresh garlic, thinly sliced or minced, adds deep flavor.
- Parmesan Cheese: Adds a savory, umami-rich touch.
- Broth or Water: Used to create a silky sauce that coats the beans.
- Lemon Juice: Brightens up the flavors.
- Fresh Herbs: Parsley or thyme for a fresh, aromatic finish.
Detailed Instructions:
- Sauté the Garlic: In a large skillet, heat 2 tablespoons of extra virgin olive oil over medium heat. Add the minced garlic and cook, stirring frequently, until golden and fragrant. Be careful not to let the garlic burn, as it can turn bitter.
- Cook the Beans: Add the drained cannellini beans to the skillet along with ½ cup of water. Season with kosher salt, black pepper, Aleppo pepper, and cumin. Stir to combine. Add the halved cherry tomatoes and cook, stirring occasionally, for about 10 minutes, or until the beans are heated through and the tomatoes have softened slightly.
- Add Fresh Herbs and Cheese: Stir in the chopped parsley, shaved Parmesan, and grated Pecorino Romano. Squeeze in the juice of half a lemon and mix well to combine. If the mixture seems dry, add a splash more water or olive oil to loosen it up.
- Finish and Serve: Drizzle a little extra virgin olive oil over the top for added richness. Serve immediately with warm pita bread, crusty bread, or as a standalone dish.
Key Preparation Tips:
- Rinse canned beans thoroughly under cold water to remove excess sodium and improve their flavor.
- Cook the garlic slowly over medium heat to prevent burning, which can make it taste bitter.
- Use a combination of Parmesan and Pecorino Romano cheeses for a balance of nutty and salty flavors.
- Lightly mash a few beans with the back of a spoon to create a thicker, creamier texture.
- Stir in the lemon juice at the very end to preserve its bright, fresh flavor.
Serving Suggestions:
- Spread the beans over slices of toasted sourdough bread for an open-faced sandwich.
- Serve alongside a simple green salad dressed with olive oil and lemon juice for a light lunch.
- Pair the dish with roasted vegetables like zucchini or bell peppers for added color and nutrition.
Storage & Reheating Tips:
- Store leftovers in an airtight container in the refrigerator for up to 4 days.
- To reheat, warm the beans in a skillet over medium heat. Add a splash of water or vegetable broth to loosen the mixture if needed.
- Avoid freezing the dish if it contains cheese, as the texture may become grainy upon thawing.
These white beans are creamy, flavorful, and perfect for a quick lunch or dinner. Plus, they’re packed with protein and fiber, making them a nutritious choice for any vegetarian meal.
3. Authentic Falafel: Crispy on the Outside, Fluffy on the Inside

Falafel is a beloved Middle Eastern classic, and this authentic falafel recipe will transport you straight to the streets of the Mediterranean. These crispy patties are made with soaked chickpeas, fresh herbs, and spices, then fried to golden perfection.
Key Ingredients:
- Dried Chickpeas Only: Using dried chickpeas (soaked overnight) is crucial for the right texture—canned chickpeas make falafel too soft and crumbly.
- Fresh Herbs: A mix of parsley, cilantro, and dill gives falafel its signature vibrant flavor.
- Baking Soda: A small amount in the chickpea mixture helps keep falafel light and fluffy.
- Spices: Cumin and coriander add earthy warmth, while a pinch of cayenne brings subtle heat.
Detailed Instructions:
- Soak the Chickpeas: Place the dried chickpeas and baking soda in a large bowl. Cover with water, ensuring the water level is at least 2 inches above the chickpeas. Soak overnight for 18–24 hours. Drain and pat the chickpeas dry before using.
- Prepare the Falafel Mixture: In a food processor, combine the soaked chickpeas, parsley, cilantro, dill, onion, garlic, salt, black pepper, cumin, coriander, and cayenne pepper (if using). Pulse the mixture in short bursts until it reaches a coarse, grainy texture—not too fine, but not too chunky. Transfer the mixture to a container, cover tightly, and refrigerate for at least 1 hour or overnight.
- Form the Patties: Just before frying, add the baking powder and toasted sesame seeds to the falafel mixture. Stir well to combine. Scoop tablespoon-sized portions of the mixture and shape them into patties or balls. Wet your hands slightly to prevent sticking.
- Fry the Falafel: Heat oil in a medium saucepan to 375°F (medium-high heat). Carefully drop the falafel patties into the oil, frying in batches to avoid overcrowding. Fry for 3–5 minutes, or until golden brown and crispy on the outside. Remove with a slotted spoon and drain on paper towels.
- Serve: Serve the falafel hot with tahini sauce, hummus, or as part of a mezze spread. You can also stuff them into pita pockets with fresh veggies for a delicious sandwich.
Key Preparation Tips:
- Soak the chickpeas for at least 18 hours to ensure they soften enough for blending.
- Pulse the mixture in short bursts to avoid over-processing, which can make the falafel dense.
- Chill the mixture for at least an hour to firm it up, making it easier to shape into patties.
- Test the oil temperature by dropping a small piece of the mixture into the oil. It should sizzle and float to the surface immediately.
- Fry the falafel in small batches to prevent the oil temperature from dropping, which can lead to soggy results.
Serving Suggestions:
- Stuff the falafel into warm pita pockets with hummus, tahini sauce, and fresh vegetables like cucumbers, tomatoes, and arugula.
- Serve the falafel as part of a mezze platter with dips like baba ganoush or tzatziki.
- Pair the falafel with a side of tabbouleh or fattoush salad for a complete Mediterranean feast.
Storage & Reheating Tips:
- Store uncooked falafel patties in the freezer for up to 1 month. Freeze them on a baking sheet before transferring to a freezer-safe bag.
- Reheat cooked falafel in the oven at 350°F for 5–10 minutes to restore crispiness. Avoid microwaving, as it can make the falafel soggy.
- Freeze leftover falafel in an airtight container for up to 3 months. Reheat directly from frozen in the oven or air fryer.
This vegetarian dish is perfect for parties, picnics, or a quick weeknight dinner. With its crispy exterior and fluffy interior, falafel is a crowd-pleaser every time. Whether you’re frying, baking, or even using an air fryer, there are so many ways to prepare this classic dish. For more inspiration, check out our article on Different Ways to Cook Falafel to explore new methods and flavor variations!
4. Sheet Pan Gnocchi with Roasted Vegetables: Effortless and Colorful
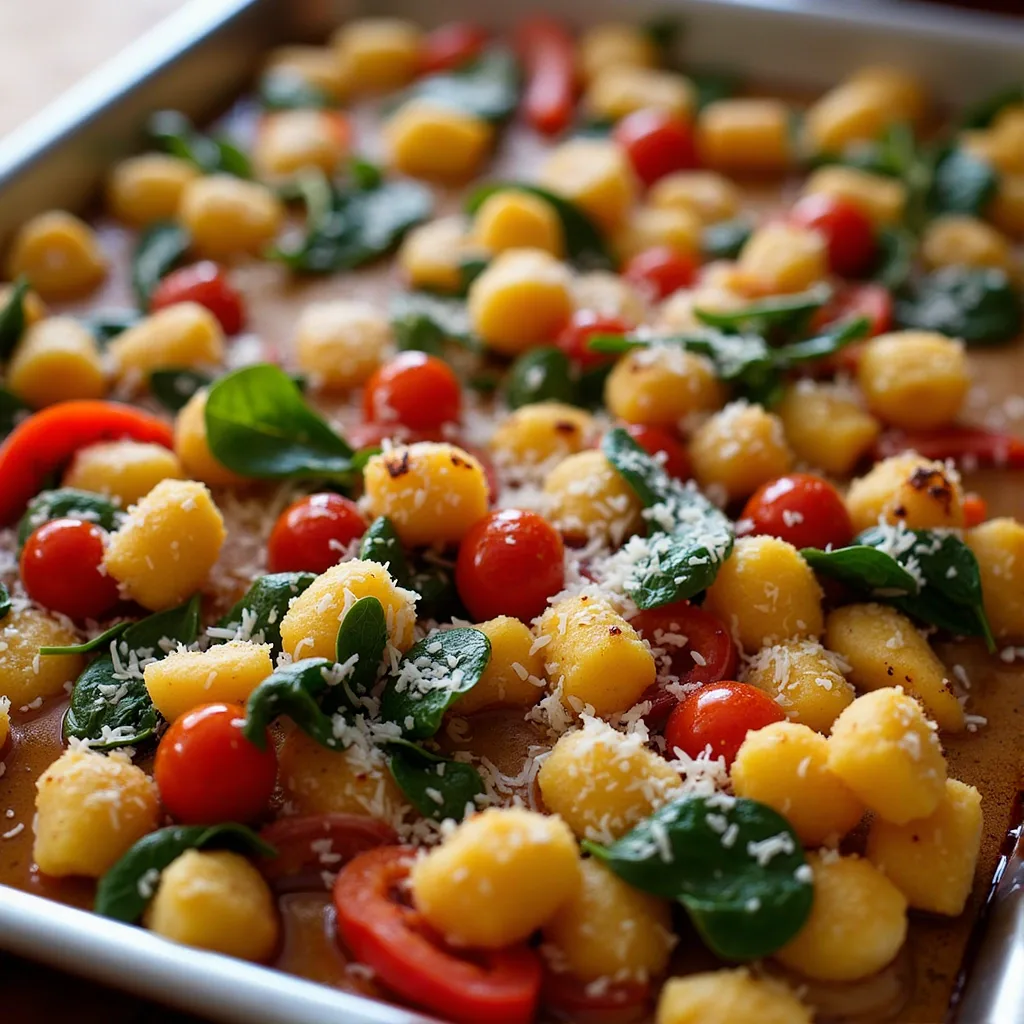
This Sheet Pan Gnocchi with Roasted Vegetables is a vibrant, one-pan wonder that’s perfect for busy weeknights. With minimal prep and maximum flavor, it’s a dish that everyone will love.
Key Ingredients:
- Shelf-Stable Gnocchi: Emphasize that shelf-stable gnocchi crisps up beautifully when roasted, unlike boiled gnocchi, which stays soft.
- Cherry Tomatoes: Highlight that they add a burst of sweetness and juiciness, balancing the dish’s roasted flavors.
- Bell Peppers: If using multiple colors, mention that they add visual appeal and subtle flavor differences (red = sweet, green = slightly bitter).
- Zucchini: Note that zucchini releases some moisture while roasting, helping prevent the gnocchi from drying out.
- Red Onion: Mention that roasting red onions brings out their natural sweetness and mellows their sharpness.
Detailed Instructions:
- Preheat the Oven: Preheat your oven to 425°F. Line a large sheet pan with parchment paper for easy cleanup.
- Combine Ingredients: On the prepared sheet pan, toss the gnocchi, red and yellow bell peppers, red onion, cherry tomatoes, minced garlic, olive oil, oregano, basil, salt, thyme, red pepper flakes, and black pepper. Use your hands to ensure everything is evenly coated.
- Roast: Place the sheet pan in the oven and roast for 40 minutes, stirring halfway through to ensure even cooking. Five minutes before the end, remove the pan from the oven, add the baby spinach, and stir to combine. Return to the oven for the final 5 minutes, or until the spinach is wilted.
- Serve: Sprinkle shaved Parmesan cheese over the roasted gnocchi and vegetables. Drizzle with a little extra olive oil before serving.
Key Preparation Tips:
- Cut all vegetables into similar sizes to ensure even roasting.
- Toss the ingredients thoroughly to coat them evenly with olive oil and spices.
- Stir the mixture halfway through cooking to prevent sticking and promote even browning.
- Add delicate vegetables like spinach toward the end of cooking to prevent over-wilting.
- Use parchment paper to prevent sticking and make cleanup easier.
Serving Suggestions:
- Serve the dish with a dollop of ricotta cheese or a drizzle of balsamic glaze for added richness.
- Pair it with a simple green salad dressed with lemon juice and olive oil for a refreshing contrast.
- Offer crusty bread on the side for soaking up any extra juices.
Storage & Reheating Tips:
- Store leftovers in an airtight container in the refrigerator for up to 3 days.
- Reheat the dish in the oven at 350°F for 10–15 minutes to restore crispiness. Avoid microwaving, as it can make the gnocchi soft.
- Freeze individual portions for up to 1 month. Reheat from frozen in the oven or air fryer.
This colorful vegetarian dish is as easy to make as it is delicious. Perfect for Meatless Mondays or any night of the week!
5. Mediterranean Chickpea Salad: Fresh and Filling
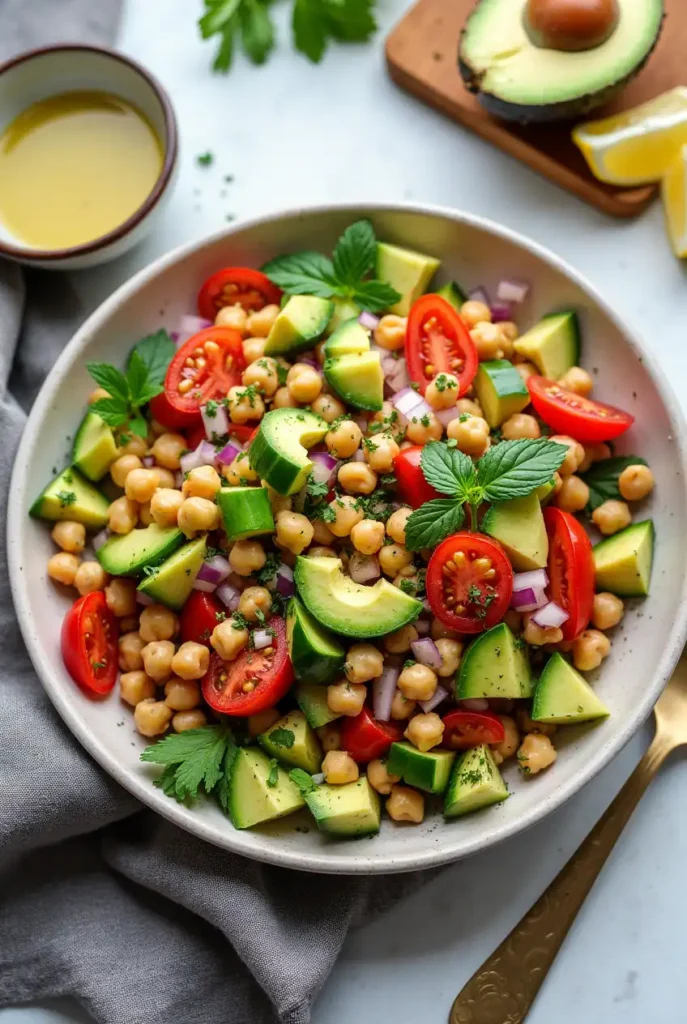
This Mediterranean Chickpea Salad is a no-cook delight that’s ready in just 10 minutes. Packed with fresh veggies, creamy avocado, and a tangy Dijon dressing, it’s a perfect lunch or side dish.
Key Ingredients:
- Chickpeas: Emphasize that chickpeas are a great source of plant-based protein and fiber, contributing to the salad’s nutritional value.
- Cucumbers: Specify using English or Persian cucumbers for their sweetness and tender skin, which eliminates the need for peeling.
- Tomatoes: Mention that grape or cherry tomatoes are preferred for their consistent flavor year-round, but any bite-sized tomatoes can be used.
- Roasted Red Peppers: Highlight that these add a smoky, sweet flavor and can be roasted at home or purchased jarred for convenience.
- Red Onions: Note that red onions offer a mild flavor suitable for raw consumption, but shallots or green onions can be alternatives.
Detailed Instructions:
- Make the Dressing: In a large bowl, whisk together the Dijon mustard, lemon juice, minced garlic, Aleppo pepper, sumac, kosher salt, and black pepper. Slowly drizzle in the olive oil while whisking continuously to emulsify the dressing.
- Assemble the Salad: Add the chickpeas, cucumber, grape tomatoes, roasted red peppers, red onion, parsley, and mint to the bowl with the dressing. Toss gently to combine.
- Add the Avocado: Gently fold in the chopped avocado, being careful not to mash it. Taste and adjust the seasoning if needed.
- Serve: Serve immediately, or store the salad and avocado separately if saving leftovers.
Key Preparation Tips:
- Rinse canned chickpeas thoroughly to remove excess sodium and improve their texture.
- Chop all vegetables uniformly to ensure even distribution of flavors in each bite.
- Add the avocado just before serving to prevent it from browning.
- Use a whisk to emulsify the dressing thoroughly for a smooth, glossy consistency.
- Taste and adjust the seasoning after assembling the salad to ensure balanced flavors.
Serving Suggestions:
- Serve the salad over a bed of mixed greens like arugula or spinach for added freshness.
- Pair it with whole-grain pita bread or use it as a filling for wraps.
- Top the salad with crumbled feta cheese or a dollop of Greek yogurt for extra creaminess.
Storage & Reheating Tips:
- Store the salad without the avocado in an airtight container in the refrigerator for up to 2 days.
- Keep the avocado separate and add it just before serving to maintain its texture and color.
- If the salad becomes dry, drizzle a little extra olive oil or lemon juice before serving.
This vegetarian salad is a refreshing and nutritious option for lunch or dinner. With its vibrant colors and bold flavors, it’s sure to become a favorite. If you’re looking for more delicious ways to enjoy chickpeas, try Balela , a Middle Eastern chickpea salad delight packed with fresh herbs, tangy lemon, and crunchy vegetables. Or, explore the Healthy Mediterranean Chickpea Salad , which combines protein-rich chickpeas with zesty spices and wholesome ingredients for a satisfying meal. Each of these salads brings its own unique twist to the table, making them perfect for any occasion.
Why Choose Vegetarian Recipes?
Incorporating more vegetarian recipes into your diet is a fantastic way to enjoy delicious, nutrient-rich meals while supporting a sustainable lifestyle. Each of these dishes highlights the versatility and creativity of vegetarian cooking, proving that plant-based meals can be just as satisfying as their meat-based counterparts.
Whether you’re making a comforting bowl of Mediterranean Detox Cabbage Soup, crispy falafel, or a vibrant chickpea salad, these recipes are sure to inspire your next meatless adventure. Enjoy the flavors, textures, and health benefits of these vegetarian recipes today!