


Most homemade falafel falls flat before it even hits the oil. The texture crumbles, the flavor tastes bland, or the whole batch turns into a soggy mess. If you have tried making falafel at home and walked away disappointed, the problem almost certainly comes down to a few fixable mistakes. This recipe, developed by Lisa Bryan after eating her way through Egypt, Israel, and Jordan, solves every one of them. The result is falafel with a genuinely crispy shell, a vibrant green herb-packed interior, and a flavor that holds up against anything you have had at a restaurant.
Why Most Homemade Falafel Fails (and How This Recipe Fixes It)
The biggest culprits behind failed falafel are using canned chickpeas and skimping on herbs. Canned chickpeas are too soft and waterlogged, which means the mixture never binds properly and your falafel falls apart in the oil. Dried chickpeas, soaked overnight, give you the right texture from the start.
The herb situation is equally important. Most Americanized recipes use a modest amount of parsley. This recipe doubles it and adds an equal amount of cilantro. That is what gives authentic falafel its beautiful green center and bold, layered flavor.
The third secret is a small green chile pepper. When Lisa first watched a street vendor in the Middle East add one to the mix, it clicked. It does not make the falafel spicy. It adds a subtle kick that makes the whole thing taste more alive.
Falafel Ingredients
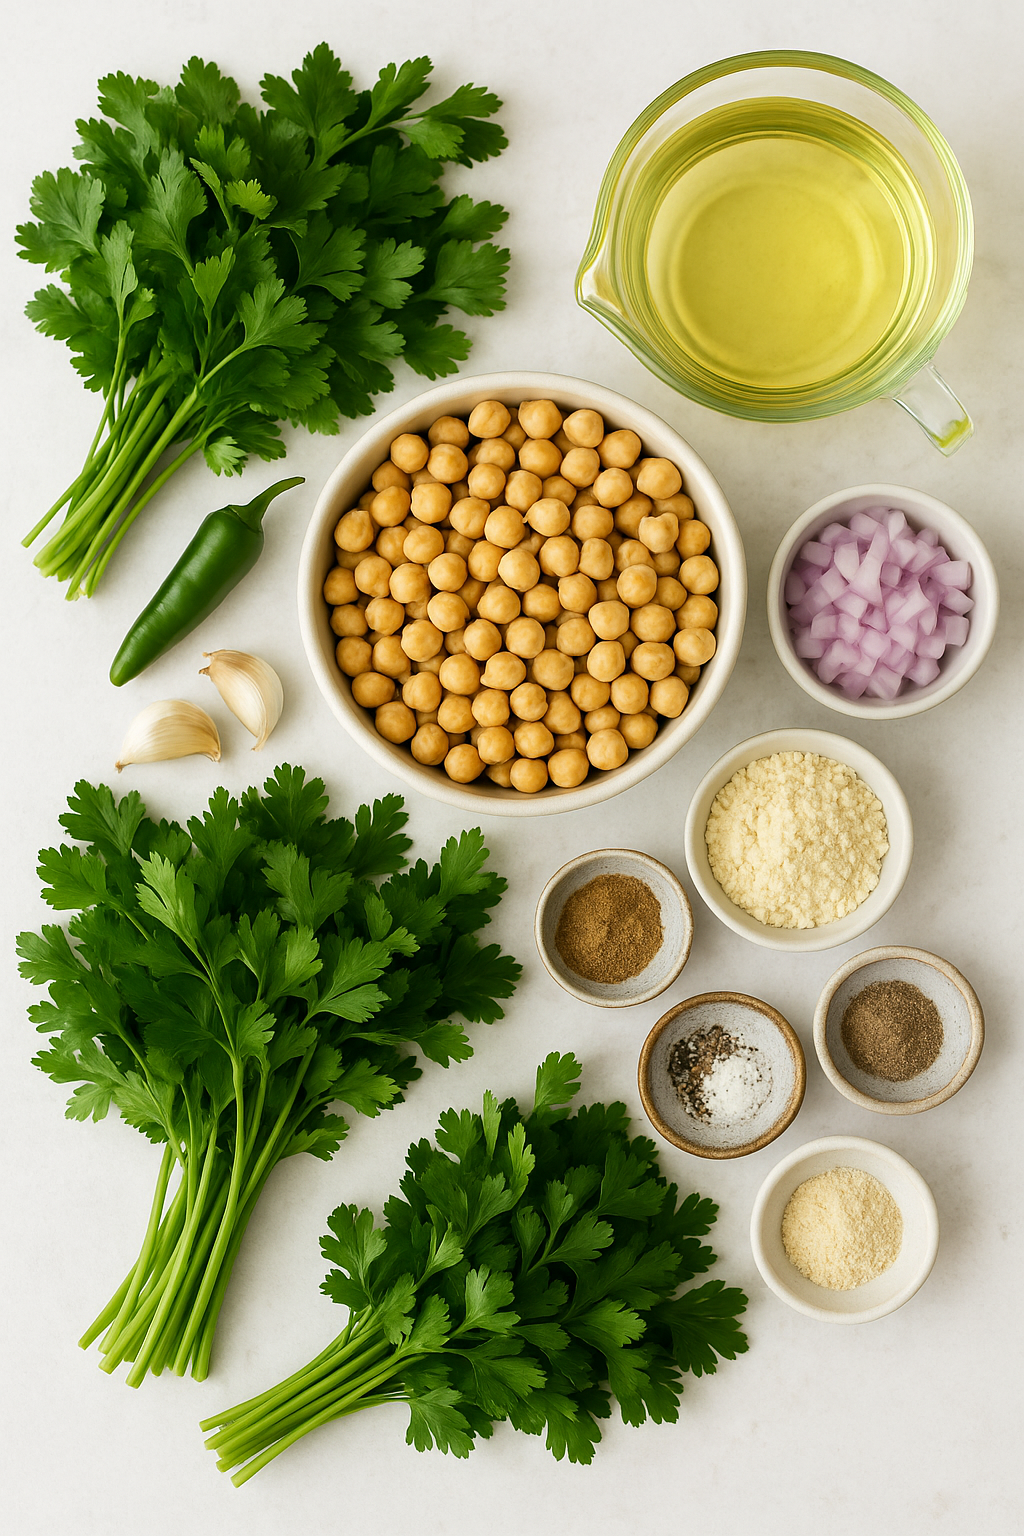
Every quantity below comes directly from the recipe. Do not substitute canned chickpeas here, no matter how tempting it seems.
- 1 cup dried chickpeas, soaked overnight (not canned)
- ½ cup roughly chopped onion
- 1 cup roughly chopped parsley (about one large bunch)
- 1 cup roughly chopped cilantro (about one large bunch)
- 1 small green chile pepper (serrano or jalapeño)
- 3 garlic cloves, fresh (not garlic powder)
- 1 teaspoon cumin
- 1 teaspoon salt
- ½ teaspoon cardamom
- ¼ teaspoon black pepper
- 2 tablespoons chickpea flour (or another flour as a substitute)
- ½ teaspoon baking soda
- Oil for frying (avocado oil works well for high-heat cooking; vegetable oil also works)
Why fresh garlic matters: Garlic powder cannot replicate the sharpness and moisture that fresh cloves bring to the mixture. The raw garlic mellows during cooking but keeps the flavor grounded and robust.
Why chickpea flour: It acts as a binder without adding a competing flavor. If your mixture feels too wet after chilling, add another tablespoon. If it feels too dry and crumbly, add a teaspoon or two of water or lemon juice.
What to Watch Before You Start
The overnight soak is not optional. Plan ahead: add your dried chickpeas to a large bowl and cover them with two to three inches of water. They will nearly triple in size overnight, so use a bigger bowl than you think you need. The water may look slightly yellow by morning. That is normal. Just drain and rinse.
One thing to watch: if you skip the chilling step after blending, the falafel will be harder to shape and more likely to crack during cooking. The 30-minute rest in the fridge is doing real structural work, not just flavor work.
Step-by-Step Instructions
Step 1: Hydrate the Chickpeas for the Right Foundation
Soak your dried chickpeas overnight or for at least 8 to 12 hours. Cover them with plenty of water since they will triple in size. The next morning, drain and rinse them thoroughly. You will know they are ready when they feel firm but yield slightly when pressed between your fingers, not mushy, not rock hard.
Step 2: Pulse Everything Into a Coarse, Textured Blend
Add the chickpeas, onion, parsley, cilantro, garlic, green chile pepper, cumin, salt, cardamom, and black pepper to a food processor. Roughly chop the onion, herbs, and pepper before adding them. This helps the processor work more evenly and keeps the final texture consistent. Pulse in short bursts, scraping down the sides between pulses. The mixture is ready when it resembles coarse sand with a little visible texture. Do not blend it smooth. If it looks like hummus, you have gone too far.
Step 3: Bind and Chill the Mixture
Transfer the blended mixture to a mixing bowl. Add the 2 tablespoons of chickpea flour and ½ teaspoon of baking soda. Stir everything together, then cover the bowl and refrigerate for 30 minutes to one hour. The baking soda is what gives the falafel that slightly fluffy interior. Do not skip it.
Step 4: Shape Into Uniform Balls or Patties
Use your hands, an ice cream scoop, or a falafel scoop to form the mixture into balls or patties. The mixture should feel dense and slightly tacky, not crumbly. If it is too wet, add another tablespoon of chickpea flour. If it falls apart when you press it, add a teaspoon or two of water or lemon juice. Patty shapes work better for pita sandwiches since they sit flat and do not roll out.
Step 5: Deep Fry for Maximum Crispiness
Pour about 3 inches of oil into a pot and heat it over medium heat to 350°F (175°C). Cook the falafel in batches of 6 to 8 at a time for 1 to 2 minutes, or until they turn a deep golden brown. Use a skimmer to gently move them around and check the color on all sides. You will hear a steady, moderate sizzle, not an aggressive spattering. Remove them to a paper-towel-lined plate immediately. If the oil is too hot, the outside darkens before the inside warms through.
Step 6: Pan Fry for a Lighter Option
Add a few tablespoons of oil to a cast iron pan and heat over medium-high. Drop one falafel in first. If it sizzles right away, the oil is ready. Cook the falafel for 2 to 3 minutes per side until golden brown on both surfaces. Transfer to a paper-towel-lined plate. This method uses significantly less oil and produces a slightly denser crust than deep frying.
Step 7: Bake for a Hands-Off, Lower-Oil Method
Preheat your oven to 425°F. Lightly oil a baking sheet, then arrange the falafel on it and brush or spray the tops with oil as well. Bake for 25 to 30 minutes, flipping halfway through. When done, they should be golden on the outside and hold their shape firmly when lifted. The baked version has a slightly firmer texture throughout, which some people actually prefer for salads.
Step 8: Serve While the Crust Is Still Crisp
Falafel are best eaten warm, right after cooking, when the outside is still crackling and the inside is soft. Drizzle with tahini sauce before serving. If you break one open, you should see a vivid green center from all those herbs. That color is your confirmation the recipe worked.
What Separates Good Falafel from Great Falafel
- Use double the herbs you think you need. The parsley and cilantro are not garnish. They are structural flavor. One cup of each is not excessive.
- Do not omit the green pepper. Even if you are heat-sensitive, remove the seeds and membrane first. The pepper adds complexity, not fire.
- Fresh garlic only. Garlic powder will make the falafel taste flat. Fresh cloves are worth the extra thirty seconds.
- Chill the mixture before shaping. The rest period lets the flour and baking soda integrate fully. Falafel shaped from warm, freshly blended dough tends to crack more during cooking.
- Oil temperature matters more than method. Whether you deep fry or pan fry, cold oil produces greasy falafel. Wait for the oil to reach temperature before adding any falafel to the pot.
Serving Suggestions
Falafel are genuinely versatile. Stuff them into gluten-free pita with sliced cucumber, tomato, and a heavy drizzle of tahini sauce. The contrast between the crispy falafel and the cool, creamy tahini is what makes the whole thing work.
For a lighter meal, place them over a salad. They add enough substance to make the salad genuinely filling without needing any other protein. Pair with hummus, lentil salad, or cauliflower rice tabbouleh for a full mezze spread.
Make It Once, Use It All Week
The raw falafel mixture keeps well in the refrigerator. Store it covered and scoop and cook fresh falafel as needed throughout the week. This is one of the most practical things about this recipe: you do the prep work once and get fresh, hot falafel on demand for days.
Cooked falafel can be stored in an airtight container in the refrigerator. To reheat, use an oven or air fryer rather than a microwave. A microwave will soften the crust and make them chewy. In an oven at around 375°F for 8 to 10 minutes, they come back close to their original texture, with a crust that snaps when you bite through it.
For longer storage, freeze cooked falafel in a single layer first, then transfer to a freezer bag. Reheat directly from frozen in the oven.
Ready to Make the Best Falafel of Your Life?
If you have been settling for dry, bland, or crumbly homemade falafel, this recipe is the reset you needed. The combination of soaked dried chickpeas, generous herbs, and that small green pepper produces something that genuinely tastes like it came from a street corner in Tel Aviv, not a box mix.
Give this one a try on a weekend when you have a little time to soak and prep. You might be surprised how quickly a batch disappears.
FAQs
Can I use canned chickpeas to make falafel?
No. Canned chickpeas are too soft and contain too much moisture. The mixture will not bind properly and the falafel will fall apart during cooking. Dried chickpeas soaked for at least 8 to 12 hours are the only option that gives you the right texture.
Why is my falafel falling apart in the oil?
This usually happens for one of three reasons: the mixture was not chilled long enough, the oil was not hot enough when the falafel went in, or the mixture is too wet. Try adding another tablespoon of chickpea flour and chilling the mixture for an additional 30 minutes before shaping again.
Is baked falafel as good as fried falafel?
Baked falafel has a slightly firmer, drier texture compared to fried. It still turns golden and holds its shape well. The flavor is the same since the herbs and spices do not change. Many people find baked falafel works especially well in salads where a denser texture is actually an advantage.
Can I make the falafel mixture ahead of time?
Yes, and it is one of the best things about this recipe. The raw mixture keeps covered in the refrigerator and you can scoop and cook fresh falafel as needed. This makes weeknight meals much faster since the prep is already done.
What is the green color inside falafel?
The vibrant green interior comes from the fresh herbs, specifically the parsley and cilantro. Recipes that use less herb produce a beige or pale interior. The green color is a visual signal that the herb ratio is right and the flavor will follow.
What oil is best for frying falafel?
A high-heat oil works best. Avocado oil is a strong choice because of its high smoke point and neutral flavor. Vegetable oil also works well. Avoid olive oil for deep frying since its lower smoke point can cause the oil to break down and affect the flavor of the falafel.
Essential Kitchen Tools
Making Falafel? Most failed attempts come from using the wrong pan or heat setup — not the recipe itself.
Must Try Recipes
- Easy 3-Minute Hummus (Super Creamy Every Time) — Pair your falafel with this creamy hummus for a delightful Mediterranean experience.
- How to Make Creamy Tahini at Home (Never Bitter or Too Thick) — Perfect complement to your falafel, adding a nutty, savory flavor.
- The Perfect Fresh Broccoli Salad — Enjoy a refreshing side dish that complements the flavors of falafel.

Want to save this recipe?
Want to save this recipe? Enter your email below, and we'll send it straight to your inbox. Plus, receive new recipes every week!

Healthy Falafel Recipe
- Total Time: 55 minutes
- Yield: 18 falafel balls 1x
Description
Enjoy a taste of the Mediterranean with this easy falafel recipe. Perfect for a quick meal, these falafels can be fried or baked to suit your preference.
Ingredients
- 1 cup dried chickpeas (soaked overnight (don't use canned chickpeas))
- ½ cup roughly chopped onion
- 1 cup roughly chopped parsley (about a one large bunch)
- 1 cup roughly chopped cilantro (about a one large bunch)
- 1 small green chile pepper (serrano or jalapeno pepper)
- 3 garlic cloves
- 1 teaspoon cumin
- 1 teaspoon salt
- ½ teaspoon cardamom
- ¼ teaspoon black pepper
- 2 tablespoons chickpea flour (or other flour)
- ½ teaspoon baking soda
- oil for frying
Instructions
- Begin by soaking the dried chickpeas for a minimum of 8 to 12 hours, ensuring they are covered with ample water as they will expand significantly. After soaking, drain and rinse them thoroughly.
- In a food processor, combine the chickpeas, onion, parsley, cilantro, garlic, green pepper, and spices. It’s advisable to chop the onion, herbs, and pepper roughly before adding them for optimal texture. Pulse the mixture until it resembles coarse sand, but do not blend it completely.
- Transfer the falafel mixture to a bowl, then incorporate the chickpea flour and baking soda. Mix well, cover the bowl, and refrigerate for 30 minutes to 1 hour.
- Shape the falafel by using your hands or a scoop to form balls or patties. If the mixture feels too wet, add an extra tablespoon of chickpea flour. Conversely, if it’s too dry, incorporate a teaspoon or two of water or lemon juice.
- To cook the falafel, choose your preferred method. For deep frying, heat about 3 inches of oil in a pot over medium heat until it reaches 350°F (175°C). Fry the falafel in batches of 6 to 8 for 1 to 2 minutes, or until they turn golden brown.
- Check the color of the falafel using a skimmer to prevent overcooking, then transfer them to a plate lined with paper towels to absorb excess oil.
- Serve the falafel hot, enjoying their crispy exterior. They pair wonderfully with tahini sauce.
Notes
TECHNIQUE TIP: Refrigerate the mixture for 30-60 minutes to let flavors meld and make forming the falafel easier.
STORAGE: Store uncooked falafel in the fridge for up to 3 days or freeze for longer preservation.
SUBSTITUTION: If green chile peppers are unavailable, use cayenne pepper for heat.
- Prep Time: 45 minutes
- chilling: 1 hour 30 minutes
- Cook Time: 10 minutes
- Category: Main Course
- Cuisine: Mediterranean
Nutrition
- Serving Size: 1 serving
- Calories: 48 kcal
- Sugar: 2 g
- Sodium: 166 mg
- Fat: 1 g
- Saturated Fat: 0.1 g
- Unsaturated Fat: 0.5 g
- Carbohydrates: 8 g
- Fiber: 2 g
- Protein: 3 g

