


Crème brûlée has a reputation for being intimidating, and honestly, that reputation keeps a lot of home cooks from ever trying it. The fear of curdled custard or a burnt sugar top sends people straight to the restaurant menu instead. But this classic French dessert comes together with just five ingredients, and once you understand a few key techniques, you will wonder why you waited so long. The result is a silky, rich vanilla custard with a caramelized sugar crust that cracks like glass when you tap it with a spoon. Restaurant quality, made in your own kitchen.
Why This Recipe Works Before You Even Start
The biggest reason homemade creme brulee fails is temperature. Pouring scalding cream directly onto egg yolks scrambles them instantly, and you end up with sweet, lumpy soup instead of a smooth custard. This recipe solves that by letting the infused cream cool for 15 minutes before it ever touches the eggs. No tempering tricks, no back-and-forth ladling. The cooling step does the work for you.
The bain marie (water bath) is the other non-negotiable. Surrounding the ramekins with hot water keeps the oven heat gentle and even, so the custard sets slowly without cracking or curdling. Skip it and the edges overcook while the center stays liquid.
What You Need: Ingredients for Crème Brûlée
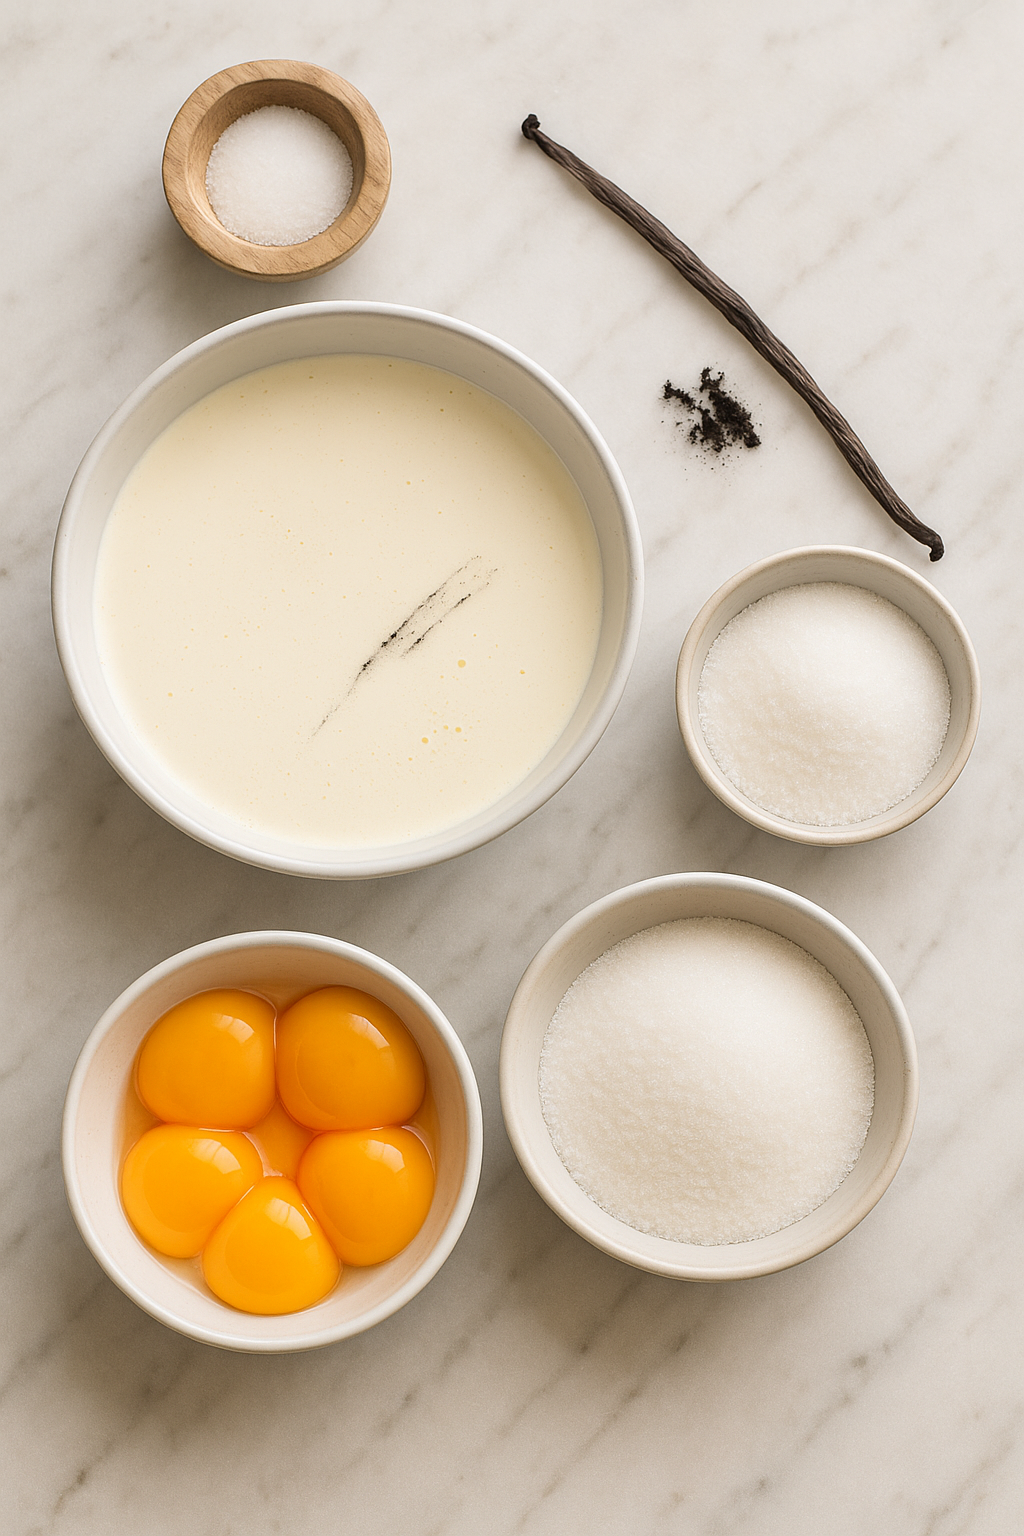
Every ingredient in this recipe has a specific job. Nothing is decorative.
- 3 cups (720ml) heavy cream: The fat content is what gives crème brûlée its signature richness. Do not substitute half-and-half or milk, the custard will not set properly.
- 1 vanilla bean, split and scraped: Those thousands of tiny seeds carry an intensity that extract cannot fully replicate. If vanilla beans are unavailable, vanilla bean paste is the next best option.
- 5 large egg yolks: Yolks are the thickening agent here. The whites are not needed, but save them for meringue or macarons.
- ½ cup (100g) granulated sugar, plus more for topping: The sugar in the custard adds sweetness without heaviness. Caster sugar works especially well for the brûlée topping because its finer grain caramelizes more evenly.
- ⅛ teaspoon salt: Salt sharpens the vanilla flavor and keeps the custard from tasting flat.
Why Most Homemade Crème Brûlée Fails (and How to Fix It)
Before you start cooking, these are the moments where things typically go wrong.
- Pouring cream in too fast: Even with cooled cream, adding it all at once can shock the yolks. Pour in a slow, steady stream while whisking constantly.
- Skipping the second strain: Straining the custard twice catches any cooked egg bits and pod fibers that would ruin the silky texture.
- Too much sugar on top: A thick layer of sugar burns on the outside before it caramelizes through. Aim for a thin, even layer, about 1 to 1½ teaspoons per ramekin, spread all the way to the edges.
- Torching from one spot: Holding the flame in one place scorches the sugar and makes it bitter. Keep the torch moving in wide, sweeping arcs and let the heat carry over between passes.
- Waiting too long to serve: Once brûléed, the sugar starts absorbing moisture from the custard within 30 minutes. Serve immediately for that satisfying crack.
Step-by-Step Instructions
Step 1: Infuse the Cream with Deep Vanilla Flavor
Preheat your oven to 325°F. In a saucepan, combine the 3 cups of heavy cream with the split vanilla bean pod and scraped seeds. Bring to a simmer over medium heat, then remove from heat and let stand for 15 minutes.
You will know the cream is ready when it smells warmly of vanilla and feels just above body temperature when tested on your wrist. Strain through a fine mesh sieve into a bowl, discarding the pod and any fibrous bits.
Step 2: Build the Custard Base Without Scrambling the Eggs
In a large mixing bowl, whisk together the 5 egg yolks, ½ cup sugar, and ⅛ teaspoon salt until just combined. You are not looking for volume here, just a uniform pale yellow mixture.
Slowly pour the warm cream into the yolks in a thin, steady stream, whisking with a whisk the entire time. If the cream was too hot and the mixture smells like cooked egg → discard and start the cream again. Strain the finished custard through the fine mesh sieve one more time to guarantee a flawless texture.
Step 3: Set Up the Water Bath for Even, Gentle Heat
Place 6 six-ounce ramekins in a large baking dish. Divide the custard evenly among them. Very carefully pour boiling water into the baking dish until it reaches about halfway up the sides of the ramekins.
One thing to watch: water splashing into the custard will leave craters on the surface. Pour slowly along the side of the baking dish, not directly over the ramekins.
Step 4: Bake Until Set at the Edges, Wobbly in the Center
Bake at 325°F for 30 to 40 minutes. The custard is done when the edges are fully set but the center still has a gentle, jelly-like wobble when you carefully shake the pan. It should not slosh or ripple like liquid.
Remove the ramekins from the water bath and let them cool completely at room temperature. Then refrigerate for at least several hours, or up to 2 days loosely covered. The wobble will disappear completely once chilled.
Step 5: Caramelize the Sugar Top for That Signature Crack
Sprinkle about 1 to 1½ teaspoons of sugar evenly over each chilled custard. Tilt and brush the sugar gently to the edges so the center does not collect a thick mound. Using a kitchen torch, caramelize the sugar with wide sweeping motions until it turns a deep golden amber and stops bubbling.
Serve immediately. The sugar top is at its best within 30 minutes of brûléeing, after that, the crack softens.
What Separates a Good Crème Brûlée from a Great One
- Use caster sugar for the top: Its finer grain sits in a thinner, more even layer and caramelizes faster and more uniformly than standard granulated sugar.
- A bigger torch makes a real difference: A small culinary torch works, but a larger butane torch gives you better heat control and more even caramelization across the surface.
- Do not rush the chill time: Letting the custards chill overnight actually improves the flavor. The vanilla integrates more fully and the texture firms up beautifully.
- Strain twice, always: The first strain catches pod pieces, the second catches any accidentally cooked egg. Both matter.
- Aim for amber, not dark brown: Dark brown sugar tastes bitter. Pull the torch away when the surface is a warm, golden amber color and still bubbling slightly.
Serving Suggestions
Crème brûlée is a complete dessert on its own, but a few small additions can make it feel even more special. Fresh raspberries or sliced strawberries alongside the ramekin cut through the richness with a bright, tart contrast. A small sprig of fresh mint adds color without competing with the vanilla.
One reader mentioned adding a splash of Grand Marnier to the custard base, and that orange note pairs beautifully with the vanilla. Keep any additions subtle so the custard stays the star.
Storage and Make-Ahead Notes
The baked, un-brûléed custards can be loosely covered and refrigerated for up to 2 days before serving. This makes crème brûlée a genuinely practical make-ahead dessert for dinner parties. Bake them the day before, store them in the fridge, and brûlée the tops right before guests sit down.
Once the sugar top has been caramelized, the dessert should be served within 30 minutes. The sugar absorbs moisture from the custard and loses its crispness if left to sit. There is no good way to re-brûlée a softened top, so time the torching carefully.
Ready to Make Your Best Crème Brûlée at Home
The fear around this dessert is mostly unearned. With cooled cream, a proper water bath, and a patient hand with the torch, you have everything you need to pull this off on the first try. The custard is forgiving once you understand the visual cues, and the brûlée step is genuinely fun once you stop rushing it.
Gather your five ingredients, set aside an afternoon, and make this recipe today. That first crack of the spoon through the caramelized sugar top is absolutely worth it.
Must Try Recipes
- French Crepes — Enjoy a classic French breakfast alongside your Crème Brûlée.
- Swiss Meringue Buttercream — Pair this light frosting with Crème Brûlée for a delightful contrast.
- Chocolate Sugar Cookies — Serve these cookies with Crème Brûlée for a sweet finishing touch.
Frequently Asked Questions
Can I make creme brulee without a kitchen torch?
A torch gives you the most control, but if you do not have one, you can enjoy the baked custard on its own without the brûlée top. The broiler is not a reliable substitute because it heats unevenly and tends to warm the custard before the sugar caramelizes properly.
Why is my crème brûlée still liquid after baking?
The most common cause is underbaking. The custard should have set edges and only a slight wobble in the very center when you gently shake the pan. If it moves like water, return it to the oven for 5 to 10 more minutes and check again.
Can I use vanilla extract instead of a vanilla bean?
Yes. Vanilla bean paste is the closest substitute and gives you those visible seeds in the custard. Pure vanilla extract also works, though the flavor will be slightly less complex. Add it after straining the cream, not during the heating step.
How do I know if I burned the sugar top?
Burned sugar smells sharp and acrid rather than sweet and caramel-like. Visually, it will be dark brown or black in spots rather than a warm amber. If this happens, the bitter layer cannot be fixed. Scrape it off carefully, add a fresh thin layer of sugar, and torch again more gently.
Can I double this creme brulee recipe?
Yes, the recipe scales well. A double batch fills 12 six-ounce ramekins. You may need to bake in two separate baking dishes to ensure the water bath surrounds each ramekin evenly. Baking time stays the same at 30 to 40 minutes.
Why did my custard turn out grainy or eggy tasting?
A grainy texture usually means the eggs were partially cooked during mixing, either from cream that was too hot or from not straining the custard before baking. An eggy flavor often comes from overbaking. Pull the ramekins when the center still has that gentle wobble, not when the surface looks fully firm.
Tools That Make Creme Brulee Actually Work
Most failed attempts come down to the wrong equipment. These are the exact tools that get you the right texture, heat, and result every time.

Want to save this recipe?
Want to save this recipe? Enter your email below, and we'll send it straight to your inbox. Plus, receive new recipes every week!

Beginner-Friendly Crème Brûlée Recipe
- Total Time: 3 hours 50 minutes
- Yield: 6 servings 1x
Description
Homemade Creme Brulee is easier to make than you think! If you follow my simple tips and tricks, you’ll have a rich, smooth vanilla custard nestled under a crisp caramelized sugar top every time!
Ingredients
- 3 cups heavy cream (720mL)
- 1 vanilla bean (split and seeds scraped)
- 5 large egg yolks
- ½ cup granulated sugar (plus more for topping (100g))
- ⅛ teaspoon salt
Instructions
- Set the oven temperature to 325°F.
- In a small saucepan, combine the cream with the vanilla bean pod and seeds, then heat over medium until it simmers. Once simmering, remove from heat and let it steep for 15 minutes.
- Pour the mixture through a fine mesh sieve into a bowl, discarding the solids and the vanilla pod.
- In a large bowl, whisk together the egg yolks, sugar, and salt. Gradually incorporate the warm cream into the egg yolk mixture. Strain the custard again through a fine mesh sieve to remove any solids.
- Arrange 6 ramekins (6-ounce each) in a large baking dish and evenly distribute the custard among them. Carefully add boiling water to the baking dish, filling it until it reaches halfway up the sides of the ramekins. Take care to avoid splashing water into the custard.
- Place in the oven and bake for 30 to 40 minutes, or until the edges of the custard are set while the center still has a slight wobble when gently shaken. After baking, allow the custards to cool completely in the water bath. Once cooled, remove the ramekins from the water and refrigerate for several hours. The custards can also be loosely covered and stored in the fridge for up to 2 days before serving.
- When ready to serve, sprinkle an even layer of sugar over each chilled custard (about 1 to 1½ teaspoons per custard). Use a blow torch to caramelize the sugar until it reaches a dark amber color and begins to bubble. Serve immediately to enjoy the crispy texture of the sugar topping.
Notes
– Achieve the perfect caramelized sugar topping by using a kitchen torch to gently melt the sugar until golden brown.
– Store Crème Brûlée in the refrigerator for up to 3 days, but wait to caramelize the sugar until just before serving.
– To scale the recipe, simply adjust the ingredient quantities proportionally, keeping the ratios consistent.
- Prep Time: 20 minutes
- chill: several hours
- Cook Time: 30 minutes
- Category: Dessert
- Method: Baked
- Cuisine: French
Nutrition
- Serving Size: 6 servings
- Calories: 519 kcal
- Sugar: 20 g
- Sodium: 88 mg
- Fat: 47 g
- Saturated Fat: 29 g
- Unsaturated Fat: 15 g
- Trans Fat: 0 g
- Carbohydrates: 21 g
- Fiber: 0 g
- Protein: 6 g
- Cholesterol: 296 mg
