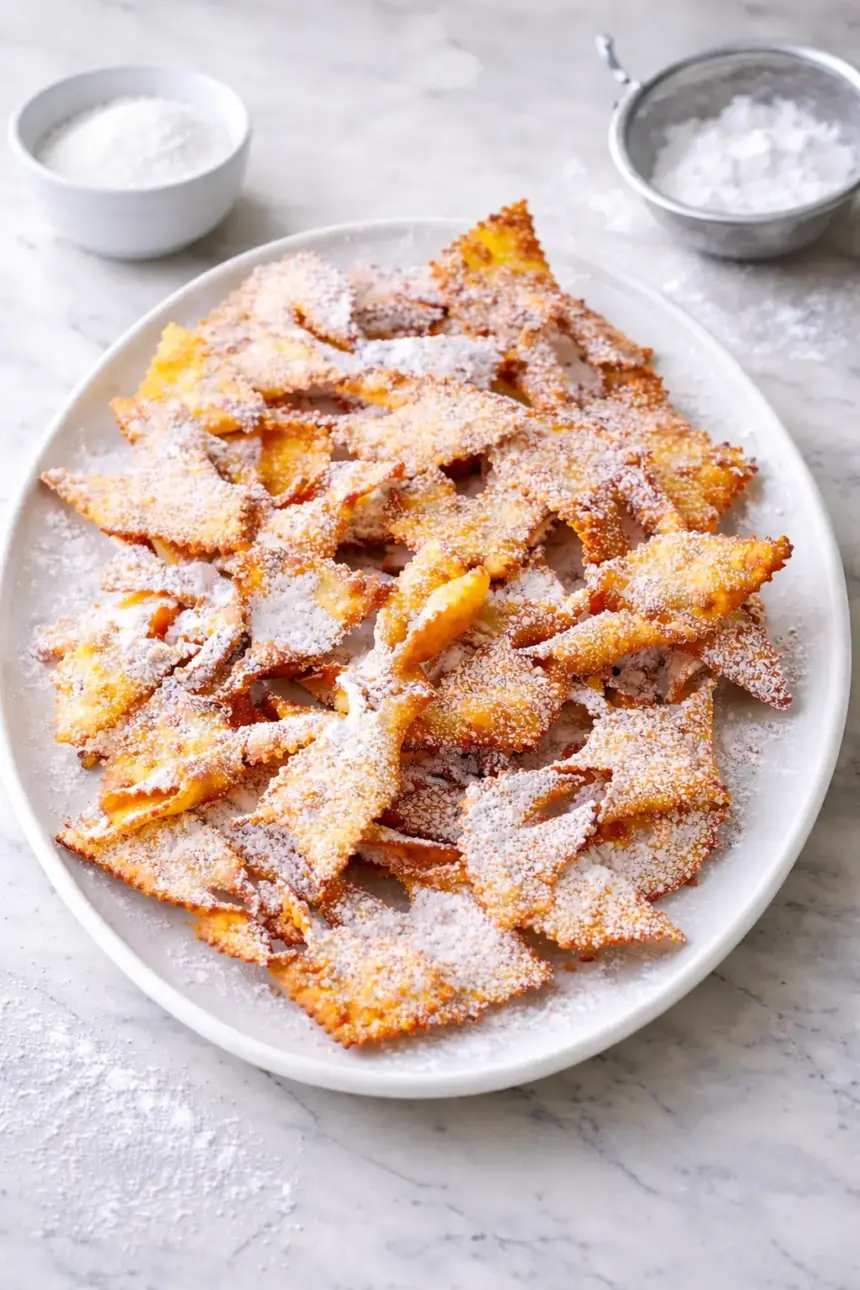
Did you know that traditional European Christmas cookies like Angel Wing Cookies have been delighting families for over 500 years, with each delicate, crispy bite representing centuries of cherished holiday tradition? Also known as Chrusciki, Faworki, or Ribbon Cookies, these ethereal treats are lighter than air, golden and crispy on the outside, with a tender crumb that melts on your tongue. Dusted generously with powdered sugar, they look like delicate snowflakes on your holiday platter and taste even better than they look. The incredible thing about Angel Wing Cookies is how deceptively simple they are to make. You don’t need fancy equipment or pastry chef skills, just six egg yolks, a handful of pantry staples, and about 45 minutes from start to finish. The dough comes together in minutes, rolls out beautifully without sticking, and fries up in seconds to golden perfection. Whether you’re continuing a family tradition or starting a new one, these cookies will become your most requested holiday treat. Let me show you exactly how to make them so they turn out perfectly crispy, beautifully shaped, and absolutely irresistible every single time.
Ingredients List for Angel Wing Cookies
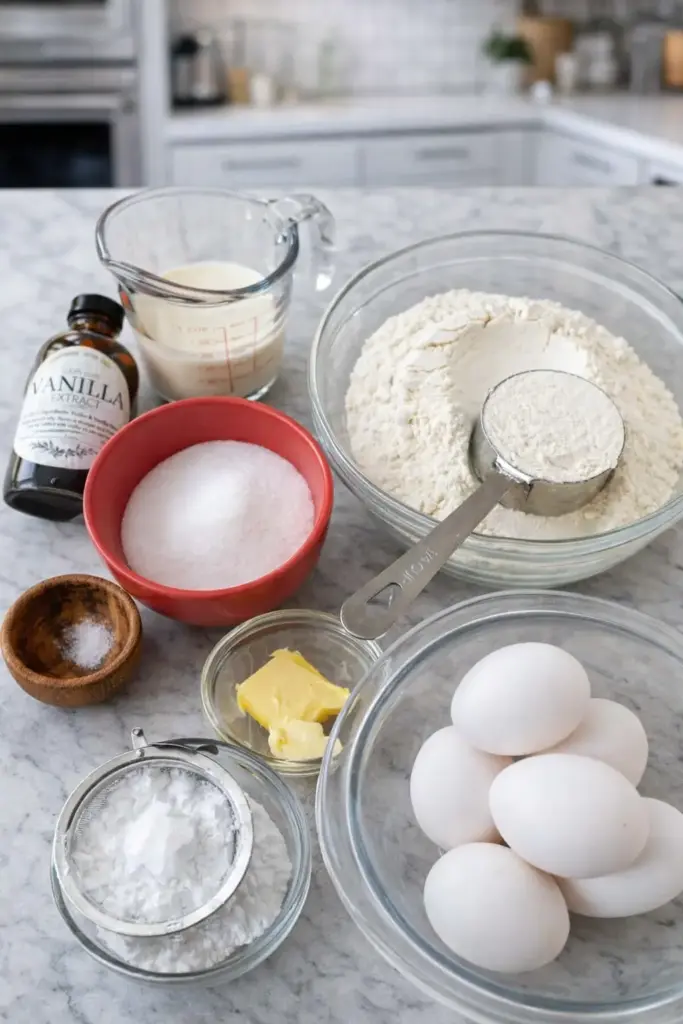
The beauty of this recipe lies in its simplicity. You’ll need just a few basic ingredients that you likely already have in your refrigerator and pantry. Additionally, everything can come straight from the fridge, no need to wait for room temperature ingredients, which means you can start baking on a whim.
- 6 large egg yolks: The foundation of your dough, providing richness and structure. Cold eggs separate more easily, so keep them refrigerated until ready to use.
- 6 tablespoons granulated sugar: Adds just a hint of sweetness to the dough itself, the real sweetness comes from the powdered sugar dusting later.
- 6 tablespoons heavy whipping cream: Creates tenderness and a delicate crumb in the finished cookies.
- 1 teaspoon vanilla extract: Preferably homemade for deeper flavor, though store-bought works perfectly well.
- 1 tablespoon unsalted butter, melted: Adds richness and helps create that melt-in-your-mouth texture.
- Pinch of salt: Enhances all the other flavors and balances the sweetness.
- 2¼ cups all-purpose flour, plus ¼ cup for dusting: The structure of your cookies. You’ll use the extra flour for kneading and rolling.
- Vegetable oil for frying: Choose a neutral, high-heat oil like vegetable, canola, or extra light olive oil.
- Powdered sugar for dusting: Be generous here, this is where the signature sweetness comes from, and it creates that beautiful snowy appearance.
Substitution tips: If you’re out of heavy cream, you can substitute with sour cream for a slightly tangier flavor. For a dairy-free version, try full-fat coconut cream, though the flavor will be subtly different. The egg yolks are essential and difficult to substitute, as they provide the structure and richness that make these cookies special.
Step-by-Step Instructions for Perfect Angel Wing Cookies
Separate Your Eggs and Prepare the Base
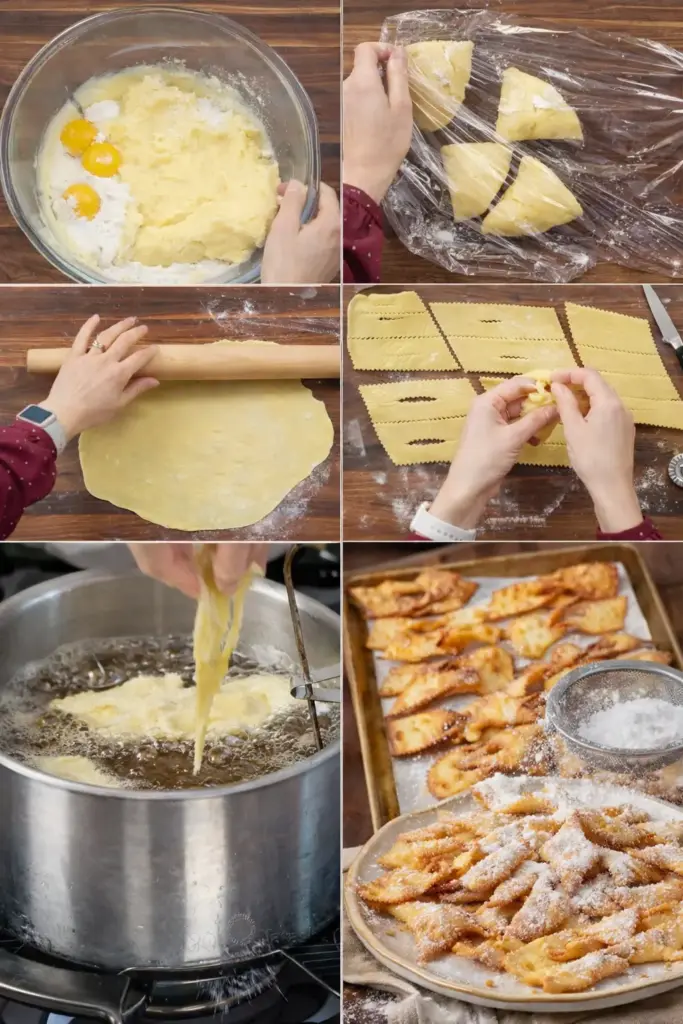
Start by separating your eggs while they’re still cold, as cold eggs separate much more easily than room temperature ones. Simply crack each egg and transfer the yolk back and forth between the shell halves, letting the white drop into a separate bowl. Place your 6 egg yolks in a large mixing bowl and add 6 tablespoons of granulated sugar. Using an electric hand mixer on high speed, beat the mixture for about 1 minute until it lightens to a pale yellow color. This aeration step is important because it creates a lighter texture in your finished cookies. Consequently, don’t skip the full minute of beating.
Combine the Wet Ingredients
Once your yolk mixture is pale and fluffy, add the 6 tablespoons of heavy whipping cream, 1 teaspoon of vanilla extract, a pinch of salt, and your tablespoon of melted butter. Beat everything together on medium speed for about 30 seconds, just until all the ingredients are fully combined and the mixture looks smooth and homogeneous. The mixture will be quite liquid at this point, which is exactly what you want.
Incorporate the Flour Gradually
Add your 2¼ cups of flour gradually, a few tablespoons at a time, mixing between each addition. Initially, you can use your electric mixer, but as the dough thickens, it will become too heavy for the mixer to handle effectively. When you notice the mixer struggling, switch to a firm spatula or a flexible food scraper. Mix in the remaining flour by hand, using folding motions to incorporate it fully. The dough should come together into a shaggy mass that’s still slightly sticky.
Knead the Dough to Perfect Consistency
Transfer your dough to a clean work surface. If it’s still quite sticky, sprinkle a bit of the extra ¼ cup of flour onto your surface and onto the dough. Knead the dough for about 1 minute, adding small amounts of flour as needed, until the dough is completely smooth and no longer sticky to the touch. The texture should resemble Play-Doh, pliable and soft but not tacky. This is one of the most forgiving doughs you’ll ever work with, so don’t worry about over-kneading.
Divide and Roll the Dough
Divide your dough into 4 equal pieces and wrap 3 of them in plastic wrap to prevent them from drying out while you work with the first piece. Lightly dust your work surface and rolling pin with flour. Roll out one piece of dough as thin as possible, aiming for slightly thicker than a lasagna noodle. The dough should be almost translucent when held up to the light. Pro tip: If you have a pasta roller attachment for your stand mixer, this is an incredible time-saver. Simply flour the dough well and gradually roll it from setting 8 down to setting 3, which gives you the perfect thickness every time.
Cut the Dough into Strips
Using either a pizza cutter or a ravioli cutter (the ravioli cutter creates prettier crimped edges), cut your rolled dough into strips about 1 inch wide. Then, cut these strips diagonally into 4-inch lengths. You should end up with elongated diamond or parallelogram shapes. Don’t worry about being perfectly precise, the beauty of these cookies is in their rustic, handmade appearance. Gather any scraps and add them back to your remaining wrapped dough to reroll later.
Create the Signature Angel Wing Shape
Now comes the fun part. Using your pizza cutter or a sharp knife, cut a 1-inch slit lengthwise down the center of each piece of dough. Take one end of the dough and carefully pull it through the slit, then gently tug to create a twisted, wing-like shape. The dough will naturally form an elegant curve that resembles an angel’s wing. For longer pieces, you can even cut two slits and fold from both directions to create a more elaborate twist. Transfer each shaped cookie to a baking sheet as you work.
Prepare Your Frying Station
Before you start frying, make sure all your cookies are shaped and ready to go, because once the frying begins, things move quickly. Pour about 2 inches of vegetable oil into a large, deep saucepan or Dutch oven. Attach a clip-on oil thermometer to the side of the pan and heat the oil over medium heat to 370°F. Set up your workstation with tongs or two forks for flipping, and a paper towel-lined platter for draining. Keeping your oil temperature steady between 360-370°F is crucial for perfectly crispy cookies that aren’t greasy.
Fry the Cookies to Golden Perfection
Carefully add 3-4 shaped cookies to the hot oil, placing them in one at a time to avoid splashing. They’ll immediately float to the surface and start to puff slightly. Watch them closely, they cook incredibly fast. After about 15 seconds, as soon as you see them start to turn golden on the edges, use your tongs or two forks to flip them over. Fry for another 15 seconds on the second side until they’re evenly golden. If they’re browning faster than 15 seconds per side, your oil is too hot, reduce the heat slightly. Transfer the fried cookies to your paper towel-lined platter to drain excess oil. Repeat with the remaining cookies, monitoring your oil temperature constantly.
Dust with Powdered Sugar
Once all your cookies are fried and have cooled for a few minutes, it’s time for the finishing touch. Arrange your cookies on a large serving platter in layers. After each layer, dust generously with powdered sugar using a fine-mesh sieve. Don’t be shy with the sugar, the cookie itself has very gentle sweetness, so the powdered sugar provides most of the sweet flavor. You can dust both sides of each cookie for maximum sweetness and that classic snowy appearance. Important tip: When you bite into these, don’t inhale, or you’ll get a mouthful of powdered sugar.
Healthier Alternatives for Angel Wing Cookies
While traditional Angel Wing Cookies are a holiday indulgence, there are several modifications you can make to reduce calories or accommodate dietary restrictions without sacrificing too much of that beloved flavor and texture.
- Baked instead of fried: For a lower-fat version, you can try baking these cookies at 375°F for about 8-10 minutes until golden. However, be aware that they won’t have the same ethereal crispness as fried versions, and the texture will be more like a crispy cracker.
- Reduce sugar: Cut the granulated sugar in the dough by half, relying more on the powdered sugar dusting for sweetness. This saves about 15 calories per cookie.
- Use Greek yogurt: Replace the heavy cream with full-fat Greek yogurt for added protein and reduced fat. The texture will be slightly denser but still delicious.
- Whole wheat flour blend: Substitute half the all-purpose flour with white whole wheat flour for added fiber and nutrients. The cookies will have a slightly nuttier flavor and a touch more color.
- Air fryer method: Spray your shaped cookies lightly with oil and air fry at 350°F for 5-7 minutes, flipping halfway through. This dramatically reduces the amount of oil used while still creating a crispy texture.
- Sugar-free dusting: For diabetic-friendly versions, use powdered erythritol or monk fruit sweetener for dusting instead of regular powdered sugar.
Keep in mind that these are traditionally indulgent treats meant for special occasions, so sometimes it’s perfectly fine to enjoy the classic version in moderation rather than compromising too much on what makes them special.
Serving Suggestions for Angel Wing Cookies
Angel Wing Cookies are beautiful on their own, but there are countless creative ways to serve them that will impress your guests and enhance the overall experience.
- Classic holiday platter: Arrange the cookies on a large white platter or cake stand, stacking them in a casual pyramid shape with generous dustings of powdered sugar between layers. The contrast of golden cookies against white sugar creates a stunning visual.
- Coffee and tea pairings: These cookies are phenomenal alongside espresso, cappuccino, or strong black tea. The mild sweetness complements bold coffee flavors perfectly, and they’re sturdy enough for dunking.
- Dessert garnish: Use smaller angel wings as an elegant garnish for ice cream sundaes, panna cotta, or mousse. They add a sophisticated crunch and beautiful presentation.
- Hot chocolate station: Set out a platter of Angel Wing Cookies next to your hot chocolate bar during holiday gatherings. They’re the perfect sweet accompaniment that won’t overwhelm the chocolate flavor.
- Gift packaging: Layer the cookies in decorative tins or clear cellophane bags tied with ribbon. They make exceptional homemade gifts for teachers, neighbors, and colleagues, and they stay crispy for up to a week when stored properly.
- Brunch centerpiece: Serve these alongside fresh fruit, whipped cream, and jam for an elegant Christmas morning brunch spread.
- Flavored variations: Before dusting, try lightly drizzling with melted dark chocolate, or add a pinch of cinnamon or cardamom to the powdered sugar for aromatic complexity.
Common Mistakes to Avoid When Making Angel Wing Cookies
Even though this recipe is remarkably forgiving, there are a few pitfalls that can prevent your cookies from turning out perfectly crispy and beautiful. Here’s what to watch out for.
- Rolling the dough too thick: Thick cookies will be doughy and soft rather than crispy and delicate. Always aim to roll the dough as thin as possible, nearly translucent. If you’re unsure, hold a piece up to the light, you should almost be able to see through it.
- Oil temperature too low: If your oil isn’t hot enough (below 360°F), the cookies will absorb too much oil and become greasy rather than crispy. Always use a thermometer and maintain steady heat between 360-370°F.
- Oil temperature too high: Conversely, if the oil is too hot (above 375°F), the cookies will brown within seconds on the outside while remaining raw inside. If you notice they’re browning in less than 15 seconds, reduce your heat immediately.
- Overcrowding the pan: Frying too many cookies at once will drop the oil temperature dramatically and cause uneven cooking. Stick to 3-4 cookies at a time for consistent results.
- Not dusting generously enough with powdered sugar: Remember, the dough itself is only mildly sweet. The powdered sugar provides most of the sweetness, so be generous. Many first-time bakers are too conservative with the dusting and end up with bland cookies.
- Skipping the kneading step: Even just 60 seconds of kneading makes a significant difference in creating smooth, pliable dough that rolls out easily without tearing.
- Letting shaped cookies sit too long before frying: If your shaped cookies sit out for more than 30 minutes, they can start to dry out and may crack when they hit the hot oil. Shape them close to frying time.
- Not watching the cookies while frying: These cook in literal seconds. Looking away for even 30 seconds can result in burnt cookies. Stay focused during the frying process.
Storing Tips for Angel Wing Cookies
Proper storage is essential for maintaining that signature crispness that makes these cookies so addictive. Here’s how to keep them fresh and delicious.
- Cool completely before storing: Allow your fried cookies to cool completely to room temperature before storing, at least 30 minutes. Storing warm cookies will create condensation and make them soggy.
- Use airtight containers: Store the cookies in an airtight container or tin at room temperature. Layer them with parchment paper between each layer to prevent them from sticking together.
- Skip the refrigerator: Never refrigerate Angel Wing Cookies, as the moisture in the refrigerator will make them lose their crispness within hours.
- Dust with sugar just before serving: For best results, store the cookies un-dusted and add the powdered sugar just before serving. This prevents the sugar from dissolving into the cookies and keeps them looking fresh and snowy.
- Shelf life: When stored properly, these cookies stay crispy and delicious for up to one week. However, in most households, they disappear within 1-2 days.
- Freezing option: You can freeze un-dusted cookies for up to 2 months. Place them in a single layer on a baking sheet and freeze until solid, then transfer to a freezer bag. Thaw at room temperature for about 15 minutes and dust with powdered sugar before serving.
- Refreshing softened cookies: If your cookies lose some crispness, you can refresh them by placing them on a baking sheet in a 300°F oven for 3-5 minutes. Let them cool completely before serving.
- Humidity considerations: These cookies are particularly sensitive to humidity. On very humid days, they may soften more quickly. Store them with a small packet of food-safe silica gel to absorb excess moisture.
Why Angel Wing Cookies Deserve a Place in Your Holiday Tradition
Angel Wing Cookies represent so much more than just another holiday dessert. They’re a connection to centuries of European baking tradition, a tangible expression of care and craftsmanship, and surprisingly, one of the most approachable special-occasion cookies you can make. Unlike finicky macarons or temperamental meringues, this dough is forgiving and fun to work with. The frying process is quick and satisfying, transforming simple strips of dough into golden, crispy masterpieces in mere seconds. Moreover, the dramatic visual impact of these cookies, with their delicate twists and snowy dusting, makes them look far more complicated than they actually are.
What makes these cookies truly special is how they bring people together. There’s something inherently communal about the shaping process, making them an excellent activity for families with children or groups of friends. Everyone can participate in rolling, cutting, and twisting the dough, and the variations in shapes add to their homemade charm. Furthermore, they’re incredibly versatile for gifting, traveling well in tins and staying fresh for days. Whether you’re honoring your Polish, Hungarian, Italian, or Scandinavian heritage (each culture has their own version), or simply starting a new tradition, these cookies have a way of becoming a requested favorite year after year.
The minimal ingredient list means you can make them on short notice, and the quick frying method produces dozens of cookies in under an hour. For busy holiday bakers juggling multiple recipes, this efficiency is invaluable. Give these Angel Wing Cookies a try this holiday season, and I guarantee they’ll earn a permanent spot on your annual baking list. Don’t forget to hide them once they’re finished, or you might find yourself making a second batch sooner than you planned.
Frequently Asked Questions About Angel Wing Cookies
Can I make the dough ahead of time?
Absolutely! The dough actually benefits from resting. You can make it up to 2 days ahead, wrap it tightly in plastic wrap, and refrigerate it. When you’re ready to use it, let it sit at room temperature for about 15 minutes to make it easier to roll out. The rested dough often rolls out even more smoothly than fresh dough.
Why are my cookies greasy instead of crispy?
Greasy cookies are almost always the result of oil temperature that’s too low. Invest in a reliable clip-on thermometer and maintain your oil between 360-370°F. If the oil temperature drops below 350°F, the cookies will absorb oil instead of crisping up quickly. Also, make sure you’re draining the cookies on paper towels immediately after frying.
Can I use a different type of flour?
All-purpose flour works best for the classic texture. However, you can substitute up to half the flour with white whole wheat flour for a slightly heartier version. Avoid using bread flour, which has too much protein and will make the cookies tough, or cake flour, which doesn’t provide enough structure.
What can I do with the leftover egg whites?
Don’t waste those 6 egg whites! Store them in an airtight container in the refrigerator for up to 4 days and use them for meringues, macarons, angel food cake, or add them to your morning scrambled eggs for extra protein. You can also freeze egg whites for up to 3 months.
Are these cookies supposed to be soft or crispy?
Traditional Angel Wing Cookies should be delicately crispy, not soft. They should shatter lightly when you bite into them and have an airy, delicate crumb. If yours are coming out soft, you’re likely rolling them too thick or your oil temperature is too low. Aim for paper-thin dough and properly heated oil.
Can I bake these instead of frying them?
While you can bake them at 375°F for 8-10 minutes, the texture will be quite different from traditional fried cookies. Baked versions tend to be more cracker-like and lack the characteristic delicate crispness of fried Angel Wings. If you prefer to avoid frying, an air fryer produces results closer to traditional frying.
How do I prevent the dough from shrinking when I cut it?
Unlike pie dough or other pastries, this dough doesn’t typically shrink because it has very little gluten development and no leavening agents. If you’re experiencing shrinkage, you may be overworking the dough during kneading. Knead just until smooth, about 60 seconds, and let the dough rest for 10 minutes before rolling if it seems elastic.
What’s the best oil to use for frying?
Choose a neutral-flavored oil with a high smoke point. Vegetable oil, canola oil, and extra light olive oil all work excellently. Avoid oils with strong flavors like virgin olive oil or coconut oil, as they’ll compete with the delicate flavor of the cookies. You’ll need about 4-6 cups of oil depending on the size of your pan.
Must Try Recipes
- Coconut Orange Slice Cookies
Bright coconut cookies with citrus zest. - Chocolate Sugar Cookies
Rich chocolate sugar cookies perfect for dessert lovers. - Stained Glass Cookies
Festive cookies with a colorful sugar center. - Chewy Oatmeal Cookies
Warm and chewy oatmeal cookies ideal for snack. - Smores Cookies
Gooey marshmallow and chocolate cookies for camping vibes.
Tools You’ll Need
Essential Kitchen Tools
Everything you need to make cooking easier and more enjoyable


Want to save this recipe?
Want to save this recipe? Enter your email below, and we'll send it straight to your inbox. Plus, receive new recipes every week!

Crispy Angel Wing Cookies (Chrusciki)
- Total Time: 45 minutes
Description
Light and crispy Angel Wing Cookies are shaped, fried, and dusted with powdered sugar for an irresistibly festive treat.
Ingredients
- 6 egg yolks (from large eggs)
- 6 Tbsp granulated sugar
- 1 Tbsp unsalted butter, melted
- Pinch of salt
- 1 tsp vanilla extract
- 6 Tbsp heavy whipping cream
- 2¼ cups all-purpose flour, plus extra for dusting
- Vegetable oil for frying
- Powdered sugar for dusting
Instructions
- In a large bowl, beat egg yolks and sugar with an electric mixer until light and creamy, about 1 minute.
- Stir in cream, vanilla, melted butter, and salt until combined.
- Gradually add 2¼ cups flour, mixing until dough forms; turn onto a floured surface and knead until smooth, adding more flour if sticky.
- Divide dough into 4 pieces, wrap in plastic, and roll one piece at a time into a very thin sheet on a floured surface.
- Cut dough into 1″ strips, then into 4″ pieces; slice a 1″ slit lengthwise, thread one end through, and twist to form a ribbon shape.
- Heat oil in a saucepan to 370°F, maintaining 360–370°F. Fry 3–4 cookies for 15 seconds per side until golden.
- Drain on paper towels, repeat with remaining dough, and dust generously with powdered sugar.
- Prep Time: 30 minutes
- Cook Time: 15 minutes
- Category: Desserts
- Cuisine: American
Nutrition
- Serving Size: 50 cookies
- Calories: 41 kcal
- Sugar: 2 g
- Sodium: 2 mg
- Fat: 2 g
- Saturated Fat: 1 g
- Unsaturated Fat: 0.7 g
- Trans Fat: 0.01 g
- Carbohydrates: 6 g
- Fiber: 0.2 g
- Protein: 1 g
- Cholesterol: 26 mg