


Craving something sweet but want a better alternative to traditional candy bars? These Date Snickers are a simple no-bake dessert made with Medjool dates, peanut butter, chocolate, and crunchy peanuts and they taste surprisingly close to the real thing.
This easy Date Snickers recipe is naturally sweetened and made with just a few wholesome ingredients. It is a great option for anyone looking for a healthier dessert or snack. Each bite delivers the perfect mix of chewy, creamy, and crunchy textures just like your favorite candy bar.
Even better, these no-bake bars come together quickly and can be made ahead for the week. Whether you need a quick snack, a healthier treat, or an easy dessert idea, this recipe is one you will come back to again and again.
Why This Actually Works (Before You Start)
The magic here comes down to one ingredient doing double duty: Medjool dates. Their soft, sticky texture mimics the chew of caramel, and their natural sweetness means you need zero added sugar in the base. That is not a compromise. That is the whole point.
The layers build on each other intentionally. Dates provide structure and sweetness. Peanut butter adds fat and creaminess that holds everything together. Chocolate seals the top and gives you that satisfying snap. Peanuts add the crunch that makes it feel like a real candy bar, not a health food imitation.
One thing worth knowing upfront: the hardest part of this recipe is spreading cold peanut butter over sticky dates without tearing the layer. Warm your peanut butter for about 20 to 30 seconds in the microwave before spreading. It pours like a dream and saves a lot of frustration.
Ingredients for Date Snickers
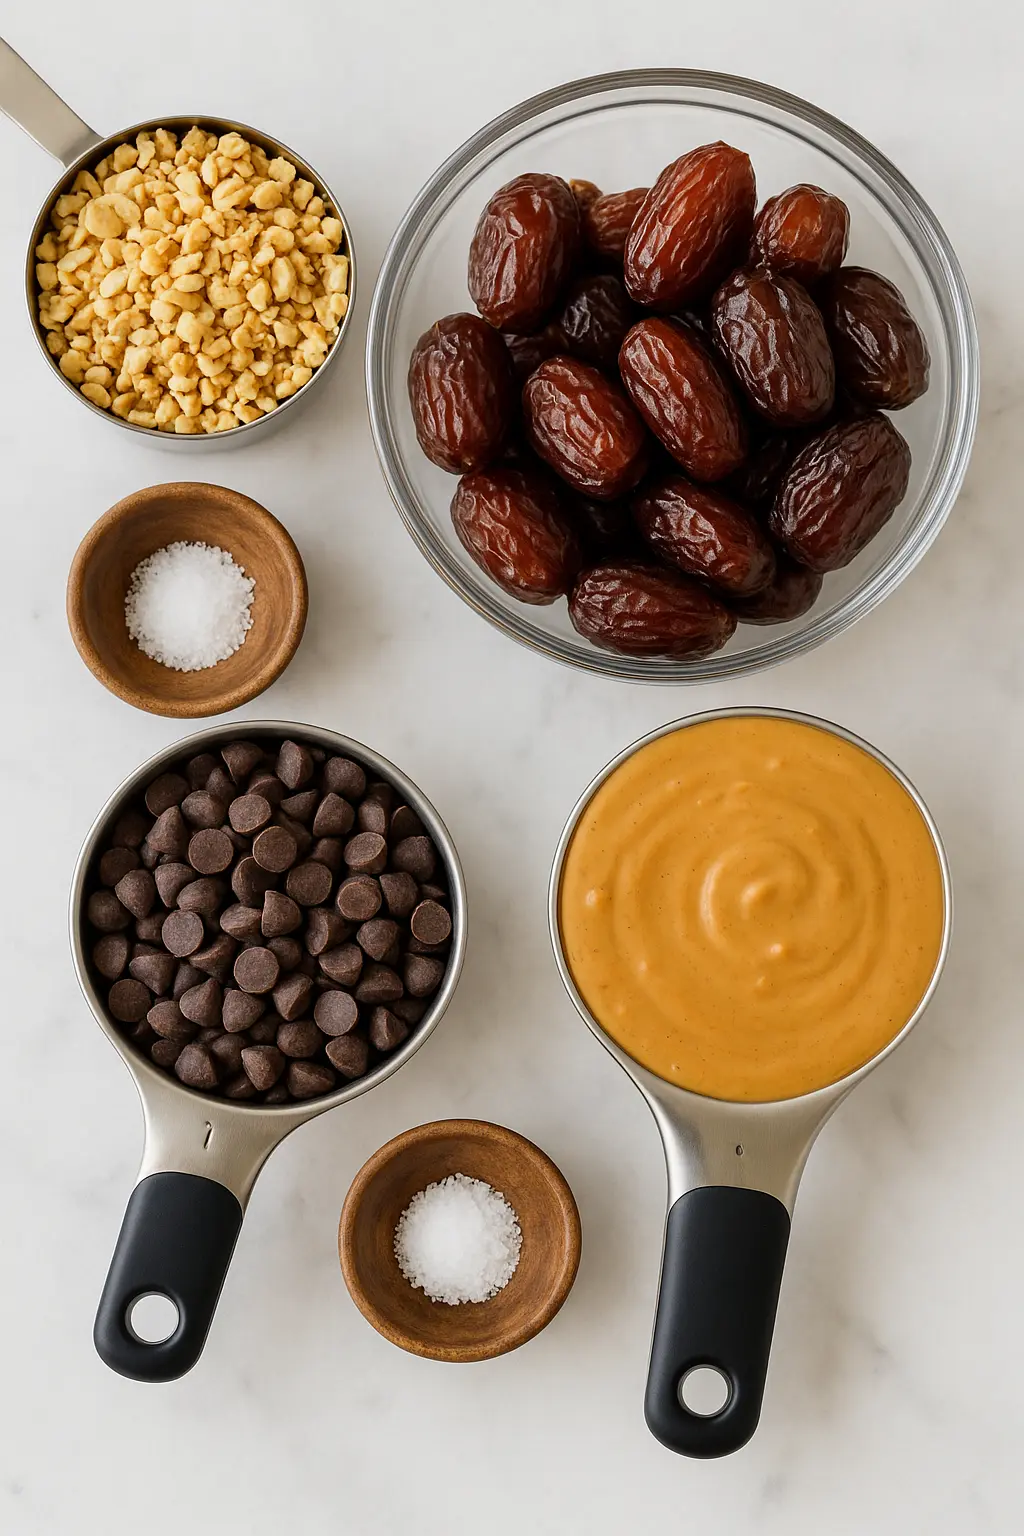
- 20 Medjool dates, pitted — the soft, moist variety is non-negotiable here. Dry or shriveled dates will not press into a cohesive layer and the texture suffers noticeably.
- 3/4 cup semisweet chocolate chips (or milk chocolate chips for a sweeter result closer to the original candy bar)
- 2/3 cup natural creamy peanut butter, stirred — look for peanut butter made with just peanuts and salt, with no added sugar or stabilizers. The natural oils help it spread smoothly once warmed.
- 1/2 cup peanuts, coarsely chopped — these go on top while the chocolate is still melted so they adhere as it sets.
- 1/4 tsp kosher salt (optional, but the contrast it adds against the sweet chocolate is worth it)
Substitution ideas: Cashews, pistachios, or slivered almonds work beautifully in place of peanuts. For a nut-free version, a thick seed butter like sunflower seed butter can stand in for peanut butter, though the flavor profile shifts. Dark chocolate chips are a great swap if you prefer less sweetness overall.
How to Make Date Snickers: Step-by-Step
Step 1: Press the Dates Into a Solid, Even Foundation
Line a baking sheet with parchment paper. Pit the dates and open them so the sticky centers face up. Arrange them side by side in a rough rectangle shape on the parchment. Cover with a second sheet of parchment paper and use a rolling pin or the back of a cup to press them into one even, gap-free layer.
You will know this step is done correctly when you can no longer see individual dates, just one cohesive, slightly glossy slab. If gaps appear, press the edges together with your fingers before moving on. Any gaps become weak points when you cut the bars later.
Step 2: Coat the Dates Without Tearing the Layer
Remove the top sheet of parchment and spread the peanut butter evenly over the date layer using an offset spatula. Work from the center outward, getting as close to the edges as possible.
One thing to watch: cold peanut butter drags and pulls the date layer up with it. Warm the peanut butter for 20 to 30 seconds first so it flows easily. It does not need to be perfectly smooth, but you want full coverage.
Step 3: Melt the Chocolate Without Scorching It
Place the chocolate chips in a microwave-safe mixing bowl and heat in 30-second increments, stirring between each. It typically takes 60 to 90 seconds total. The chocolate is ready when it stirs completely smooth with no visible chips remaining.
Do not push past that point. Overheated chocolate turns grainy and dull rather than glossy, and it will not set with that satisfying snap. As soon as it is fully melted and smooth, stop the microwave.
Step 4: Seal the Top with an Even Chocolate Layer
Pour the melted chocolate over the peanut butter layer and use a spoon or offset spatula to spread it into an even coat. It does not need to be flawless. The swirls and texture on top actually look beautiful once set.
While the chocolate is still warm and fluid, sprinkle the coarsely chopped peanuts over the surface and gently press them in with your fingertips. Add the kosher salt now if using. The peanuts need to go on while the chocolate is liquid so they bond as it hardens.
Step 5: Set and Slice into Bars
Refrigerate the whole sheet uncovered until the chocolate is completely firm, about 1 hour. Alternatively, freeze for 30 minutes if you are short on time. You will know it is ready when the chocolate surface feels hard to the touch and does not give at all when pressed.
Once set, use a sharp knife to cut into Snickers-sized bars or squares. Placing the date side down when holding them keeps the sticky base from sticking to your fingers.
What Separates Good Date Snickers from Great Ones
- Use only soft Medjool dates. These are the same variety used in stuffed date recipes for good reason. Their moisture content is what makes the layer press together cleanly. Dry dates crumble and leave gaps.
- Add peanuts while the chocolate is still melted. Waiting even a few minutes means the chocolate starts to set and the peanuts will not adhere properly. They will fall off when you pick up a piece.
- Freeze to set rather than refrigerate if you want cleaner cuts. The freezer firms everything up faster and the peanut butter holds its shape better when sliced cold.
- Try a small amount of coconut oil in the chocolate. About 1/2 teaspoon stirred into the melted chocolate gives it a slightly glossier finish and a cleaner snap once hardened.
- Milk chocolate versus semisweet: I personally prefer semisweet for a less sweet result that lets the date flavor come through. Milk chocolate brings it closer to the candy bar experience. Both are genuinely good.
Serving Suggestions
Cut into bars for a straightforward snack, or slice into smaller squares for a dessert platter. The triangular cut works surprisingly well for a more elegant presentation, especially on a holiday spread.
These pair well alongside fresh fruit or a small handful of nuts when you want a more complete snack. Letting them sit at room temperature for 5 to 10 minutes before eating softens the peanut butter layer slightly and makes the texture even more satisfying.
They also work on a gluten-free dessert platter alongside other naturally gluten-free treats, since the entire recipe contains no wheat or gluten-containing ingredients.
Make It Once, Use It All Week
Store Date Snickers in an airtight container at room temperature for 3 to 4 days. For longer storage, refrigerate for up to 2 weeks. The chocolate stays firm and the layers hold together well when kept cold.
For freezing, cut the bars first, then wrap individually or layer between parchment in an airtight container. They keep well in the freezer and only need 10 to 15 minutes at room temperature to thaw before eating. The texture after thawing is nearly identical to fresh.
This makes them genuinely useful for meal prep. A batch on Sunday gives you a grab-and-go sweet option all week without any additional effort.
A Treat Worth Making Again
The first time I made these, I was skeptical that four ingredients could actually deliver on the Snickers comparison. They do. The chewy date base, the creamy peanut butter middle, the snappy chocolate top, and the crunch of the peanuts hit every note that makes a candy bar satisfying, without the ingredient list that makes you feel like you need to put it back on the shelf.
Give this one a try when you want something that actually satisfies. You might be surprised how quickly the whole batch disappears.
Must Try Recipes
- Homemade Tahini — Perfect for a healthy, creamy touch to various dishes.
- Peanut Butter Eggs — A delightful treat for peanut butter lovers.
- Raspberry Bars — Enjoy a fruity and sweet contrast with your Date Snickers.
Frequently Asked Questions
Can I make Date Snickers without a rolling pin?
Yes. The back of a flat-bottomed measuring cup or a small saucepan works just as well. The goal is even pressure across the entire date layer until no gaps remain and the surface looks uniform.
What type of dates work best for this recipe?
Medjool dates are strongly recommended because of their soft, moist texture. They press into a cohesive layer easily and provide the chewy, caramel-like quality that makes Date Snickers taste like a candy bar. Avoid dates that feel dry or look shriveled.
Can I use a different nut butter instead of peanut butter?
Almond butter and cashew butter both work well and keep a similar consistency. Sunflower seed butter is a good nut-free option, though the flavor is noticeably different. Whatever you use, warm it slightly before spreading so it does not tear the date layer.
Why did my chocolate turn grainy when I melted it?
Overheating is the most common cause. Chocolate scorches quickly in the microwave. Heat in 30-second increments and stop as soon as it stirs completely smooth. If it does seize slightly, stirring in a small amount of coconut oil can sometimes rescue the texture.
How do I cut clean bars without the peanut butter oozing out?
Freeze the set bark for 30 minutes rather than refrigerating for an hour. The colder temperature firms the peanut butter enough that a sharp knife slices through cleanly. A warm knife blade also helps, run it under hot water and wipe dry before each cut.
Are Date Snickers gluten-free and vegan?
Yes to both, provided you use dairy-free chocolate chips. The base recipe contains no gluten or animal products. Check your chocolate chip label if strict vegan compliance matters, as some brands include milk solids.
Tools That Make Date Snickers Actually Work
Most failed attempts come down to the wrong equipment. These are the exact tools that get you the right texture, heat, and result every time.

Want to save this recipe?
Want to save this recipe? Enter your email below, and we'll send it straight to your inbox. Plus, receive new recipes every week!

Light Date Snickers Recipe
- Total Time: 1 hour 10 minutes
- Yield: 16 pieces 1x
- Diet: Vegan
Description
Date Snickers are a perfect candy or snack alternative, and are absolutely delicious. These no-bake treats combine peanut butter, chocolate, and peanuts layered over dates for a healthy, irresistible sweet treat you won’t want to miss.
Ingredients
- 20 Medjool dates, pitted
- 3/4 cup semisweet chocolate chips or milk chocolate chips
- 2/3 cup natural creamy peanut butter, stirred
- ½ cup peanuts, coarsely chopped
- ¼ tsp kosher salt, optional
Instructions
- To start, line a baking sheet with parchment paper. Pit the dates and open them so the sticky sides are facing upwards. Place the dates side by side on the parchment to create a rough rectangle. Cover with another sheet of parchment and use a rolling pin or the back of a cup to flatten the dates into an even layer, filling all gaps.
- Next, take off the top layer of parchment and evenly spread the peanut butter over the dates. An offset spatula can help achieve a smooth layer.
- In a microwave-safe bowl, melt the chocolate according to the package directions. Stir the chocolate every 30 seconds, which usually takes about 60 to 90 seconds to completely melt.
- Pour the melted chocolate over the peanut butter layer, then use a spoon or offset spatula to create an even coating over the peanut butter.
- Sprinkle the chopped peanuts on top of the melted chocolate and gently press them in. If desired, add the kosher salt.
- Place the bar in the refrigerator uncovered until the chocolate hardens, which takes around 1 hour. Alternatively, you can freeze it for 30 minutes. Once set, cut the bark into bars resembling Snickers.
Notes
1. TECHNIQUE TIP: Stir the peanut butter well to ensure a smooth consistency for easy spreading within dates.
2. STORAGE: Store in an airtight container for up to 2 weeks in the fridge. Let them come to room temperature before serving for optimal texture.
3. SUBSTITUTION OR MAKE-AHEAD: Use dark chocolate chips for a less sweet option, or prepare and freeze in advance, thawing as needed.
- Prep Time: 10 minutes
- Cook Time: 1 hour
- Category: Dessert
- Method: Stovetop
- Cuisine: American
Nutrition
- Serving Size: 16 pieces
- Calories: 222 kcal
- Sugar: 24 g
- Sodium: 40 mg
- Fat: 11 g
- Saturated Fat: 3 g
- Unsaturated Fat: 7 g
- Trans Fat: 0.01 g
- Carbohydrates: 30 g
- Fiber: 4 g
- Protein: 5 g
- Cholesterol: 1 mg

