


Making a molten chocolate lava cake at home sounds intimidating, but the truth is most people overcomplicate it. The real challenge is not the technique, it is the timing. Get that wrong, and you end up with either a fully baked chocolate cake or a raw, soupy mess. This recipe solves exactly that problem with a clear, beginner-friendly approach that delivers a rich, gooey center every single time. With just seven ingredients and under 25 minutes from start to finish, you will pull individual cakes from the oven that look and taste like something from a proper restaurant dessert menu.
Why This Works Before You Even Start
Chocolate lava cakes are intentionally undercooked at the center. That is not a mistake, it is the whole point. The outer edges bake firm while the middle stays molten, and that contrast is what makes every bite so satisfying.
The recipe uses two whole eggs plus two extra yolks, which adds richness and helps the outer structure set quickly at high heat. The flour is kept to just two tablespoons, which is barely enough to hold the cake together. Any more and you lose the lava entirely.
One thing to watch: if your chocolate is still hot when you add it to the egg mixture, the eggs can scramble slightly. Let the melted chocolate cool for a couple of minutes before combining.
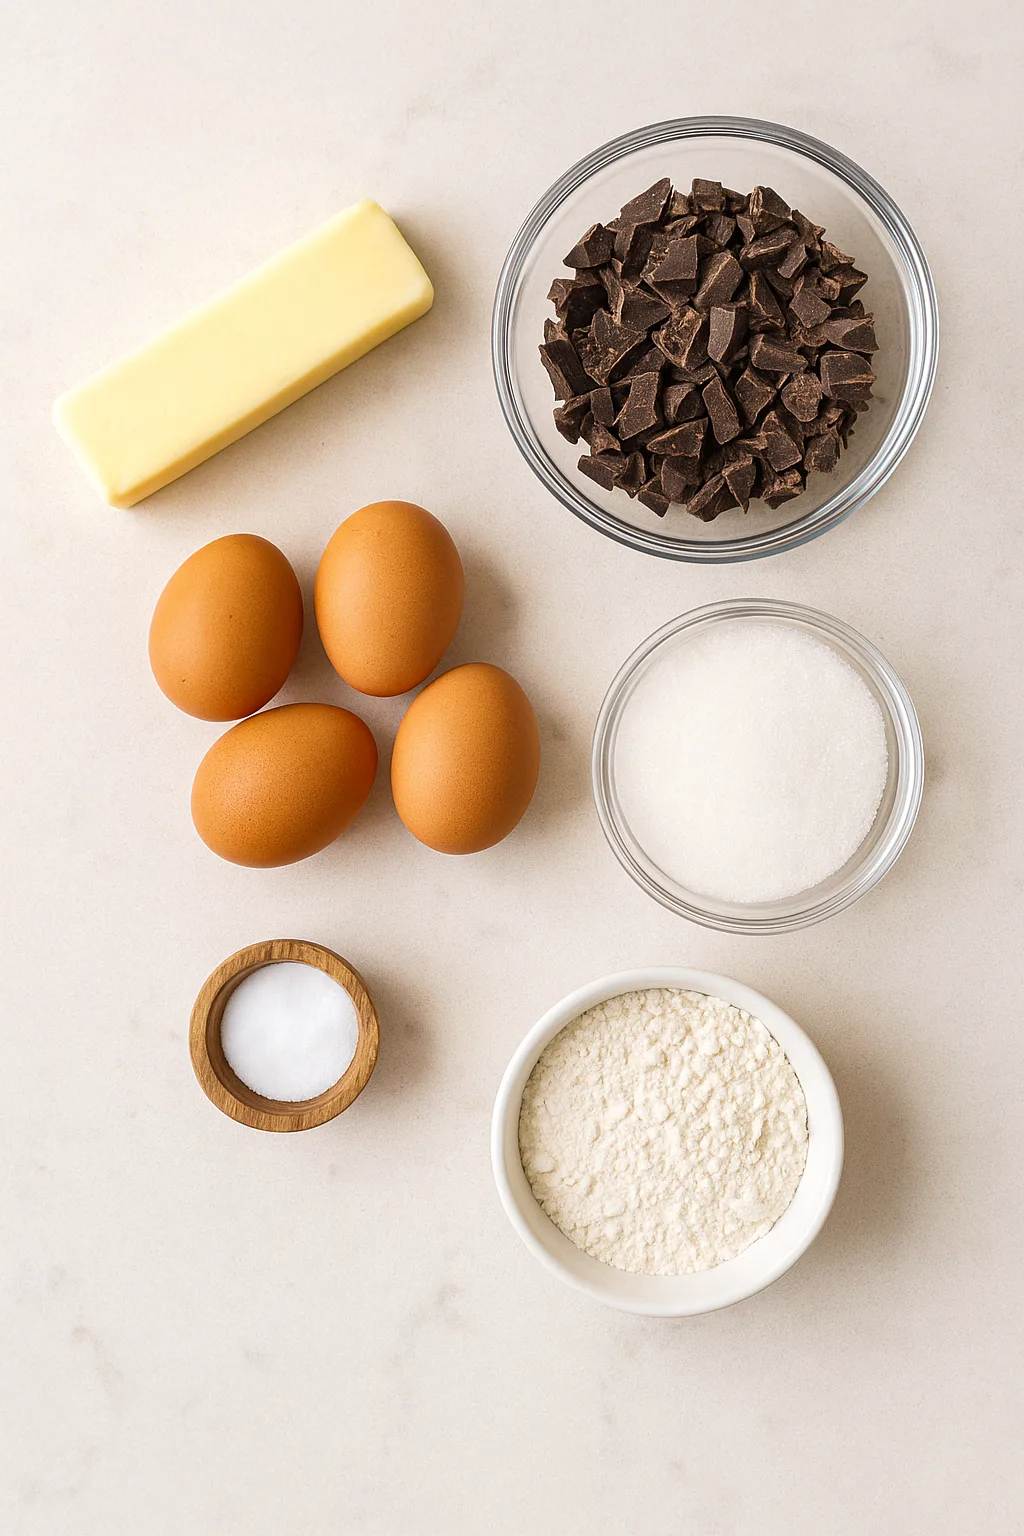
Ingredients for Chocolate Lava Cake
Every ingredient here is doing real work. Nothing is decorative.
- ½ cup unsalted butter (113g) — adds richness and helps the cake release cleanly from the ramekin
- 6 ounces bittersweet chocolate, chopped (168g) — this is the backbone of the flavor, so use a bar you would actually eat on its own
- 2 large eggs
- 2 large egg yolks — the extra yolks deepen the fudgy texture and add color
- ¼ cup granulated sugar (50g) — just enough to balance the bitterness without masking the chocolate
- ⅛ teaspoon salt
- 2 tablespoons all-purpose flour
Substitution notes: Bittersweet chocolate chips work in a pinch, though chopped bars melt more smoothly and evenly. Semi-sweet chocolate is a fine swap if that is what you have on hand, and the cakes will taste slightly sweeter. For a gluten-free version, a one-to-one gluten-free flour blend works here given the tiny quantity used.
If you enjoy baking with chocolate and want to explore other rich desserts, the Fudge Chocolate Cheesecake is another indulgent option worth having in your rotation.
Why Most Homemade Lava Cakes Fail (and How to Fix It)
Before walking through the steps, here are the four mistakes that ruin lava cakes most often.
- Skipping the butter and flour on the ramekins: This is the single biggest reason cakes stick. Coat every surface generously with butter, then add a light dusting of flour and tap out the excess. Do not rush this step.
- Overbaking: Even 60 extra seconds at 450°F can turn a lava cake into a regular chocolate cake. Pull them when the edges look set but the center still has a visible jiggle.
- Adding hot chocolate to cold eggs: The temperature difference can cause the eggs to cook unevenly. Always let the melted chocolate mixture cool slightly before combining.
- Baking too far in advance: These cakes need to go straight from the oven to the plate. Baking them ahead and reheating kills the molten center.
Step-by-Step Instructions
Step 1: Prepare the Ramekins So Nothing Sticks
Preheat your oven to 450°F. Butter six 4- to 5-ounce ramekins thoroughly, using your finger to press butter into the corners and up the sides. Add about a teaspoon of flour to each, shake to coat, then tap firmly to release the excess. Place the prepared ramekins on a Muffin Tin or baking sheet.
You will know the prep is right when the interior looks lightly matte with no bare spots. If you see shiny patches of uncoated butter, add a touch more flour there.
Step 2: Melt the Chocolate and Butter Until Completely Smooth
Combine the butter and chopped chocolate in a double boiler over low heat, stirring occasionally until fully melted and smooth. Alternatively, place both in a microwave-safe bowl and microwave on high in 30-second increments, stirring between each, until no lumps remain.
Chop the chocolate into small, uniform pieces before melting. Large uneven chunks take longer to melt and can cause the rest of the chocolate to overheat while you wait. Once melted, set the mixture aside to cool for a few minutes before the next step.
Step 3: Build the Egg Base That Gives the Cake Its Structure
In a large Mixing Bowl, combine the eggs, egg yolks, granulated sugar, and salt. Beat on medium speed until the mixture is thick and a pale, creamy yellow color. This takes a few minutes and is worth doing properly.
The mixture is ready when it looks noticeably lighter in color and slightly ribbony when you lift the beaters. If you skip this step and just stir the eggs loosely, the batter will be thinner and the cakes will not hold their shape as well after unmolding.
Step 4: Combine the Batter Without Losing the Airiness
Fold the cooled chocolate mixture into the egg mixture. Then sift the two tablespoons of flour directly over the batter as you fold, which prevents any lumps from forming. Fold until no streaks remain, scraping the bottom and sides of the bowl with a spatula.
Use a gentle folding motion rather than aggressive stirring. The batter should look glossy and uniform. Divide it evenly among the prepared ramekins.
Step 5: Bake to the Edge of Done, Then Stop
Bake at 450°F for 6 to 8 minutes. The sides of the cakes should look firm and set, but the center should still have a clear jiggle when you gently shake the pan. That jiggle is your lava.
Let the cakes cool in the ramekins for exactly 1 minute. No longer. Place a small dessert plate over each ramekin, invert confidently, hold for about 10 seconds, then lift the ramekin away. Sift powdered sugar over the top and garnish with fresh berries if you like. Serve immediately.
I personally prefer a handful of raspberries alongside, the tartness cuts through the richness beautifully. If you want another chocolate dessert that pairs well with fresh fruit, Chocolate Covered Strawberries are a natural companion for a full dessert spread.
What Separates a Good Lava Cake from a Great One
- Use a chocolate you genuinely enjoy eating. The flavor of these cakes is almost entirely the chocolate you choose. A higher quality bittersweet bar makes a real difference in depth of flavor.
- Make the batter ahead. You can fill the ramekins, cover them tightly, and refrigerate for up to two days. When guests arrive, let the ramekins come to room temperature, then bake as normal. The bake time may need an extra minute or so from cold.
- Do not skip the 1-minute rest. Inverting immediately causes the cake to fall apart. One minute in the ramekin lets the outer structure firm up just enough to hold its shape on the plate.
- Serve with vanilla ice cream. The contrast of warm, molten cake against cold ice cream is one of those combinations that genuinely never gets old.
Serving Suggestions
These cakes are rich and deeply satisfying on their own, but a few simple additions make them feel even more special. A scoop of vanilla ice cream placed next to the warm cake creates a contrast of temperatures that makes each bite more interesting.
Fresh raspberries or strawberries add brightness and cut through the intensity of the chocolate. A light dusting of powdered sugar keeps the presentation clean and elegant without any extra effort.
For a full chocolate-forward dessert table, consider pairing these with something lighter in texture, like Chocolate Chip Shortbread Cookies or a slice of Amazing Chocolate Bundt Cake for guests who want a larger portion.
Storage and Make-Ahead Notes
Baked lava cakes do not store well. Once baked, the molten center sets as it cools and reheating cannot fully restore it. The best approach is to bake them fresh every time.
The unbaked batter, however, stores beautifully. Fill your ramekins, cover each one with plastic wrap, and refrigerate for up to two days. When you are ready to bake, remove them from the fridge and let them sit at room temperature for about 20 to 30 minutes before going into the oven. You may need to add a minute to the bake time.
You will know they are ready even from cold when the edges look set and the center still has that characteristic wobble.
Ready to Make Your Molten Chocolate Lava Cake?
This recipe is proof that impressive desserts do not require complicated techniques or a long list of ingredients. Seven ingredients, one bowl, and less than 30 minutes stand between you and a restaurant-quality dessert at home.
The first time I made these, I pulled them out of the oven too early and panicked, thinking the whole thing was underdone. Turns out that wobble in the center is exactly what you want. Trust the process.
Give this one a try the next time you want to finish a meal with something genuinely memorable. You might be surprised how quickly those ramekins empty out. And if you want to keep exploring rich chocolate desserts, the Perfect Chocolate Pie is well worth a look.
FAQs
Can I make molten chocolate lava cake without ramekins?
Yes. A standard muffin tin works well as a substitute. Butter and flour each cup the same way you would a ramekin, and reduce the bake time to around 5 minutes since the smaller volume cooks faster. Watch for set edges and a jiggly center as your visual cue.
How do I know when the lava cakes are done without cutting into them?
Look at the edges. When the sides of each cake pull away slightly from the ramekin and look fully set, but the center still moves when you gently shake the pan, they are ready. That center jiggle is not underbaking, it is the lava.
Can I use milk chocolate instead of bittersweet?
You can, but the result will be noticeably sweeter and less intense. Bittersweet chocolate provides the depth that makes these cakes taste rich rather than just sweet. Semi-sweet is a closer substitute if bittersweet is unavailable.
Why did my lava cake stick to the ramekin?
This almost always comes down to insufficient prep. The ramekins need a thorough butter coating, including the corners and rim, followed by a light flour dusting. Tap out any excess flour so it does not clump. If you are still having trouble, try chilling the buttered and floured ramekins in the fridge for 10 minutes before adding the batter.
Can I bake these ahead of time for a dinner party?
Do not bake them ahead. Instead, prepare the batter, fill the ramekins, cover, and refrigerate for up to two days. Bake them fresh as your guests sit down. They take only 6 to 8 minutes, so the timing is very manageable even mid-dinner.
What if I accidentally overbake the lava cakes?
They become small, fully baked chocolate cakes, which are still genuinely good. The texture will be more fudgy than molten, but the flavor remains rich. Next time, check them at the 6-minute mark and look for that center jiggle before pulling them out.
Essential Kitchen Tools
Making molten chocolate lava cake? Most failed attempts come from using the wrong pan or heat setup — not the recipe itself.

Want to save this recipe?
Want to save this recipe? Enter your email below, and we'll send it straight to your inbox. Plus, receive new recipes every week!

Beginner-Friendly Molten Chocolate Lava Cake Recipe
- Total Time: 22 minutes
- Yield: 6 cakes 1x
Ingredients
- ½ cup unsalted butter ((113g))
- 6 ounces bittersweet chocolate (chopped (168g))
- 2 large eggs
- 2 large egg yolks
- ¼ cup granulated sugar ((50g))
- ⅛ teaspoon salt
- 2 tablespoons all-purpose flour
Instructions
- Start by preheating the oven to 450°F. Prepare 6 ramekins (4- to 5-ounce) by buttering and lightly flouring them, then arrange on a baking sheet.
- In a double boiler, melt the butter and chocolate over low heat, stirring until smooth. Alternatively, you can microwave them in a bowl, stirring every 30 seconds until fully melted, then whisk together until combined.
- In a large mixing bowl, combine the eggs, egg yolks, sugar, and salt. Beat on medium speed until the mixture becomes thick and pale yellow. Gently fold in the melted chocolate mixture and flour until everything is well mixed. Distribute the batter evenly among the prepared ramekins.
- Bake for 6 to 8 minutes, or until the edges are firm but the center remains jiggly. Allow the cakes to cool in the ramekins for 1 minute.
- To serve, place a small dessert plate over each ramekin and carefully invert it to release the cake onto the plate. Let it sit for about 10 seconds before lifting the ramekin away. Dust with powdered sugar and add berries for garnish, if desired. Serve right away.
Notes
TECHNIQUE TIP: Be sure to chop the bittersweet chocolate finely to ensure it melts evenly and creates a smooth batter.
STORAGE: Store leftover cakes in an airtight container in the refrigerator for up to 3 days. Reheat in the oven at a low temperature before serving for a gooey center.
- Prep Time: 13 minutes
- Cook Time: 8 minutes
- Category: Dessert
- Method: Baked
- Cuisine: American
Nutrition
- Calories: 383 kcal
- Sugar: 19 g
- Sodium: 80 mg
- Fat: 29 g
- Saturated Fat: 17 g
- Unsaturated Fat: 10 g
- Trans Fat: 1 g
- Carbohydrates: 25 g
- Fiber: 2 g
- Protein: 5 g
- Cholesterol: 166 mg

