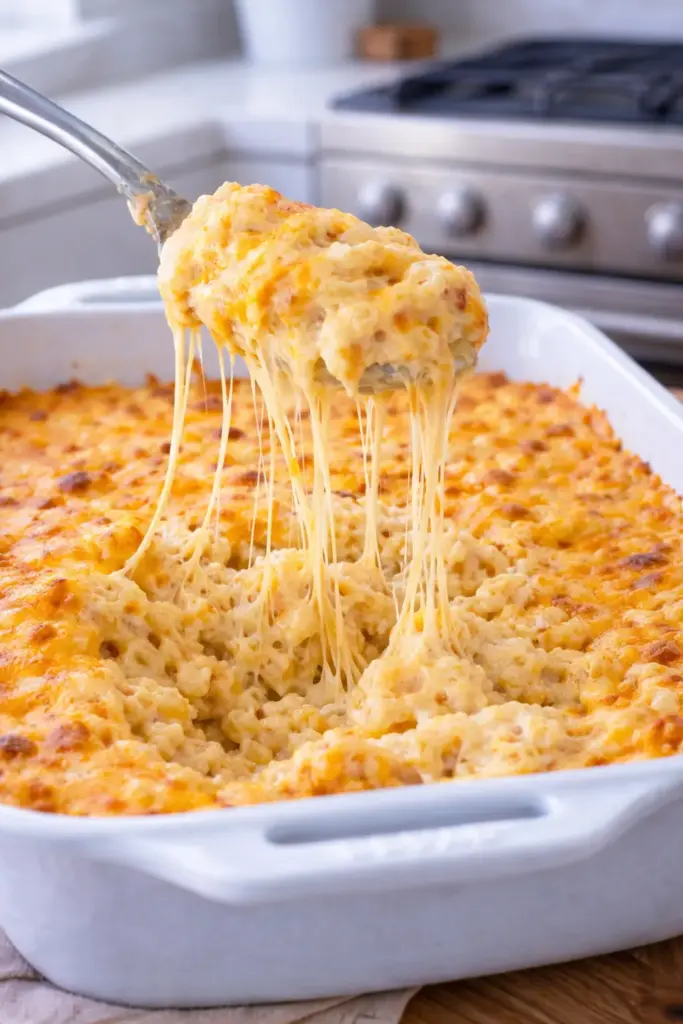
Did you know that the secret to achieving that irresistible, creamy texture in Baked Mac and Cheese lies in using reserved pasta water? This simple trick transforms a good casserole into an absolutely spectacular one that will have everyone asking for seconds. Picture this: golden, bubbly cheese creating a crispy crust on top, while underneath, tender elbow macaroni swimming in a velvety sauce that’s perfectly seasoned with just the right balance of sharpness from cheddar and gooey meltiness from mozzarella. The aroma alone is enough to bring the whole family running to the dinner table.
What makes this Baked Mac and Cheese truly special is how it manages to be both incredibly comforting and impressively elegant. Whether you’re preparing a weeknight dinner, hosting a birthday party, or looking for the perfect holiday side dish, this recipe delivers every single time. The best part? It reheats beautifully, which means you can make it ahead and still enjoy that fresh-from-the-oven quality. Plus, with just 45 minutes from start to finish, you’ll have a crowd-pleasing casserole that serves 12 people generously.
Get ready to create the ultimate comfort food that combines restaurant-quality flavor with homemade warmth. Let’s dive into this foolproof recipe that will quickly become your go-to for any gathering!
Ingredients List
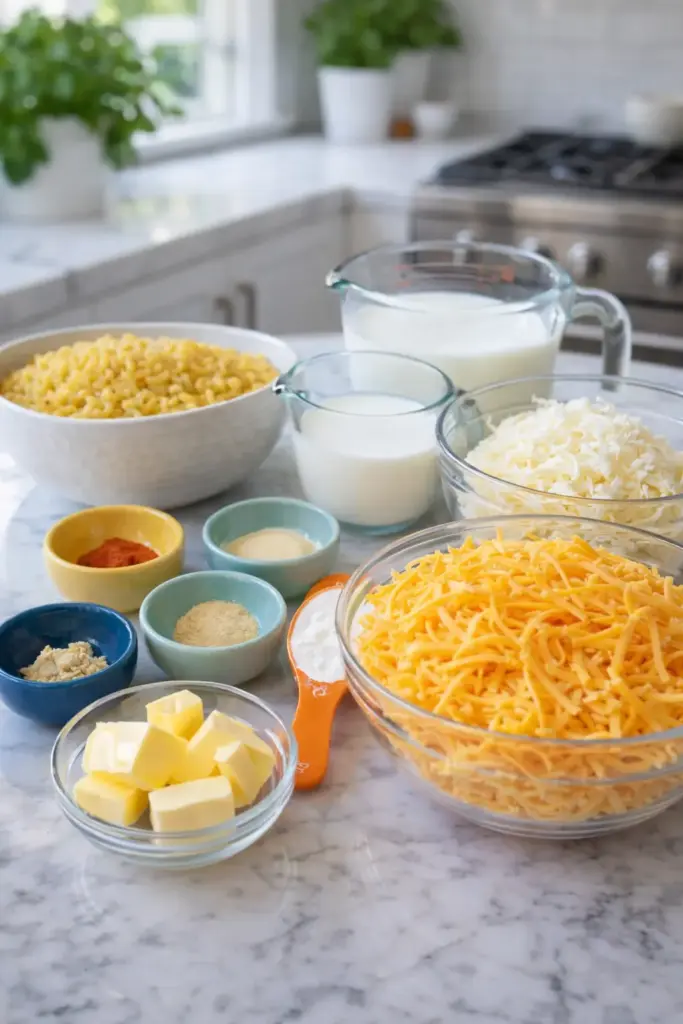
Gathering your ingredients before you begin makes the cooking process smooth and enjoyable. For this Baked Mac and Cheese recipe, you’ll need a thoughtful combination of quality cheeses, dairy, and seasonings that work together to create layers of flavor.
Pasta and Base Ingredients
- 1 lb elbow macaroni pasta – Bronze-cut Italian pasta works best as it holds sauce better than standard varieties
- 1 Tbsp plus 1/2 tsp fine sea salt – Divided for pasta water and sauce seasoning
- 1/2 cup reserved pasta water – The starchy liquid that helps create a silky sauce
- 1 Tbsp extra-light olive oil – Prevents pasta from sticking together after draining
- 6 Tbsp unsalted butter – Plus extra for greasing the casserole dish
Cheese Sauce Components
- 6 cups shredded medium cheddar cheese (16 oz) – Medium cheddar provides the perfect balance of sharpness and meltability
- 2 cups shredded mozzarella cheese (6 oz) – Adds that signature cheese pull and creamy texture
- 1/3 cup all-purpose flour – Creates the roux base for a thick, velvety sauce
- 3 cups whole milk – Whole milk is ideal, though 2% works in a pinch
- 1 cup heavy cream – The secret to ultra-creamy, luxurious texture
Seasoning Blend
- 1 tsp paprika – Adds subtle warmth and a beautiful color
- 1 tsp mustard powder – Can substitute 2 tsp Dijon mustard for a tangier flavor
- 1 tsp garlic powder – Provides savory depth without overpowering the cheese
- 1/2 tsp onion powder – Enhances the overall flavor profile
- 1/4 tsp freshly ground black pepper – Plus more to taste for the perfect finish
Substitution tips: If you need to make this recipe with what you have on hand, you can use sharp cheddar instead of medium for a more pronounced flavor, or swap half the mozzarella for Monterey Jack. For a lighter version, you can use 2% milk, though the sauce won’t be quite as rich and creamy.
Step-by-Step Instructions
Follow these detailed steps to create a Baked Mac and Cheese that’s perfectly creamy, wonderfully cheesy, and absolutely irresistible. Each step builds upon the last to ensure foolproof results.
Step 1: Prepare Your Oven and Casserole Dish
First and foremost, preheat your oven to 350°F. This moderate temperature ensures the cheese melts evenly without burning. Next, generously butter a 9×13-inch casserole dish, making sure to coat both the bottom and sides thoroughly. This prevents sticking and makes cleanup significantly easier. A well-buttered dish also helps create those coveted crispy edges that everyone fights over at the dinner table.
Step 2: Cook the Pasta to Al Dente Perfection
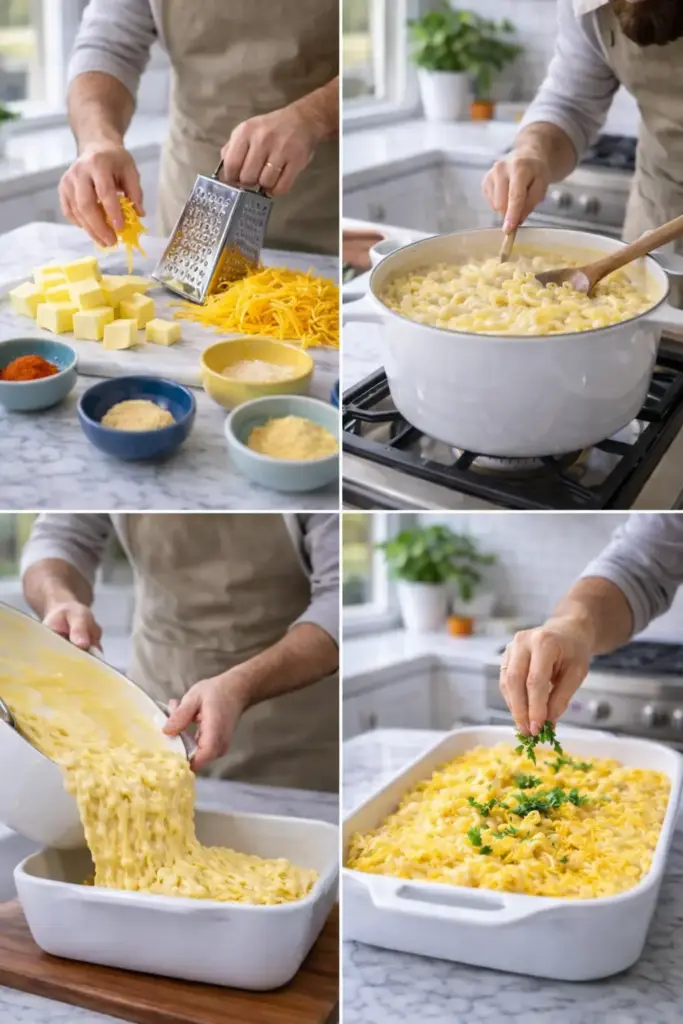
Bring a large pot of water to a rolling boil over high heat. Once boiling, add 1 tablespoon of salt to the water, which seasons the pasta from the inside out. Add the elbow macaroni and cook according to package instructions until al dente, typically 7 to 8 minutes. Stir frequently during the first two minutes to prevent the pasta from sticking together. Before draining, reserve exactly 1/2 cup of the starchy pasta cooking water—this is crucial for creating a smooth, cohesive sauce. Drain the pasta immediately, then drizzle with 1 tablespoon of olive oil and toss gently. Set aside while you prepare the cheese sauce.
Step 3: Combine and Prep Your Cheeses
In a large mixing bowl, combine the 6 cups of shredded cheddar cheese with 2 cups of shredded mozzarella. Toss them together thoroughly so they’re evenly distributed. This cheese mixture should yield approximately 8 cups total. Having your cheeses pre-mixed saves time later and ensures even melting throughout the sauce.
Step 4: Create the Roux Foundation
In the same pot you used for the pasta (no need to wash it), melt 6 tablespoons of butter over medium heat. Watch carefully as the butter melts and begins to foam. Once foaming, immediately whisk in 1/3 cup of all-purpose flour. Continue whisking constantly for about 2 minutes. During this time, the flour will cook and turn a light golden color, which removes the raw flour taste and creates a nutty aroma. This step is called making a roux, and it’s the foundation of your creamy sauce.
Step 5: Build the Creamy Sauce Base
While whisking continuously, slowly stream in the 3 cups of whole milk. Pour gradually to prevent lumps from forming. Once all the milk is incorporated, add the 1 cup of heavy cream, still whisking. Finally, pour in the reserved 1/2 cup of pasta water. The starch from this water helps the sauce cling beautifully to every piece of pasta. Continue whisking until the mixture becomes creamy, smooth, and just begins to bubble. The constant whisking is essential—it prevents the sauce from scorching on the bottom of the pot.
Step 6: Season the Sauce Perfectly
Add 1 teaspoon each of paprika, mustard powder, garlic powder, and the remaining 1/2 teaspoon of salt to the sauce. Add 1/2 teaspoon of onion powder and 1/4 teaspoon of freshly ground black pepper. Whisk everything together thoroughly to distribute the seasonings evenly. Reduce the heat to low and let the sauce simmer gently while continuing to whisk for 2 to 3 minutes. You’ll notice the sauce thickening to a consistency similar to light gravy. This simmering time also allows the flavors to meld beautifully.
Step 7: Melt the Cheese in Two Additions
Add 3 cups of your cheese mixture to the simmering sauce. Stir continuously until completely melted and smooth, which takes about 1 to 2 minutes. Then add another 3 cups of cheese, again stirring until fully melted and incorporated. Adding the cheese gradually prevents it from clumping and ensures a silky-smooth texture. You should have approximately 2 cups of cheese remaining, which you’ll use for topping the casserole later.
Step 8: Combine Pasta with Cheese Sauce
Turn off the heat completely. Add all of the cooked pasta to the cheese sauce and stir gently but thoroughly until every piece of macaroni is beautifully coated in that luscious, creamy sauce. Take a moment to taste and adjust the seasoning, adding more salt and pepper if needed. The mixture should look incredibly saucy and gooey—remember, the pasta will continue absorbing sauce as it bakes, so you want plenty of liquid at this stage.
Step 9: Assemble and Top the Casserole
Pour the mac and cheese mixture into your prepared buttered casserole dish. Use a spatula to spread it evenly into all corners of the pan. Sprinkle the remaining 2 cups of shredded cheese evenly over the top. This cheese layer creates a golden crust that seals in all the moisture and flavor underneath, resulting in that perfect combination of crispy top and creamy interior.
Step 10: Bake to Bubbly Perfection
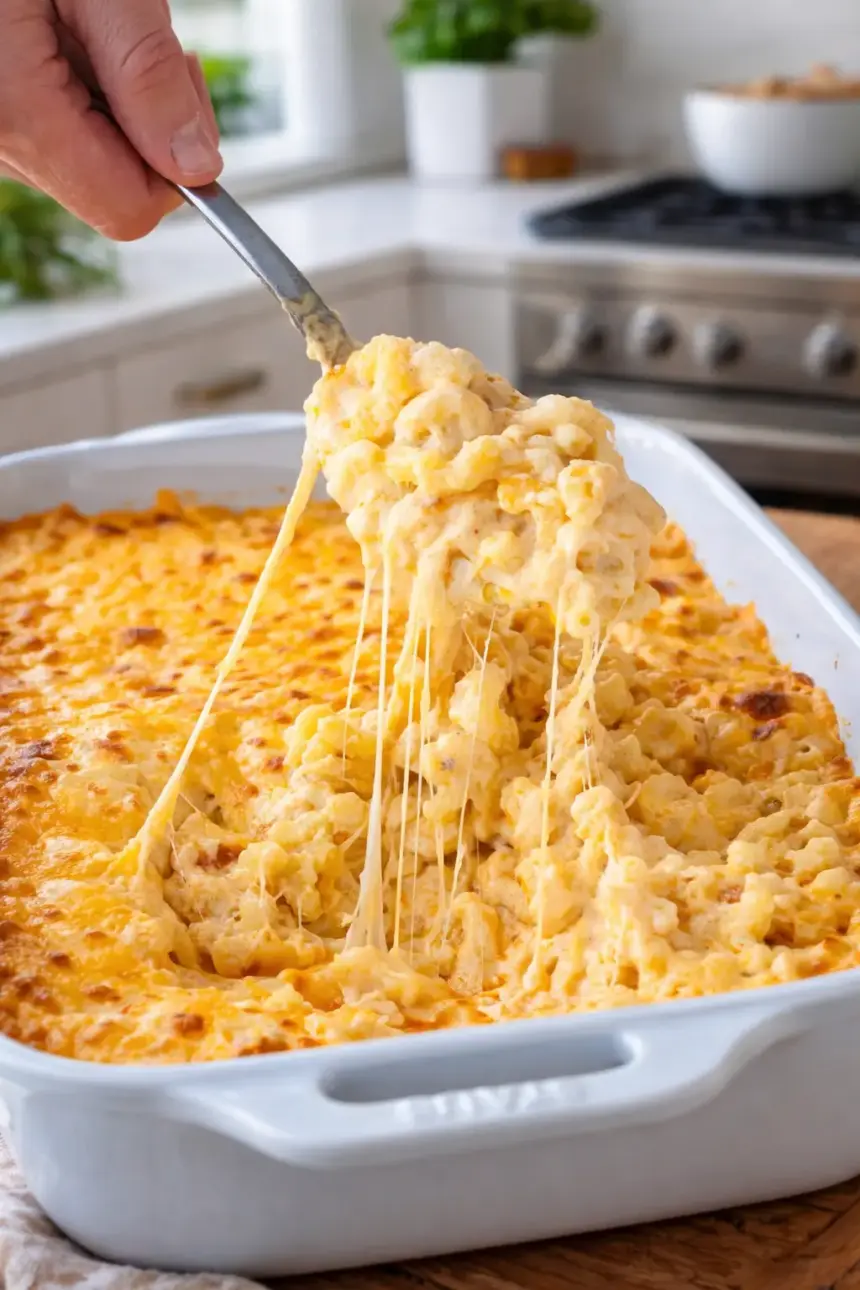
Transfer the casserole dish to your preheated 350°F oven. Bake for 15 minutes, or until the cheese on top is completely melted and you can see bubbles forming around the edges. For an extra-golden, more deeply browned top, switch your oven to broil for the last 2 to 3 minutes of baking. Watch carefully during broiling—it can go from perfect to burnt very quickly. The finished Baked Mac and Cheese should be bubbling enthusiastically and have a gorgeous golden-brown cheese crust on top.
Step 11: Rest and Serve
Remove the casserole from the oven and let it rest for 5 minutes before serving. This brief resting period allows the sauce to thicken slightly, making it easier to serve neat portions. Plus, it gives the dish time to cool to a safe eating temperature while still remaining wonderfully hot and melty.
Healthier Alternatives for the Recipe
While this Baked Mac and Cheese is undeniably indulgent, you can make several modifications to lighten it up without sacrificing too much of that beloved creamy texture and rich flavor. These alternatives allow you to enjoy this comfort food more frequently while supporting your health goals.
- Use whole wheat or chickpea pasta – These options add fiber and protein, keeping you fuller longer. Whole wheat pasta contributes a slightly nutty flavor that complements the cheese beautifully, while chickpea pasta provides extra protein and works well for gluten-free diets.
- Reduce the cheese by 25% – You can use 4.5 cups of cheddar and 1.5 cups of mozzarella instead of the full amounts. Surprisingly, the dish remains creamy and satisfying with this reduction, saving approximately 100 calories per serving.
- Substitute low-fat milk and half-and-half – Replace the whole milk with 2% milk and use half-and-half instead of heavy cream. This swap reduces the saturated fat content by nearly 30% while maintaining a creamy consistency.
- Add pureed vegetables to the sauce – Blend cooked butternut squash, cauliflower, or carrots into the cheese sauce. This technique adds nutrients, natural sweetness, and creaminess while allowing you to reduce the cheese quantity. A cup of butternut squash puree adds vitamin A and fiber without noticeably changing the flavor.
- Use reduced-fat cheese – Choose reduced-fat cheddar and part-skim mozzarella. While the texture may be slightly less creamy, this swap cuts fat content significantly. Avoid fat-free cheese, which doesn’t melt well.
- Incorporate Greek yogurt – Stir in 1/2 cup of plain Greek yogurt at the end for extra protein and tanginess. This addition boosts the protein content by approximately 10 grams per serving while adding a pleasant, subtle tang.
- Add vegetables directly to the pasta – Mix in steamed broccoli florets, peas, or diced butternut squash. These additions increase fiber and vitamins while adding volume, which naturally reduces the calorie density of each serving.
Serving Suggestions
This versatile Baked Mac and Cheese works beautifully as either a hearty main course or a satisfying side dish. Here are creative ways to serve it that will delight your family and guests.
- Pair with a crisp green salad – Balance the richness of the mac and cheese with a fresh salad featuring mixed greens, cherry tomatoes, cucumber, and a light vinaigrette. The acidity from the dressing cuts through the creaminess beautifully.
- Serve alongside barbecue favorites – This casserole pairs wonderfully with grilled chicken, roasted turkey, or plant-based mains. The smoky flavors from the grill complement the creamy cheese sauce beautifully.
- Add a protein topping – Transform this side dish into a complete meal by topping individual portions with grilled chicken strips, roasted mushrooms, or seasoned ground beef. These options boost protein while keeping the dish bacon-free.
- Create a mac and cheese bar – Set out various toppings in small bowls and let everyone customize their serving. Popular options include diced tomatoes, sliced green onions, hot sauce, toasted breadcrumbs, caramelized onions, or chopped fresh herbs like parsley or chives.
- Serve with roasted vegetables – Pair with oven-roasted Brussels sprouts, roasted asparagus, or caramelized green beans. The slight char and crunch from roasted vegetables provide excellent textural contrast.
- Make it a holiday showstopper – Serve this as part of your Thanksgiving or Christmas spread alongside turkey, ham, cranberry sauce, and dinner rolls. It’s always a crowd favorite that appeals to both kids and adults.
- Pack for potlucks and picnics – This recipe transports beautifully and stays warm for extended periods. Cover tightly with foil and wrap in towels to maintain temperature. It reheats exceptionally well, making it ideal for gatherings.
Common Mistakes to Avoid
Even experienced cooks can stumble when making Baked Mac and Cheese. Avoid these frequent pitfalls to ensure perfect results every single time.
- Overcooking the pasta initially – Since the pasta continues cooking in the oven, starting with overcooked pasta results in a mushy final texture. Always cook to al dente, which means the pasta should still have a slight firmness when you bite into it.
- Forgetting to reserve pasta water – That starchy pasta water is essential for creating a sauce that properly coats the noodles. Without it, your sauce may be too thick or may separate. Set out a measuring cup near the sink before you drain to remind yourself.
- Adding cheese to sauce that’s too hot – If your sauce is boiling vigorously when you add the cheese, it can cause the proteins to seize and become grainy. Always reduce to low heat before adding cheese, and stir constantly while it melts.
- Using pre-shredded cheese exclusively – While convenient, pre-shredded cheese contains anti-caking agents that prevent smooth melting. For the creamiest results, shred your own cheese from a block. If you must use pre-shredded, mix it with some freshly shredded cheese.
- Not buttering the casserole dish properly – Skipping this step or buttering too lightly causes the mac and cheese to stick stubbornly to the pan. Be generous with the butter, covering every inch of the bottom and sides.
- Making the sauce too thick – The sauce should look almost too thin when you combine it with the pasta. Remember, it will thicken considerably as it bakes and as the pasta absorbs liquid. A sauce that seems perfect before baking will be dry and clumpy after.
- Baking at too high a temperature – Temperatures above 350°F can cause the cheese to separate and become greasy, and the edges to burn before the center is properly heated. Stick to 350°F for even, gentle heating.
- Skipping the resting time – Cutting into the casserole immediately after removing it from the oven results in a runny, soupy consistency. Those 5 minutes of resting allow the sauce to set up properly for neat servings.
Storing Tips for the Recipe
One of the best features of this Baked Mac and Cheese is how well it stores and reheats. Follow these guidelines to enjoy delicious leftovers that taste nearly as good as the original.
Refrigerator Storage
- Cool completely before storing – Let the casserole reach room temperature before covering and refrigerating. This prevents condensation from forming inside the container, which can make the dish watery.
- Use airtight containers – Transfer portions to airtight containers or cover the casserole dish tightly with plastic wrap followed by aluminum foil. Properly stored, the mac and cheese will keep for 3 to 4 days in the refrigerator.
- Portion for easy reheating – Consider dividing leftovers into individual serving containers for quick lunches or single servings. This method allows you to reheat only what you need.
Freezer Storage
- Freeze before or after baking – This recipe freezes beautifully either assembled but unbaked, or after baking and cooling. For unbaked, prepare through Step 9, cover tightly with plastic wrap and foil, and freeze for up to 3 months.
- Protect against freezer burn – Wrap the casserole dish twice: first with plastic wrap pressed directly onto the surface, then with heavy-duty aluminum foil. Label with the date and reheating instructions.
- Freeze in portions – For even more convenience, freeze individual portions in freezer-safe containers. This allows you to thaw and reheat single servings as needed.
Reheating Instructions
- Oven method for best results – Preheat your oven to 350°F. If frozen, thaw overnight in the refrigerator first. Cover the casserole with foil and bake for 20 to 25 minutes, or until heated through. Remove the foil for the last 5 minutes to re-crisp the top.
- Microwave for quick portions – Place a single serving in a microwave-safe dish and add a splash of milk (about 1 tablespoon per cup of mac and cheese). Cover loosely and microwave on 50% power in 1-minute intervals, stirring between each, until heated through. The milk helps restore creaminess.
- Add moisture when reheating – Whether using the oven or microwave, adding a small amount of milk or cream prevents the dish from drying out during reheating. Stir it in gently before reheating for best distribution.
- From frozen in the oven – You can bake from frozen without thawing. Cover tightly with foil and bake at 350°F for 60 to 75 minutes, removing the foil for the last 10 minutes. Check that the center is heated through before serving.
Conclusion
This Baked Mac and Cheese recipe delivers everything you want in comfort food: a creamy, velvety sauce that coats every piece of pasta, a perfectly seasoned flavor profile that’s both sophisticated and kid-friendly, and that irresistible golden cheese crust on top. With straightforward instructions and common ingredients, it’s accessible enough for weeknight dinners yet impressive enough to serve at holiday gatherings. The secret lies in the combination of quality cheeses, the addition of pasta water for silkiness, and the gentle baking process that brings everything together.
Whether you’re feeding a crowd of twelve or meal-prepping for the week ahead, this casserole reheats beautifully and actually tastes even better the next day as the flavors continue to meld. The versatility of this dish means you can customize it with your favorite add-ins, make it healthier with simple substitutions, or serve it exactly as written for pure, unadulterated comfort food bliss.
Don’t wait for a special occasion to make this recipe. Gather your ingredients, preheat that oven, and treat yourself and your loved ones to the ultimate Baked Mac and Cheese experience. After your first bite of that creamy, cheesy perfection, this recipe will become a permanent fixture in your dinner rotation. Give it a try this week and discover why it’s considered the gold standard for homemade mac and cheese!
Frequently Asked Questions
Can I make Baked Mac and Cheese ahead of time?
Absolutely! This recipe is perfect for make-ahead preparation. You can assemble the entire casserole through Step 9, cover it tightly with plastic wrap and aluminum foil, and refrigerate for up to 24 hours before baking. When you’re ready to serve, remove it from the refrigerator and let it sit at room temperature for 20 to 30 minutes, then bake as directed. You may need to add 5 to 10 minutes to the baking time since it’s starting from a colder temperature. This makes it ideal for holiday dinners or entertaining when you want to minimize last-minute cooking.
Why is my mac and cheese sauce grainy or separated?
Grainy or separated cheese sauce typically happens when the cheese is added to liquid that’s too hot, causing the proteins to seize. To prevent this, always reduce your heat to low and make sure the sauce is gently simmering (not boiling) before adding cheese. Additionally, using pre-shredded cheese can contribute to graininess due to anti-caking agents. For the smoothest results, shred cheese from a block yourself. If your sauce does separate, try whisking in a tablespoon of cold milk or cream, which can sometimes bring it back together.
Can I use different types of pasta?
While elbow macaroni is traditional and holds sauce beautifully, you can certainly experiment with other pasta shapes. Shells, cavatappi, penne, rigatoni, or gemelli all work wonderfully because their shapes trap the creamy sauce. Choose pasta with ridges or hollow centers for best results. Keep the pasta quantity at 1 pound regardless of shape, and cook to al dente. Just note that different shapes may slightly change the texture and how the sauce distributes throughout the dish.
How do I prevent my Baked Mac and Cheese from drying out?
The key to avoiding dry mac and cheese is ensuring your sauce is quite loose and liquidy before baking. It should look almost too saucy when you pour it into the casserole dish because the pasta continues absorbing liquid as it bakes. Using the reserved pasta water helps maintain moisture, as does the combination of milk and cream. When reheating leftovers, always add a splash of milk to restore creaminess. Additionally, avoid baking at temperatures higher than 350°F, which can cause the sauce to break and dry out.
Can I add mix-ins like vegetables, chicken, or lobster?
Definitely! This recipe serves as an excellent base for customization. Vegetables such as broccoli, peas, spinach, or diced butternut squash should be lightly steamed or sautéed first, then gently folded into the pasta mixture before baking.
If you’d like to boost the protein, grilled chicken, rotisserie chicken, or seasoned ground beef are all excellent options that pair well with the creamy cheese sauce.
For a more indulgent twist, add 8 to 12 ounces of cooked, chopped lobster meat during Step 8. Keep in mind that ingredients with excess moisture can make the dish soupy, so be sure to drain or pat dry any add-ins before mixing.
Is it necessary to use both cheddar and mozzarella?
While you can technically make this recipe with just cheddar, the combination of cheeses creates a superior texture and flavor. Cheddar provides that classic sharp, tangy mac and cheese flavor, while mozzarella contributes exceptional meltability and creates those gorgeous cheese pulls everyone loves. Mozzarella also has a milder flavor that balances the sharpness of the cheddar. If you want to experiment, try substituting the mozzarella with Gruyère for a more sophisticated flavor, or Monterey Jack for added creaminess with a mild taste.
What’s the best way to reheat individual portions?
For single servings, the microwave works well if done correctly. Place your portion in a microwave-safe bowl and add 1 to 2 tablespoons of milk or cream. Cover loosely with a damp paper towel to create steam, which prevents drying. Heat on 50% power in 1-minute intervals, stirring between each interval, until heated through. The lower power and added liquid prevent the cheese from becoming rubbery. For the best texture that’s closest to freshly baked, reheat individual portions in a small oven-safe dish covered with foil at 350°F for 15 to 20 minutes.
Can I make this recipe gluten-free?
Yes! Simply substitute gluten-free pasta for the regular elbow macaroni and use a gluten-free flour blend in place of all-purpose flour for the roux. Make sure your flour blend contains xanthan gum or another binder to help thicken the sauce properly. Cook gluten-free pasta carefully according to package directions, as it can become mushy more easily than regular pasta. All other ingredients in this recipe are naturally gluten-free, so you only need to make these two substitutions for a delicious gluten-free version.
Tools You’ll Need
Essential Kitchen Tools
Everything you need to make cooking easier and more enjoyable


Must Try Recipes
- Pesto Chicken Pasta
Fresh pasta tossed in homemade pesto and tender chicken. - One-Pot Cheeseburger Pasta
A fun twist with cheeseburger flavors in a creamy pasta. - Chicken Fettuccine Alfredo
Classic creamy Alfredo with tender chicken and fettuccine. - Cajun Chicken Pasta
Spicy Cajun-seasoned chicken tossed with pasta. - Pasta Primavera
Vibrant veggies and pasta in a light garlic sauce.

Want to save this recipe?
Want to save this recipe? Enter your email below, and we'll send it straight to your inbox. Plus, receive new recipes every week!

Ultimate Baked Mac and Cheese
- Total Time: 45 minutes
Description
Indulgent baked mac and cheese with a rich cheese sauce and golden crust, perfect for family meals or cozy sides.
Ingredients
- 6 Tbsp unsalted butter (2/3 stick plus extra for greasing)
- 1 Tbsp plus 1/2 tsp fine sea salt, divided, plus more to taste
- 1 lb elbow macaroni pasta
- 1/2 cup reserved pasta water
- 1 Tbsp extra-light olive oil or other neutral oil
- 6 cups shredded medium cheddar cheese (16 oz)
- 2 cups shredded mozzarella cheese (6 oz)
- 1/3 cup all-purpose flour
- 3 cups whole milk
- 1 cup heavy cream
- 1 tsp paprika
- 1 tsp mustard powder or 2 tsp Dijon mustard
- 1 tsp garlic powder
- 1/2 tsp onion powder
- 1/4 tsp freshly ground black pepper, plus more to taste
Instructions
- Preheat oven to 350°F and butter a 9×13-inch casserole dish.
- Boil pasta with 1 Tbsp salt until al dente; reserve 1/2 cup cooking water, drain, and toss with oil.
- Combine cheddar and mozzarella in a mixing bowl and set aside.
- Melt butter in a large pot, whisk in flour, cook 2 minutes until golden.
- Slowly whisk in milk, cream, and reserved pasta water until sauce is smooth and bubbling.
- Stir in paprika, mustard, garlic and onion powders, remaining salt, and pepper; simmer until thickened.
- Melt 3 cups cheese into sauce, then another 3 cups; stir in pasta and season as needed.
- Transfer to casserole dish, top with remaining cheese, bake 15 minutes until bubbly; broil 2–3 minutes for golden top.
- Prep Time: 30 minutes
- Cook Time: 15 minutes
- Category: Main Course
- Cuisine: American
Nutrition
- Serving Size: 12 servings (1 cup each)
- Calories: 598 kcal
- Sugar: 5 g
- Sodium: 615 mg
- Fat: 39 g
- Saturated Fat: 22 g
- Unsaturated Fat: 12 g
- Trans Fat: 0.2 g
- Carbohydrates: 37 g
- Fiber: 1 g
- Protein: 26 g
- Cholesterol: 113 mg