
Looking for a quick, family-friendly chicken dinner that’s crispy on the outside and juicy inside? These chicken cutlets are your go-to solution. Made with thinly pounded chicken breast, coated in golden panko breadcrumbs, and pan-fried to perfection, this recipe delivers restaurant-quality results in under 30 minutes.
Whether you need a busy weeknight dinner, a make-ahead freezer meal, or a versatile protein for salads, sandwiches, or chicken parmesan, these crispy chicken cutlets check every box. They’re easy, budget-friendly, meal-prep approved, and picky-eater tested.
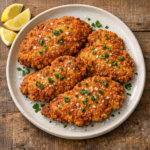
Let’s make the juiciest chicken cutlets you’ve ever had.
Ingredients List for Chicken Cutlets
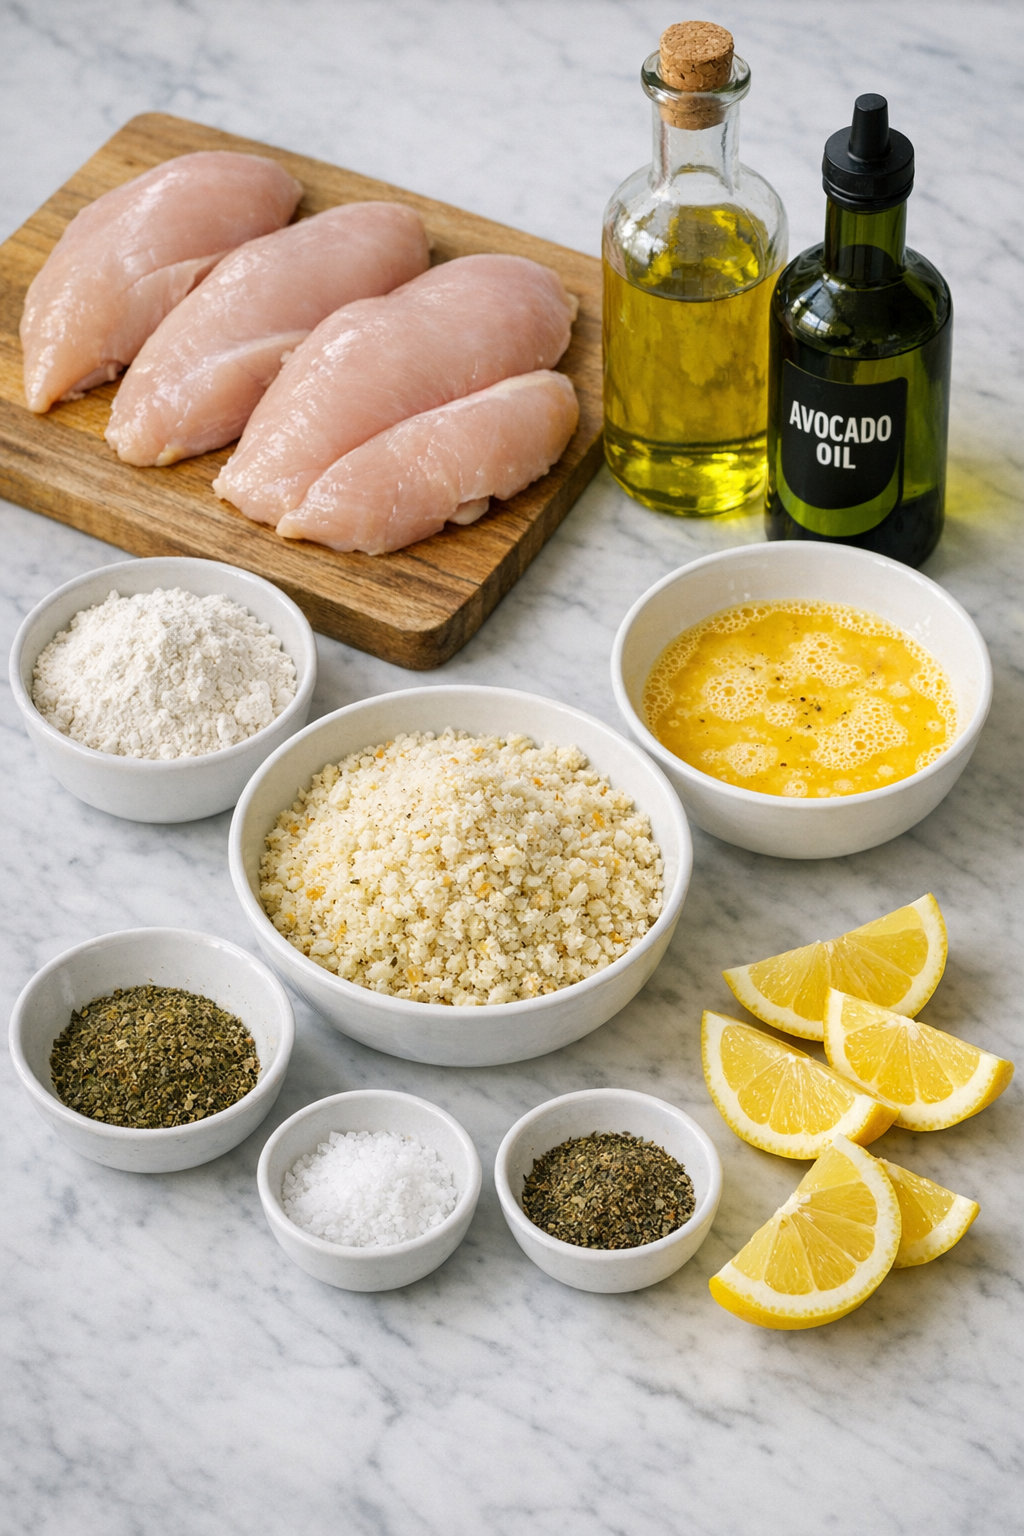
This chicken cutlet recipe calls for simple ingredients that you likely already have in your kitchen. The combination of panko breadcrumbs and parmesan cheese creates an irresistibly crunchy coating, while the careful seasoning ensures every bite is packed with flavor. Here’s everything you’ll need:
- 4 medium boneless, skinless chicken breasts (about 2 lbs total, 8 oz each): Look for breasts that are similar in size for even cooking. You can substitute with chicken tenderloins if you prefer smaller portions.
- 1 1/2 tsp fine sea salt, divided: Essential for seasoning the chicken and the breading mixture. Kosher salt can be used as a substitute.
- 1/2 tsp black pepper: Freshly ground black pepper adds the best flavor and aroma.
- 1/2 cup all-purpose flour: This creates the first layer that helps the egg wash adhere. Gluten-free flour works as a 1:1 substitute.
- 2 large eggs, plus 1 Tbsp water: The egg wash acts as glue between the flour and breadcrumbs.
- 1 1/2 cups panko breadcrumbs: Panko creates a lighter, crispier crust than regular breadcrumbs. Italian breadcrumbs can be substituted for extra flavor.
- 1/2 cup finely grated Parmesan cheese: Freshly grated parmesan melts into the breading and adds savory, nutty flavor.
- 1/2 tsp garlic powder: Adds depth without overpowering the other flavors.
- 1 tsp Italian seasoning: A blend of dried herbs like oregano, basil, and thyme that brings classic Italian flavor.
- Neutral oil for pan frying: Use canola, avocado, or light olive oil. You’ll need enough to coat the bottom of your skillet.
- Lemon wedges, for serving: Fresh lemon juice brightens the dish and cuts through the richness.
- 2 Tbsp chopped fresh parsley, for garnish: Adds color and a fresh herbal note.
- Flaky sea salt: A finishing sprinkle of coarse salt elevates the flavor dramatically.
Step-by-Step Instructions for Perfect Chicken Cutlets
Prepare and Pound the Chicken Breasts
Start by trimming any excess fat from the chicken breasts. Place each breast on a cutting board and carefully slice horizontally through the middle to create two thinner cutlets. You should end up with 8 pieces total. Even after cutting them in half, you’ll notice that each cutlet has a thicker end and a thinner end, which can lead to uneven cooking if not addressed.
To fix this, place 2-3 cutlets inside a large zip-top bag, seal it tightly, and use a meat mallet to gently pound them to an even 1/4-inch thickness. If you don’t have a meat mallet, a rolling pin or heavy saucepan works perfectly. This step does two important things: it tenderizes the meat by breaking down the muscle fibers, and it ensures the chicken cooks evenly in just 2 minutes per side. Season each cutlet generously on both sides with 1 tsp of the salt and all of the black pepper. Don’t skimp here, this is where the foundational flavor begins.
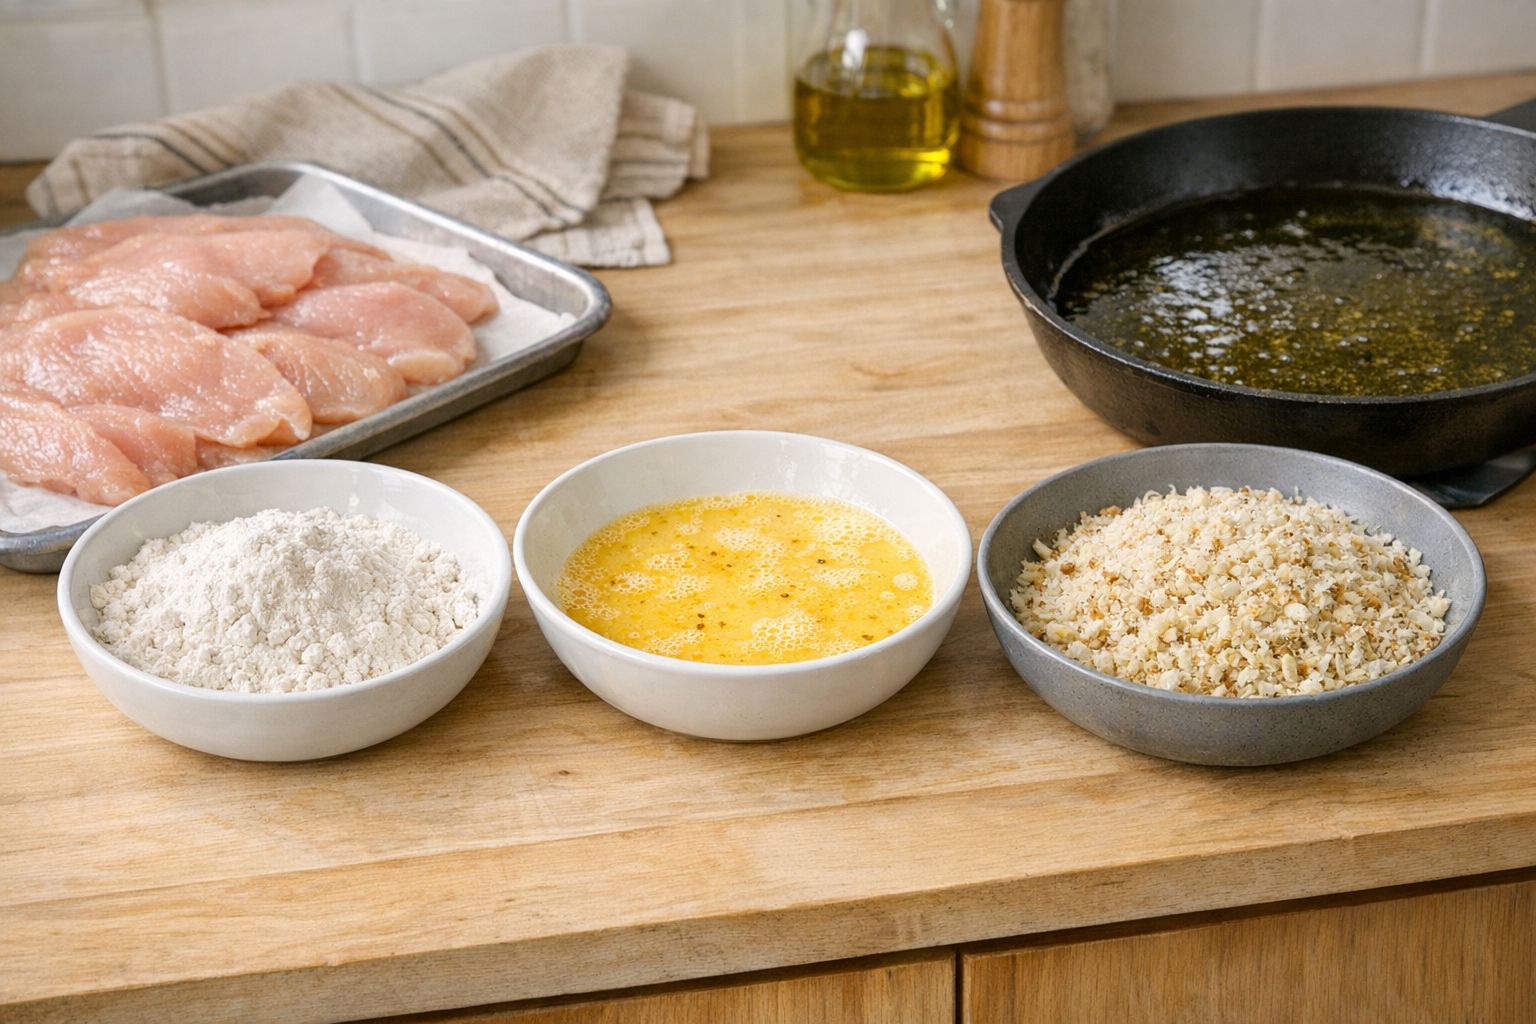
Set Up Your Three-Station Breading System
Creating an efficient breading station makes the process much faster and keeps your hands cleaner. Arrange three shallow dishes in a row. The first dish holds the 1/2 cup of flour. Next, whisk together the 2 eggs and 1 tablespoon of water in the second dish until well combined to create your egg wash. Fill the third dish with the panko breadcrumbs, parmesan cheese, garlic powder, Italian seasoning, and the remaining 1/2 tsp salt. Stir the breadcrumb mixture thoroughly so the seasonings are evenly distributed.
Using tongs or a fork to move the chicken between stations will keep your fingers from getting coated in breading. This setup allows you to work assembly-line style, which is especially helpful when you’re breading multiple cutlets at once.
Bread the Chicken Cutlets Thoroughly
Take one seasoned cutlet and dredge it lightly in the flour, making sure both sides are coated. Tap off any excess flour, otherwise the breading may become too thick or clumpy. Next, dip the cutlet into the egg wash, allowing any extra egg to drip back into the bowl. Finally, press the cutlet firmly into the breadcrumb mixture, using your hands to help the coating adhere evenly on both sides. You want a nice, uniform layer of crispy breading covering every inch of the chicken.
Repeat this process with all 8 cutlets, placing each breaded piece on a clean plate or baking sheet. Once all the cutlets are breaded, let them rest for about 10 minutes. This resting period allows the breading to set and stick better during cooking, which reduces the chance of it falling off in the pan.
Pan-Fry to Golden Perfection
Heat a large, heavy skillet (cast iron works beautifully) over medium heat. Add enough oil to completely coat the bottom of the pan, about 1/4 inch deep. Heat the oil until it’s shimmering and reaches approximately 350-375°F. You can test the temperature by dropping a breadcrumb into the oil, it should sizzle immediately. If the oil is too cool, the cutlets will absorb excess oil and become greasy. If it’s too hot, the outside will burn before the inside cooks through.
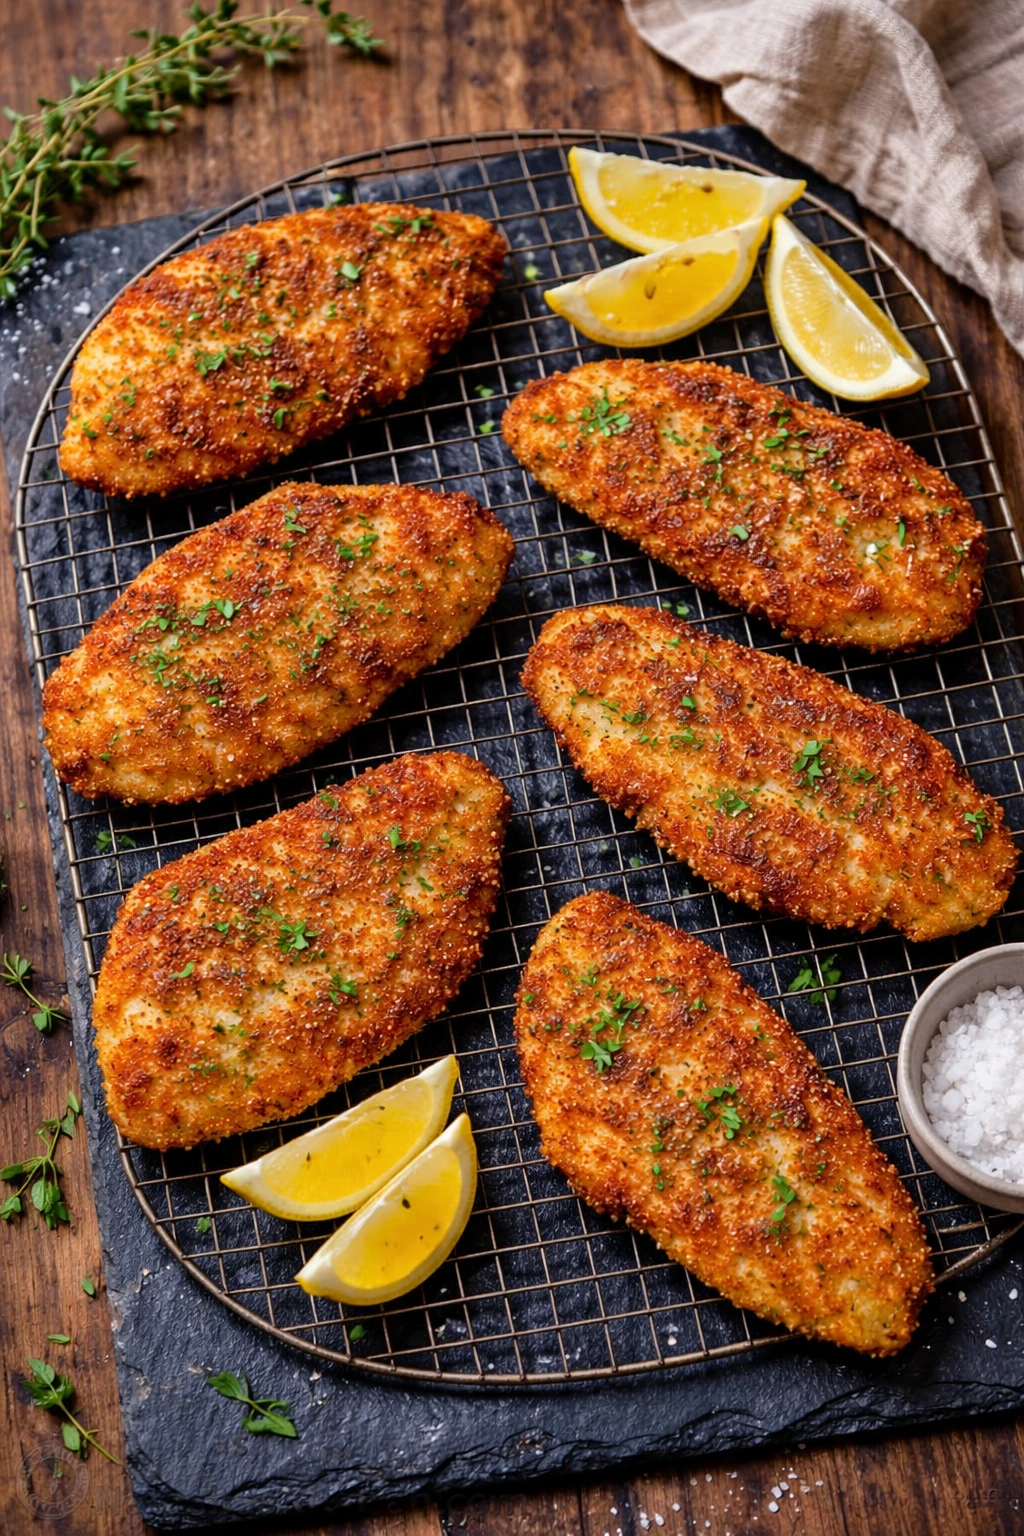
Carefully place 2-3 cutlets into the hot oil, being careful not to overcrowd the pan. Sauté for about 2 minutes per side, or until the breading is deep golden brown and the internal temperature reaches 165°F on an instant-read thermometer. Because the cutlets are pounded thin, they cook incredibly fast, so keep a close eye on them to avoid overcooking. Transfer the finished cutlets to a wire rack set over a baking sheet to drain. Immediately sprinkle with a pinch of flaky sea salt while they’re still hot, this finishing touch makes a huge difference in flavor.
Add more oil to the pan as needed and repeat with the remaining cutlets. Once all the chicken cutlets are cooked, squeeze fresh lemon juice generously over the top and garnish with chopped parsley.
Healthier Alternatives for Chicken Cutlets
If you’re looking to make this recipe lighter without sacrificing flavor or texture, there are several smart substitutions you can make. These modifications maintain the delicious crispy exterior while cutting calories, carbs, or fat depending on your dietary goals.
- Use whole wheat panko breadcrumbs: Swap regular panko for whole wheat panko to add fiber and nutrients while keeping the same crispy texture.
- Bake or air-fry instead of pan-frying: Spray the breaded cutlets lightly with cooking spray and bake at 425°F for 15-18 minutes, flipping halfway through. Or air-fry at 400°F for 10-12 minutes for a significantly lower-fat version.
- Try almond flour or crushed pork rinds: For a low-carb or keto-friendly version, replace the panko with finely ground almond flour or crushed pork rinds mixed with parmesan.
- Use chicken tenderloins: These are naturally smaller and leaner, and they cook even faster than pounded cutlets.
- Replace some oil with cooking spray: If pan-frying, use just a thin layer of oil and spray the tops of the cutlets before flipping to reduce overall fat content.
- Add ground flaxseed to the breading: Mix 2 tablespoons of ground flaxseed into the breadcrumb mixture for added omega-3 fatty acids and fiber.
Serving Suggestions for Chicken Cutlets
One of the best things about crispy chicken cutlets is their incredible versatility. They pair beautifully with countless sides and can be transformed into entirely different meals with just a few additions. Here are some creative and delicious ways to serve them:
- Classic Italian style: Serve over spaghetti with marinara sauce and a sprinkle of fresh parmesan for an easy chicken parmesan.
- On a bed of greens: Slice the cutlets and arrange over mixed greens, cherry tomatoes, cucumbers, and your favorite vinaigrette for a hearty chicken cutlet salad.
- In a sandwich: Tuck a cutlet into a crusty roll with lettuce, tomato, and mayo, or top with marinara and mozzarella for a chicken parm sub.
- With creamy pasta: Place a cutlet over fettuccine alfredo or creamy garlic pasta for an indulgent dinner.
- Alongside mashed potatoes: Pair with creamy mashed potatoes and roasted vegetables for classic comfort food.
- With rice pilaf: Serve with herbed rice pilaf and steamed broccoli for a balanced, filling meal.
- As a protein bowl base: Slice and add to a bowl with quinoa, roasted sweet potatoes, avocado, and tahini dressing.
- Cold in lunchboxes: These cutlets taste amazing even when cold, making them perfect for school or work lunches.
Common Mistakes to Avoid When Making Chicken Cutlets
Even though this recipe is straightforward, there are a few common pitfalls that can prevent you from achieving perfectly crispy and juicy chicken cutlets. Being aware of these mistakes will help you nail this recipe every single time.
- Skipping the pounding step: If you don’t pound the chicken to an even thickness, some parts will overcook and dry out while others remain undercooked. Consistent thickness is essential for even cooking.
- Not seasoning the chicken itself: Relying only on the breading for flavor means the chicken itself will taste bland. Season generously with salt and pepper before breading.
- Using oil that’s not hot enough: If the oil isn’t hot enough (below 350°F), the breading will absorb oil and become soggy instead of crispy. Always test with a breadcrumb first.
- Overcrowding the pan: Placing too many cutlets in the pan at once lowers the oil temperature and causes steaming instead of frying. Cook in batches for best results.
- Skipping the resting period after breading: Letting the breaded cutlets rest for 10 minutes helps the coating adhere better and reduces the chance of it falling off during cooking.
- Overcooking the chicken: Since these cutlets are thin, they cook very quickly. Use an instant-read thermometer and remove them as soon as they reach 165°F to prevent dryness.
- Not adding finishing salt and lemon: A sprinkle of flaky salt and a squeeze of fresh lemon juice after cooking elevates the flavor significantly. Don’t skip this final touch.
Storing Tips for Chicken Cutlets
One of the biggest advantages of this chicken cutlet recipe is how well it stores and reheats, making it perfect for meal prep and busy weeknights. Here’s how to store them properly to maintain maximum flavor and texture:
- Refrigerating cooked cutlets: Store cooked cutlets in an airtight container in the refrigerator for up to 4 days. Place parchment paper between layers to prevent them from sticking together.
- Freezing cooked cutlets: Let the cutlets cool completely, then wrap each one individually in plastic wrap or aluminum foil. Place wrapped cutlets in a freezer-safe bag or container and freeze for up to 3 months. Thaw overnight in the fridge before reheating.
- Freezing uncooked breaded cutlets: Arrange breaded (but uncooked) cutlets on a baking sheet and freeze until solid, about 2 hours. Transfer to a freezer bag and freeze for up to 3 months. Cook directly from frozen, adding an extra minute or two per side.
- Reheating in the oven: Preheat your oven to 375°F. Place cutlets on a wire rack set over a baking sheet and bake for 10-12 minutes until heated through and crispy.
- Reheating in the air fryer: Air fry at 375°F for 5-7 minutes for the crispiest results. This method keeps the breading crunchy without adding extra oil.
- Reheating on the stovetop: Heat a skillet over medium heat with a small amount of oil and cook for 2-3 minutes per side until warmed through and crispy.
- Avoid the microwave: Microwaving makes the breading soggy and rubbery. Always use oven, air fryer, or stovetop methods for best texture.
Conclusion
These crispy breaded chicken cutlets are the answer to busy weeknight dinners, meal prep success, and family-friendly meals that everyone will actually enjoy. With their golden, crunchy panko coating and tender, juicy interior, they prove that simple ingredients and basic techniques can create restaurant-quality results right in your own kitchen. The beauty of this recipe lies in its versatility, whether you serve them alongside mashed potatoes, transform them into chicken parmesan, tuck them into sandwiches, or slice them over a fresh salad, they adapt beautifully to whatever your family is craving.
What makes these cutlets truly special is how forgiving and make-ahead friendly they are. You can freeze them before or after cooking, meal prep them for the entire week, and they reheat beautifully without tasting like leftovers. The combination of pounding the chicken thin, seasoning generously, and finishing with flaky salt and fresh lemon juice creates layers of flavor and texture that keep you coming back for more. Don’t forget those two secret ingredients: a generous sprinkle of coarse salt right after frying and a bright squeeze of lemon juice to cut through the richness.
Now it’s your turn to make this family favorite in your own kitchen. Give this recipe a try tonight and discover why these chicken cutlets will become your new go-to dinner solution. Share your results in the comments below, tag me on social media with your serving ideas, and let me know which sides you paired them with. Happy cooking!
Frequently Asked Questions
Can I use chicken thighs instead of chicken breasts?
Yes, you can absolutely use boneless, skinless chicken thighs for this recipe. Thighs are naturally more forgiving and stay juicy even if slightly overcooked. Pound them to an even thickness just like you would with breasts, and follow the same breading and cooking instructions. The cook time may be slightly longer, so use an instant-read thermometer to ensure they reach 165°F internally.
What can I substitute for panko breadcrumbs?
If you don’t have panko, you can use regular Italian breadcrumbs, though the texture won’t be quite as light and crispy. For a gluten-free option, try gluten-free panko or crushed cornflakes. For a low-carb or keto version, use finely ground almond flour, crushed pork rinds, or a combination of both mixed with parmesan cheese. Each alternative creates a slightly different texture but all work well.
How do I know when the oil is hot enough for frying?
The ideal frying temperature for chicken cutlets is between 350-375°F. You can use an instant-read or infrared thermometer to check, or simply drop a breadcrumb into the oil. If it sizzles immediately and vigorously, the oil is ready. Oil that sits quietly is too cool, while a breadcrumb that burns right away signals the oil is too hot. Adjust the heat accordingly and wait a minute before testing again.
Can I bake these chicken cutlets instead of frying them?
Absolutely! To bake, preheat your oven to 425°F. Place the breaded cutlets on a wire rack set over a baking sheet and spray both sides lightly with cooking spray. Bake for 15-18 minutes, flipping halfway through, until golden brown and the internal temperature reaches 165°F. Baking creates a lighter version with less oil, though the texture won’t be quite as crispy as pan-frying. For even better results, try using an air fryer at 400°F for 10-12 minutes.
Why is my breading falling off during cooking?
Breading falls off for a few common reasons: the chicken wasn’t dry before breading (pat it completely dry with paper towels), you didn’t press the breadcrumbs firmly enough into the chicken, you skipped the 10-minute resting period after breading, or the oil wasn’t hot enough. Make sure you follow all three breading steps (flour, egg, breadcrumbs) and let the cutlets rest before frying. Using one hand for dry ingredients and one for wet ingredients also helps keep the coating intact.
How long do cooked chicken cutlets last in the fridge?
Cooked chicken cutlets will stay fresh in the refrigerator for up to 4 days when stored properly in an airtight container. Place parchment paper between layers to prevent sticking. For longer storage, freeze them for up to 3 months. Always reheat to an internal temperature of 165°F before eating. The great news is that these cutlets taste delicious even when cold, making them perfect for lunches and snacks throughout the week.
What’s the best way to reheat chicken cutlets and keep them crispy?
The best reheating methods are the air fryer or oven. For the air fryer, heat to 375°F and cook for 5-7 minutes until heated through and crispy. For the oven, preheat to 375°F, place cutlets on a wire rack over a baking sheet, and bake for 10-12 minutes. You can also reheat in a skillet with a small amount of oil over medium heat for 2-3 minutes per side. Avoid the microwave, as it makes the breading soggy and rubbery.
Can I make these chicken cutlets ahead of time?
Yes, this recipe is incredibly make-ahead friendly! You can bread the cutlets and refrigerate them (uncooked) for up to 24 hours before frying, which is perfect for party prep. You can also freeze breaded uncooked cutlets for up to 3 months and cook them straight from frozen. Alternatively, cook them fully, let them cool, and refrigerate for up to 4 days or freeze for up to 3 months. Having pre-breaded or pre-cooked cutlets in your freezer is like having a restaurant meal ready at any time.
Essential Kitchen Tools
Everything you need to make cooking easier and more enjoyable


Must Try Recipes
- How To Cook Chicken Breast
Learn to cook juicy, flavorful chicken breasts easily. - Baked Chicken Breast
Tender oven-baked chicken breast every time. - Air Fryer Chicken Breast
Quick, juicy chicken made in the air fryer. - Garlic Butter Chicken
Rich, buttery garlic chicken skillet dinner. - Pesto Chicken Pasta
Flavorful chicken pasta with homemade basil pesto.

Want to save this recipe?
Want to save this recipe? Enter your email below, and we'll send it straight to your inbox. Plus, receive new recipes every week!
Crispy Panko Chicken Cutlets
- Total Time: 25 minutes
Description
Golden, crispy chicken cutlets with a flavorful panko–Parmesan crust.
Ingredients
- 4 medium boneless, skinless chicken breasts (about 2 lb total, 8 oz each)
- 1 1/2 tsp fine sea salt, divided
- 1/2 tsp black pepper
- 1/2 cup all-purpose flour
- 2 large eggs plus 1 Tbsp water
- 1 1/2 cups panko breadcrumbs (or Italian breadcrumbs)
- 1/2 cup finely grated Parmesan cheese
- 1/2 tsp garlic powder
- 1 tsp Italian seasoning
- Neutral oil for frying (extra light olive, canola, or avocado oil)
- Lemon wedges, chopped parsley, and coarse salt for serving
Instructions
- Slice each chicken breast horizontally into 2 cutlets. Place between plastic wrap or parchment and pound to 1/4-inch thickness. Season both sides with 1 tsp salt and 1/2 tsp pepper.
- Arrange three bowls: one with flour, one with eggs whisked with 1 Tbsp water, and one with panko, Parmesan, garlic powder, Italian seasoning, and the remaining 1/2 tsp salt.
- Dredge each cutlet in flour, shake off excess, dip into egg wash, then press into breadcrumb mixture to coat. Place on a tray and let rest 5 to 10 minutes.
- Pour oil into a large skillet to reach halfway up the sides and heat over medium until shimmering (350–375°F). Fry cutlets 2 minutes per side until golden and internal temperature reaches 165°F. Drain on a wire rack or paper towel–lined plate.
- Sprinkle with flaky salt, squeeze lemon juice over cutlets, and garnish with parsley before serving.
- Prep Time: 20 minutes
- Cook Time: 5 minutes
- Category: Main Course
- Cuisine: American, Italian
Nutrition
- Serving Size: 8 servings
- Calories: 308 kcal
- Sugar: 1 g
- Sodium: 776 mg
- Fat: 13 g
- Saturated Fat: 3 g
- Unsaturated Fat: 9 g
- Trans Fat: 0.02 g
- Carbohydrates: 15 g
- Fiber: 1 g
- Protein: 30 g
- Cholesterol: 119 mg