


Weeknight dinners have a way of defeating even the most motivated home cook, especially when chicken breast is involved. Overcooked, dry, and flavorless chicken is one of the most common frustrations in the home kitchen, and it turns a promising meal into a disappointment. Honey Glazed Chicken solves that problem in a single pan, in just 15 minutes, with a sticky honey-garlic glaze that clings to every bite. The result is juicy, golden chicken with a sweet-savory sauce that tastes far more involved than it actually is.
Why This Technique Changes Everything
Most honey chicken recipes fail at the texture level, not the flavor level. The glaze tastes fine, but the chicken itself is rubbery or unevenly cooked. The scoring method used here fixes that before the pan even heats up.
Cutting a shallow diamond pattern into the top of each breast, about one-third of the way through, does three things at once: it speeds up cooking, helps heat distribute evenly through thicker pieces, and opens up channels for the glaze to sink into the meat rather than just sit on the surface. It is a small step that makes a significant difference in both texture and flavor.
For anyone who wants the same juicy result with even less hands-on time, Air Fryer Chicken Breast covers the technique for hands-off cooking when the stovetop feels like too much.
What You Need: Ingredients for Honey Glazed Chicken Breast
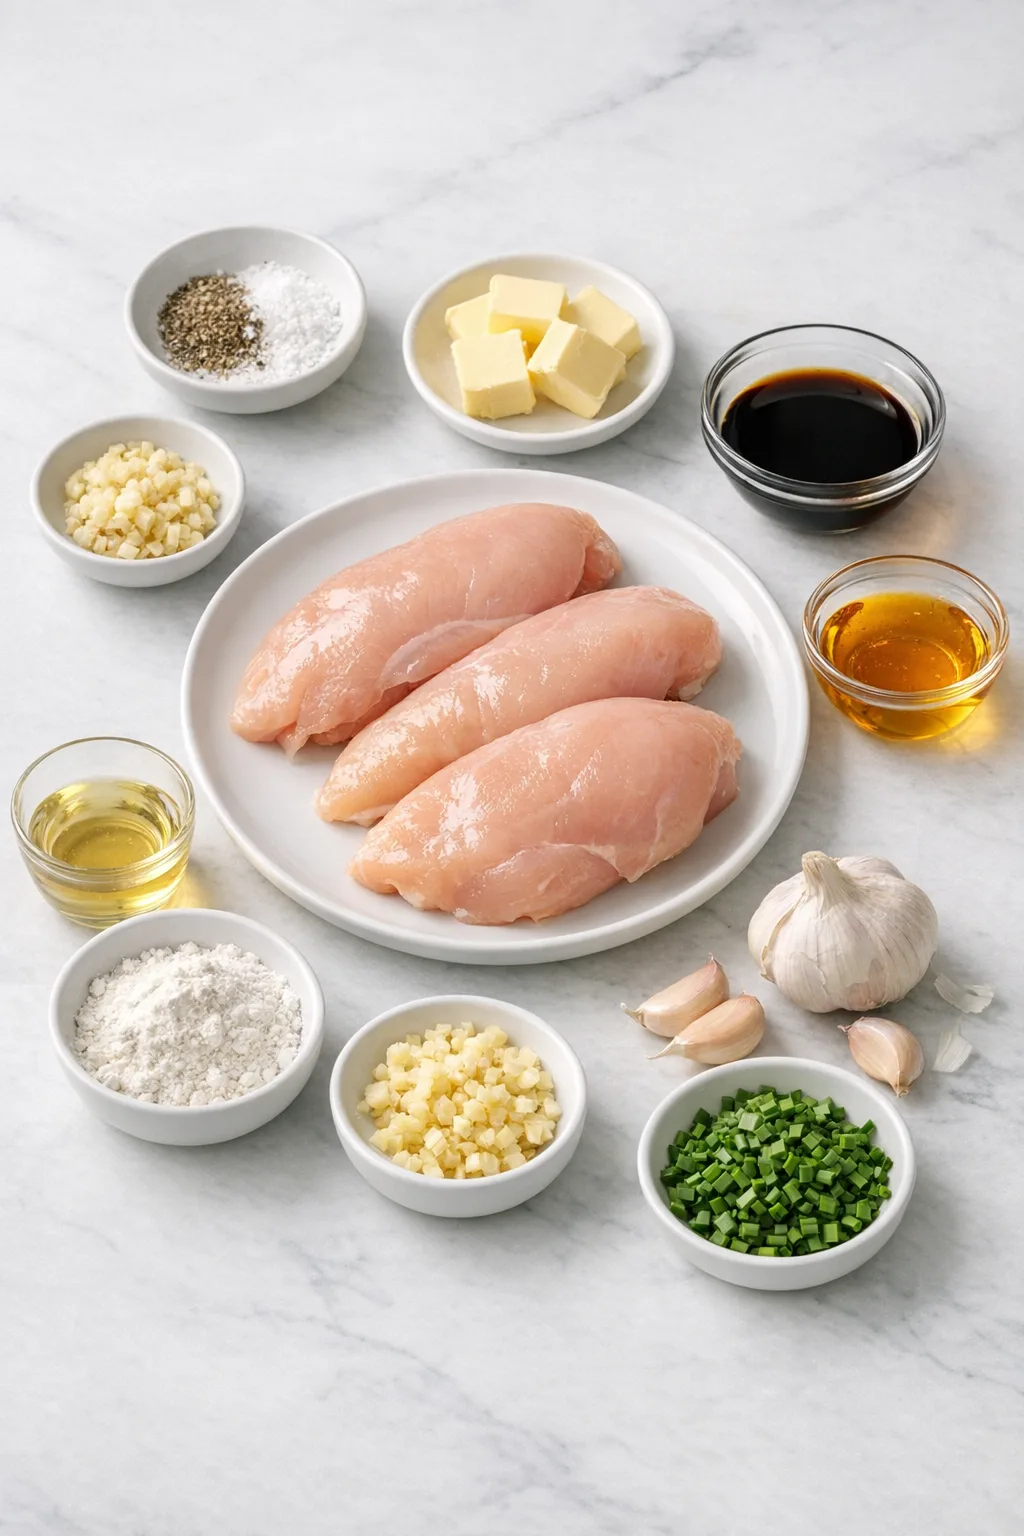
Every ingredient here pulls its weight. Nothing is decorative.
- 3 medium chicken breasts (about 1½ lbs, similar in size for even cooking)
- Salt and black pepper to taste
- ¼ cup all-purpose flour (or cornstarch for a gluten-free version)
- 4 tablespoons butter, divided (or 3 tablespoons olive oil)
- 4 garlic cloves, minced
- 1½ tablespoons apple cider vinegar
- 1 tablespoon soy sauce
- ⅓ cup honey or maple syrup
- Fresh chives, chopped, for garnish
The flour coating is not just for texture. It creates a thin, starchy layer on the surface that helps the honey glaze thicken and cling rather than slide off. The apple cider vinegar is the ingredient most people overlook, but it is doing real work here: it cuts through the sweetness of the honey and balances the richness of the butter, giving the sauce its depth. Rice wine vinegar or plain white vinegar work as substitutes if needed.
Maple syrup swaps in for honey with no adjustment required. Both produce a beautifully glossy glaze with slightly different flavor notes.
How to Make Honey Glazed Chicken: Step-by-Step
Step 1: Score the Chicken to Unlock Flavor Penetration
Place the chicken breasts on a cutting board. Using a sharp Chef Knife, make shallow diagonal cuts across the top of each breast, then rotate and cut the opposite direction to create a diamond pattern. Cut about one-third of the way through, not all the way.
You will know the scoring is right when the surface looks like a crosshatch grid with visible grooves, not just surface scratches. If your garlic has a green center when you mince it, remove that inner sprout. It turns bitter when cooked and can give the sauce an off flavor.
Step 2: Season and Coat for a Golden, Glaze-Ready Crust
Season both sides of each breast generously with salt and freshly cracked black pepper. Lightly dredge in flour, pressing the coating into the scored grooves so the flour settles inside them. Shake off the excess.
One thing to watch: if you skip pressing the flour into the grooves, those channels stay bare and the glaze will not penetrate as deeply. Take an extra few seconds here and it pays off at the table.
Step 3: Sear Until Deeply Golden on Both Sides
Set a large Skillet/Pan over medium heat. Once hot, melt 3 tablespoons of butter, swirling the pan continuously as it melts. This swirling prevents the milk solids from getting trapped under the fat and sputtering aggressively when the chicken goes in.
Add the chicken scored-side down. Cook for 5 to 6 minutes until the surface is a deep, even golden brown. Flip and cook another 4 minutes, or until nearly cooked through. The chicken should be about 10 degrees below the final temperature at this point. It will finish in the sauce.
If the chicken is browning too fast and the butter is darkening quickly, lower the heat to medium-low and give the pan a moment to settle before continuing.
Step 4: Build the Honey Garlic Glaze in the Same Pan
Add the remaining 1 tablespoon of butter and the minced garlic directly to the pan. Stir for about 30 seconds, until the garlic smells nutty and fragrant rather than sharp and raw. That shift in aroma is your cue to move forward.
Pour in the honey, soy sauce, and apple cider vinegar. Stir to combine and let the sauce simmer for 2 to 3 minutes, spooning it continuously over the chicken as it thickens. The sauce is ready when it coats the back of a spoon and a line drawn through it holds its shape. The thickest part of the chicken should reach 165°F.
For a deeper, more complex sauce profile, the glaze in Honey Garlic Chicken uses a slightly different ratio of soy to honey, which produces a more savory-forward result compared to the sweeter balance here.
Step 5: Finish with Sauce and Garnish
Remove from heat. Spoon the remaining sauce generously over each breast. Scatter fresh chives across the top. Serve warm immediately.
The chives are not just decoration. They add a mild onion brightness that cuts through the richness of the glaze and makes the whole dish taste more complete.
What Separates Good Honey Glazed Chicken from a Great One
- Prep everything before the pan heats up. The sauce comes together fast once the garlic goes in. Having the honey, vinegar, and soy sauce measured and ready prevents the garlic from burning while you scramble for ingredients.
- Use similar-sized chicken breasts. If one breast is significantly thicker than the others, it will still be underdone when the rest are finished. Pound thicker pieces lightly or slice them horizontally before scoring.
- Swirl the butter as it melts. This is not just a visual trick. It keeps the milk solids suspended in the fat rather than settling and scorching on the pan surface.
- Spoon the sauce actively. Do not just let the chicken sit in the glaze. Basting it repeatedly as it simmers is what creates that thick, lacquered coating on the surface.
- Rest briefly before slicing. Even two minutes off the heat lets the juices redistribute. The first time I skipped this step, the chicken looked perfect but ran clear juice all over the cutting board the moment I cut into it.
Serving Suggestions
Honey glazed chicken breast works over almost any grain or starch. White rice is the classic pairing because it soaks up the extra sauce beautifully. Brown rice, quinoa, or fried rice all work just as well.
For vegetables, roasted broccoli, a simple vegetable stir fry, or roasted carrots complement the sweetness of the glaze without competing with it. A crisp Asian chopped salad adds texture contrast if you want something fresh alongside the richness of the sauce.
If you want a completely different flavor direction on a similar weeknight timeline, Jalapeno Popper Stuffed Chicken delivers heat and creaminess where this recipe leans sweet and savory.
Make It Once, Use It All Week
Honey glazed chicken breast stores well and reheats without losing its texture, which makes it genuinely useful for meal prep.
- Refrigerate: Once cooled to room temperature, transfer to an airtight container. Keeps for 3 to 4 days.
- Freeze: Store in the freezer for up to 3 months. Thaw overnight in the refrigerator before reheating.
- Reheat: Warm in a skillet over medium-low heat until the internal temperature returns to 165°F. Add a small splash of water to loosen the sauce as it heats. You will know it is ready when the glaze looks glossy again and the sauce coats the chicken rather than sitting dry on the surface.
FAQs
Can I use chicken thighs instead of chicken breasts for this honey glazed chicken recipe?
Chicken thighs work well here and tend to stay even juicier under high heat. The key difference is the final internal temperature: thighs should reach 170 to 175°F rather than the 165°F target for breasts. The scoring technique applies equally to thighs.
What if I do not have apple cider vinegar?
Rice wine vinegar is the closest substitute and produces a very similar result. Plain white vinegar works too, though it is slightly sharper. The vinegar is essential for balancing the sweetness of the honey, so do not skip it entirely.
Can I make this gluten-free?
Swap the all-purpose flour for cornstarch or a gluten-free 1:1 flour blend. Use coconut aminos in place of soy sauce. The glaze will still thicken and cling properly with either substitution.
How do I know when the sauce is thick enough?
The sauce should coat the back of a wooden spoon and hold a line when you drag your finger through it. At that point, it will cling to the chicken rather than pool at the bottom of the pan. This usually happens around the 2 to 3 minute mark of simmering.
Can I fit a fourth chicken breast in the pan?
It depends on your skillet size. A fourth breast can fit if the pieces are smaller and there is enough room to avoid crowding. Crowding the pan drops the temperature and causes steaming rather than searing, which means you lose the golden crust entirely.
How do I prevent the garlic from burning?
Add the garlic only after the chicken has been flipped and is nearly cooked through. Stir it constantly for about 30 seconds and watch for that shift from sharp to nutty in the aroma. If it starts to darken too quickly, add the honey immediately to bring the temperature down.
A Recipe Worth Keeping
Dry, flavorless chicken breast does not have to be the default on a busy night. This recipe solves the problem at the technique level, not just the sauce level, and the result speaks for itself the first time you pull it off the heat.
Give this one a try on a night when you have 15 minutes and a pan. The scoring step alone will change how you approach chicken breast from here on, and the sauce is the kind you will want to spoon over everything on the plate.
Essential Kitchen Tools
Making Honey Glazed Chicken? Most failed attempts come from using the wrong pan or heat setup — not the recipe itself.

Want to save this recipe?
Want to save this recipe? Enter your email below, and we'll send it straight to your inbox. Plus, receive new recipes every week!

Quick Honey Glazed Chicken Recipe
- Total Time: 15 minutes
- Yield: 4 servings 1x
Description
Tender chicken breasts coated in a luscious honey glaze, infused with garlic and a hint of soy sauce, offer a sweet and savory experience. Garnished with fresh chives, this Honey Glazed Chicken is a delectable family-friendly meal ready in just 15 minutes.
Ingredients
- 3 chicken breasts (medium, about 1 1/2 lbs*)
- Salt and black pepper (to taste)
- 1/4 cup all-purpose flour (or cornstarch for gluten-free)
- 4 Tbsp butter (divided (or 3 tbsp olive oil))
- 4 garlic cloves (minced)
- 1 1/2 Tbsp apple cider vinegar
- 1 Tbsp soy sauce
- 1/3 cup honey or maple syrup
- Fresh chives (chopped for garnish)
Instructions
- Begin by scoring the chicken: Place the chicken breasts on a cutting board and create a shallow diamond pattern on the top, cutting about one-third of the way through without cutting all the way through.
- Season and dredge the chicken: Sprinkle salt and pepper on both sides. Lightly coat with flour, pressing it into the scored areas, and then shake off any excess.
- Heat a large skillet over medium heat. Once hot, melt 3 tablespoons of butter, swirling the pan to avoid splatter. Add the chicken, scored side down, and cook for 5 to 6 minutes until golden brown. Flip and cook for an additional 4 minutes, or until almost fully cooked, as it will finish cooking in the sauce.
- Incorporate garlic and glaze: Add the remaining tablespoon of butter along with the minced garlic to the pan and sauté briefly until fragrant. Mix in the honey, soy sauce, and apple cider vinegar. Allow the sauce to simmer for 2 to 3 minutes until it thickens, spooning it over the chicken as it cooks. Ensure the thickest part of the chicken reaches 165°F.
- To finish, garnish with fresh chives and serve warm, drizzling the extra sauce over the top.
Notes
TECHNIQUE TIP: Cook chicken breasts until they reach an internal temperature of 165°F for best results.
STORAGE: Store leftovers in an airtight container in the fridge for up to 4 days or freeze for up to 3 months.
SUBSTITUTION: Use chicken tenders for quicker cooking or chicken thighs for a richer flavor, cooking to 170-175°F.
- Prep Time: 5 minutes
- Cook Time: 10 minutes
- Category: Dinner
- Cuisine: American
Nutrition
- Calories: 416 kcal
- Sugar: 23 g
- Sodium: 540 mg
- Fat: 16 g
- Saturated Fat: 8 g
- Unsaturated Fat: 5 g
- Trans Fat: 0.5 g
- Carbohydrates: 31 g
- Fiber: 0.4 g
- Protein: 38 g
- Cholesterol: 139 mg

