


Craving cheesecake but dreading the oven, the water bath, and the two-hour cool-down? No-bake mini cheesecakes solve all of that in one shot. This recipe from Natasha’s Kitchen has earned a 4.9-star rating from 39 reviews, and once you taste that airy, whipped filling sitting on a buttery graham cracker crust, you will understand why. Each bite is cool, creamy, and just tangy enough from fresh lemon juice, with a sweet-tart cherry topping that makes the whole thing feel genuinely special.
Ingredients for No-Bake Mini Cheesecakes
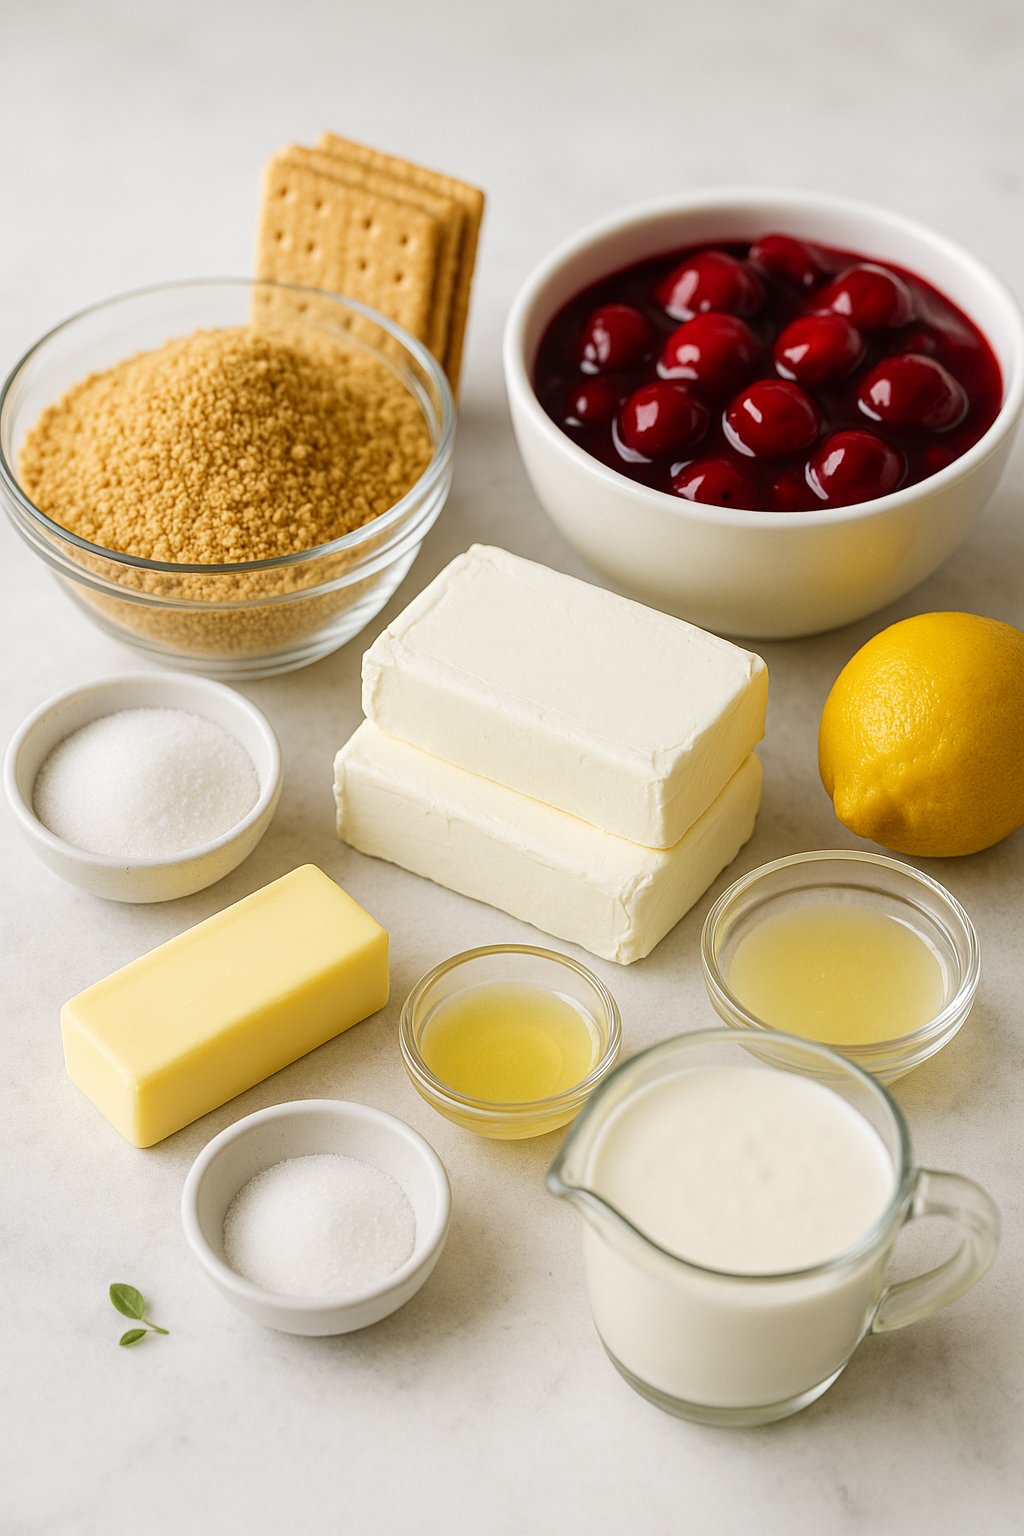
This recipe makes 14 cupcake-sized cheesecakes. The ingredient list is short, but every item is doing real work here.
For the Graham Cracker Crust
- 1 1/2 cups graham cracker crumbs (from 12 whole crackers)
- 1 Tbsp granulated sugar
- 8 Tbsp unsalted butter (1 stick, melted)
The butter is not optional and it is not just for flavor. It acts as the glue that binds the crumbs together without any baking. If the crumbs look dry and loose after mixing, add a small extra drizzle of melted butter until every crumb looks moistened and clumps slightly when pressed.
Crust substitution: Vanilla wafers, Biscoff shortbread, or chocolate Oreos with the cream removed all work beautifully in place of graham crackers. For a gluten-free version, use certified GF graham crackers.
For the No-Bake Cheesecake Filling
- 16 oz cream cheese (two 8-oz blocks, room temperature)
- 2/3 cup granulated sugar
- 2 Tbsp sour cream
- 2 Tbsp lemon juice, freshly squeezed
- 1 cup heavy whipping cream
- Cherry Topping, for serving
Why full-fat cream cheese matters: Full-fat blocks of cream cheese hold their structure once chilled. Tubs of whipped cream cheese contain more air and water, which prevents the filling from setting properly. Philadelphia blocks are the gold standard here.
Why lemon juice matters: Fresh lemon juice cuts through the richness of the cream cheese and balances the sweetness. Bottled concentrate tastes flat by comparison, so squeeze it fresh.
How to Make No-Bake Mini Cheesecakes: Step-by-Step Instructions
Step 1: Prepare Your Muffin Tin
Line a muffin tin with paper liners. This recipe yields 14 mini cheesecakes, so if your tin only holds 12, use ramekins for the remaining two. Skipping the liners is a mistake you will only make once since the cheesecakes will stick and tear when you try to remove them.
Step 2: Make the Graham Cracker Crust
In a medium bowl, stir together the graham cracker crumbs and sugar. Add the melted butter and stir until every crumb is evenly coated and the mixture looks like wet sand. Divide about 2 tablespoons of the mixture into each liner and press firmly into the bottom with the back of a spoon.
The crust should feel compact and hold its shape when you press it. If it crumbles back up, it needs more pressing. If you are using ramekins, sprinkle the crumbs in loosely without pressing down.
Step 3: Beat the Cream Cheese Filling
In a large mixing bowl, beat the room-temperature cream cheese and sugar together using a hand mixer on medium-high speed for 3 minutes. You are looking for a mixture that is completely smooth, fluffy, and pale, with no visible lumps. Scrape down the sides of the bowl at least once during mixing.
Add the sour cream and freshly squeezed lemon juice, then beat for another minute until fully incorporated. If your cream cheese was too cold and the mixture looks lumpy, keep beating. It will smooth out with time, but cold cream cheese is the number one reason for a grainy filling.
Step 4: Whip the Heavy Cream
Wash and dry your mixer attachments thoroughly. In a second large bowl, beat the heavy whipping cream on medium speed until it begins to thicken, then increase to medium-high. Beat for about 3 minutes total, until stiff peaks form. The whipped cream should hold a firm peak that does not droop when you lift the beater.
If your cream is not thickening after several minutes, your bowl or beaters may have traces of grease. Fat prevents cream from whipping. Start fresh with clean, dry equipment.
Step 5: Fold and Fill
Using a spatula, gently fold the whipped cream into the cream cheese mixture. Scrape from the bottom of the bowl upward to fully combine without deflating the cream. The finished filling should look thick, airy, and hold its shape when scooped.
Use a trigger-release ice cream scoop to portion the filling evenly into the lined cups. Smooth the tops with the back of a spoon until the filling sits level with the rim of the liner.
Step 6: Chill
Refrigerate the mini cheesecakes for at least 6 hours, or overnight. After a couple of hours, loosely cover the tops with plastic wrap to prevent them from absorbing any fridge odors. If you have a cupcake carrier with a lid, use that instead.
Step 7: Make the Cherry Topping and Serve
Prepare the cherry sauce and allow it to cool completely to room temperature before refrigerating. When ready to serve, peel the paper liners off the cheesecakes straight from the fridge. They soften as they sit at room temperature, so removing the wrappers while they are still cold makes the process much cleaner. Spoon the chilled cherry sauce over each cheesecake and serve immediately.
Expert Cooking Tips
- Soften cream cheese quickly: Cut the blocks into small cubes and let them sit on the counter for about an hour. Alternatively, place the sealed block in a bowl of warm water for 10 to 15 minutes. The microwave works in a pinch, but heat it in 10 to 15-second bursts to avoid melting the edges.
- Do not use low-fat substitutions: Low-fat cream cheese, light sour cream, and regular whipping cream all have lower fat content, which means the filling will not firm up properly after chilling. This is one recipe where full-fat is non-negotiable.
- Frozen cherries work fine: If fresh cherries are out of season, frozen pitted cherries produce an equally good sauce. Store-bought cherry pie filling is a perfectly acceptable shortcut too.
- Foil liners over paper: Several readers noted that paper liners can become slightly damp from the filling. Foil cupcake liners peel away more cleanly and hold their shape better.
- Make it ahead: Both the cheesecakes and the cherry sauce can be made a day in advance. Keep them refrigerated separately and add the topping right before serving.
Serving Suggestions
The cherry topping is a classic pairing, but the beauty of this easy no-bake cheesecake recipe is how adaptable it is. Fresh strawberries or a homemade strawberry sauce bring a bright, summery flavor that works especially well in warm months.
For a patriotic presentation, one reader topped these with strawberries and blueberries in red, white, and blue cups for a Fourth of July party, and they were a crowd favorite. Blueberries, raspberries, caramel sauce, chocolate shavings, or chopped toasted nuts all make excellent no-bake cheesecake toppings.
For parties, arrange the unwrapped cheesecakes on a platter and let guests add their own toppings. Small wine glasses or clear dessert cups also make a beautiful presentation if you want to skip the muffin tin entirely.
Common Mistakes to Avoid
- Using cold cream cheese: Cold cream cheese will not beat smooth. You will end up with lumps that no amount of mixing will fully fix. Always start with room-temperature blocks.
- Skipping the full chill time: Pulling the cheesecakes out after only 2 or 3 hours means the filling will be soft and mousse-like rather than set. The full 6 hours is necessary for a clean, sliceable texture.
- Folding too aggressively: Stirring the whipped cream in rather than folding it deflates all the air you just beat in. Use a spatula and work slowly from the bottom of the bowl upward.
- Adding warm cherry topping: Spooning hot or even warm cherry sauce over the chilled cheesecakes will soften the filling and make a mess. Let the sauce cool to room temperature, then refrigerate it before using.
- Not pressing the crust firmly enough: A loosely packed crust will crumble the moment you pick up the cheesecake. Press it down firmly so it holds together as a single compact layer.
Storage and Make-Ahead Tips
Refrigerator: Store the mini cheesecakes in the fridge for up to 4 days. Keep the topping separate and add it only when you are ready to serve, so the crust stays firm.
Freezer: These freeze surprisingly well. After the cheesecakes have fully chilled, wrap the entire pan in several layers of plastic wrap and freeze for up to 2 months. The texture holds up beautifully after thawing.
Thawing: Move the wrapped cheesecakes from the freezer to the refrigerator and let them thaw overnight. Do not thaw at room temperature, as the filling can become too soft and lose its shape.
Wrapping Up
No-bake mini cheesecakes are proof that you do not need a complicated technique or a hot oven to make something genuinely impressive. The filling is light and creamy with that classic tangy cheesecake flavor, the crust holds together without a single minute of baking, and the whole thing can be made the day before you need it.
Give this recipe a try this weekend and let us know in the comments what topping you chose.
Must Try Recipes
- No-Bake Mini Cheesecakes — Perfect for a quick and easy dessert option.
- No-Bake Lemon Cheesecake — A refreshing twist on the classic cheesecake.
- Berry Cheesecake — Add a fruity touch to your cheesecake with fresh berries.
Frequently Asked Questions
Why are my no-bake mini cheesecakes not setting?
The most common reason is not enough chill time. These need at least 6 hours in the refrigerator to firm up properly. If they are still soft after 6 hours, give them another hour or two. Using low-fat cream cheese or regular whipping cream instead of heavy whipping cream can also prevent the filling from setting.
Can I make no-bake mini cheesecakes without a muffin tin?
Absolutely. Ramekins, small glasses, or even disposable dessert cups all work well. When using ramekins, sprinkle the crust crumbs in loosely without pressing them down, since you will be scooping the cheesecake directly from the dish rather than peeling off a liner.
How do I know when the whipped cream has reached stiff peaks?
Lift the beater straight up out of the cream. If the peak that forms stands upright without drooping or curling over, you have stiff peaks. The whipped cream should look glossy and hold its shape when the bowl is tilted.
Can I use store-bought cherry pie filling as a topping?
Yes, store-bought cherry pie filling works as a quick substitute. Homemade cherry sauce has a fresher, more balanced flavor since you control the sweetness and tartness, but the store-bought version is a completely acceptable shortcut when time is short.
How far in advance can I make no-bake mini cheesecakes for a party?
You can make them up to 4 days ahead and store them covered in the refrigerator. For longer storage, freeze them for up to 2 months and thaw overnight in the fridge. Add any toppings right before serving to keep the crust from getting soggy.
What is the best cream cheese to use for no-bake cheesecake?
Full-fat block cream cheese, such as Philadelphia, gives the best results. Tubs of whipped or spreadable cream cheese contain more water and air, which prevents the filling from firming up to that smooth, sliceable texture you want.
Tools That Make No-Bake Mini Cheesecakes Actually Work
Most failed attempts come down to the wrong equipment. These are the exact tools that get you the right texture, heat, and result every time.

Want to save this recipe?
Want to save this recipe? Enter your email below, and we'll send it straight to your inbox. Plus, receive new recipes every week!

Beginner-Friendly No-Bake Mini Cheesecakes Recipe
- Total Time: 6 hours 20 minutes
- Yield: 14 cupcake size, or ramekins 1x
- Diet: Vegetarian
Description
These no-bake mini cheesecakes have a buttery graham cracker crust and irresistibly creamy filling. Add my homemade cherry sauce for sweet perfection in every bite.
Ingredients
- 1 1/2 cups graham cracker crumbs (12 whole crackers)
- 1 Tbsp granulated sugar
- 8 Tbsp unsalted butter (1 stick, melted)
- 16 oz cream cheese ((2) 8-oz blocks, room temperature)
- 2/3 cup granulated sugar
- 2 Tbsp sour cream
- 2 Tbsp lemon juice (freshly squeezed)
- 1 cup heavy whipping cream
- Cherry Topping
Instructions
- Line your muffin tin with paper liners. If you don’t have a spare muffin tin to make 14 total, you can put the extra 2 into ramekins.
- In a medium bowl, stir together graham crackers and sugar then add melted butter and stir until crumbs are evenly moistened. Divide the crumbs between your paper liners (about 2 Tablespoons in each). Press the crumbs evenly into the bottom of the liners to form the crust.
- In a large mixing bowl, beat the cream cheese and sugar with an electric hand mixer on medium/high speed for 3 minutes until fluffy and completely smooth, scraping down the bowl as needed. Add sour cream and lemon juice and beat for another minute until well incorporated.
- Wash the mixer attachments and then in a second large mixing bowl, beat heavy whipping cream on medium-high speed for about 3 minutes, or until whipped and stiff peaks form.
- Using a spatula fold the whipped cream into the cream cheese mixture until fully combined, scraping from the bottom of the bowl as you mix. Divide the cheesecake mixture evenly between your cupcake liners (a trigger-release ice cream scoop makes this easy!). Even out the tops with the back of a spoon. The cream cheese should be about level with the tops of the cupcake liners.
- Refrigerate the mini cheesecakes for at least 6 hours or overnight (set a reminder to cover with plastic wrap after a couple of hours in the refrigerator).
- Make the Cherry Sauce and set it aside to cool to room temperature then cover and refrigerate until ready to serve the cheesecakes.
- To serve, remove the wrappers from the mini cheesecakes (the cheesecakes soften as they stand so it’s easier to remove the wrappers right away). Spoon cooled cherry sauce over the mini cheesecakes and enjoy!
Notes
Use full-fat cream cheese only — low-fat versions won’t set properly. Chill for at least 6 hours; overnight gives the best texture. Store covered in the refrigerator for up to 3 days.
- Prep Time: 20 minutes
- Chill Time: 6 hours
- Category: Dessert
- Method: No-Bake
- Cuisine: American
Nutrition
- Calories: 309 kcal
- Sugar: 14 g
- Sodium: 168 mg
- Fat: 25 g
- Saturated Fat: 15 g
- Unsaturated Fat: 7 g
- Trans Fat: 0.3 g
- Carbohydrates: 20 g
- Fiber: 0.3 g
- Protein: 3 g
- Cholesterol: 70 mg

