


When you need something sweet and satisfying but have absolutely no time to bake, peanut butter bars are the answer. Most no-bake desserts either taste flat or fall apart before you can serve them. These bars solve both problems with just five ingredients and about 8 minutes of hands-on work. The result is a thick, fudgy peanut butter base layered under a glossy chocolate topping, with graham cracker crumbs giving every bite that irresistible crunch. They chill to a clean slice and hold together beautifully.
Why This Actually Works (Before You Start)
The secret behind these peanut butter bars is the double use of peanut butter. Most of it goes into the base, but a quarter cup gets melted directly into the chocolate topping. That small addition keeps the chocolate layer from turning brittle and cracking when you cut the bars. It stays smooth, slightly soft, and bonds to the peanut butter layer underneath.
The graham cracker crumbs also do more than add texture. They absorb just enough moisture from the butter-peanut butter mixture to create a base that holds its shape without refrigerating for hours. Even after a couple of days in the fridge, the crunch stays intact because there is no watery liquid pulling it apart.
Powdered sugar is used here instead of granulated for a reason: it dissolves completely into the mixture, keeping the base smooth and creamy rather than gritty. Granulated sugar would create an unpleasant crunch in all the wrong places.
Ingredients for Peanut Butter Bars
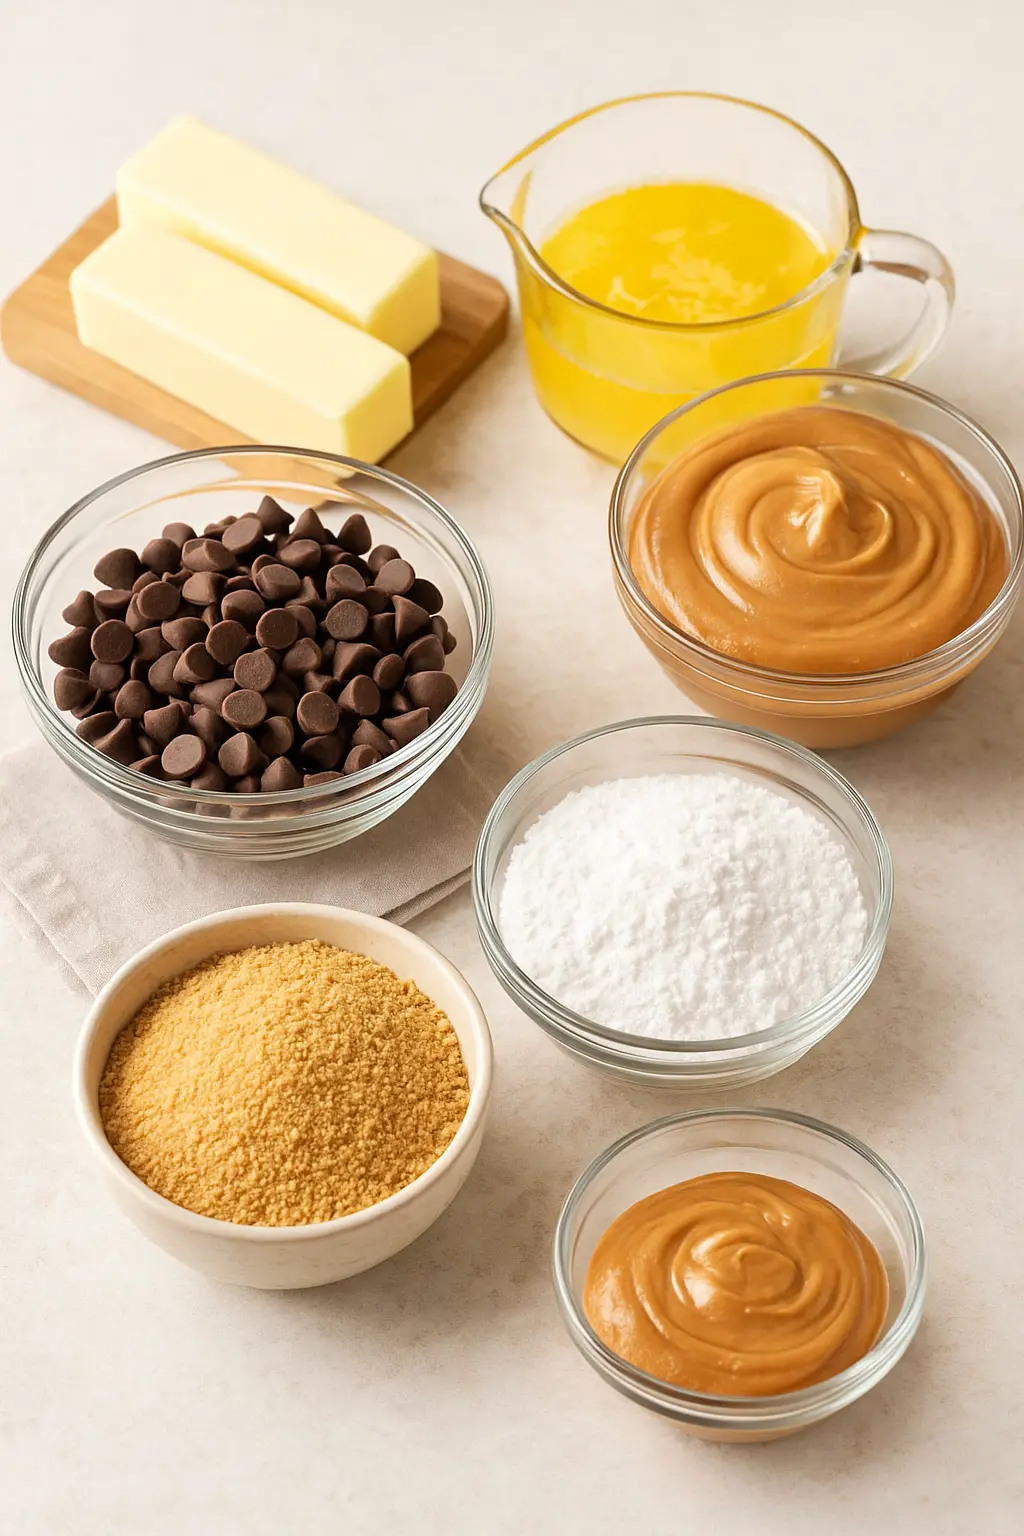
Everything you need is likely already in your pantry. Here is the full list from the recipe:
- 1 cup unsalted butter (melted and slightly cooled, 226g) — unsalted works best if your peanut butter already contains salt
- 1½ cups creamy peanut butter (divided, 396g) — 1¼ cups go into the base, ¼ cup goes into the chocolate topping
- 1¾ cups powdered sugar (210g)
- 2 cups graham cracker crumbs (240g) — pre-crushed works, but hand-crushed pieces give better texture
- 1½ cups semi-sweet or milk chocolate chips (270g)
Substitution notes: Biscoff cookies or shortbread can replace graham crackers for a different flavor profile. Dark chocolate chips work well if you want to balance the sweetness of the base. Crunchy peanut butter is a great swap if you want even more texture in every bite.
What to Watch Out For Before You Make These
A few small mistakes can affect the final result, and they are all easy to avoid once you know what to look for.
- Using hot melted butter: Let the butter cool slightly before mixing. If it is too hot, it can make the peanut butter mixture oily and difficult to press evenly into the pan.
- Overheating the chocolate: Microwaving in long bursts will seize the chocolate. Stick to 30 to 40 second increments and stir between each one. You will know it is ready when just a few small lumps remain and stirring makes them disappear completely.
- Skipping the parchment paper: This is not optional. Without it, the bars stick to the pan and you lose the clean edges that make them easy to cut and serve.
- Cutting too early: The chocolate topping needs at least 2 hours in the refrigerator to fully set. Cutting before that gives you smeared edges and a topping that slides off the base.
- Using natural peanut butter with separated oil: Stir it thoroughly first, or the mixture may turn greasy. Conventional creamy peanut butter gives the most consistent result here.
Step-by-Step Instructions
Step 1: Prepare Your Pan for a Clean Release
Line an 8-inch or 9-inch square baking dish with parchment paper or foil. Make four small snips at the corners, then fold and press it into the pan so it sits flat. The parchment should overhang the sides slightly so you can lift the entire slab out cleanly after chilling. If [the paper keeps shifting] → press it firmly into the corners and let the overhang drape over the edges to anchor it.
Step 2: Build a Stable, Creamy Peanut Butter Foundation
In a large mixing bowl, combine the melted and slightly cooled butter with 1¼ cups (330g) of peanut butter. Use a hand mixer on medium speed, or whisk by hand, until the mixture is completely smooth with no visible butter pockets. The texture should look like a thick, glossy peanut butter sauce.
Step 3: Sweeten Without Losing Creaminess
Add the powdered sugar (1¾ cups / 210g) to the peanut butter mixture. Mix on medium speed, scraping down the sides of the bowl as needed, until fully combined. One thing to watch: clumps of powdered sugar can hide along the bowl’s edge and go unincorporated, so scrape thoroughly before moving to the next step.
Step 4: Fold In the Crumbs to Lock In the Crunch
Add the graham cracker crumbs (2 cups / 240g) and fold them in with a silicone spatula rather than mixing. Folding preserves those larger cracker pieces that create the signature crunch. The mixture should feel dense and slightly tacky, not crumbly. Transfer it to the lined dish and press it into an even layer, then refrigerate while you prepare the topping.
Step 5: Melt the Chocolate Topping Without Breaking It
In a microwave-safe bowl, combine the chocolate chips (1½ cups / 270g) with the remaining ¼ cup (66g) of peanut butter. Microwave at 100% power in 30 to 40 second bursts, stirring between each increment, until just a few small pieces of chocolate remain, about 2 minutes total. Stir one final time until the mixture is completely smooth and glossy. You will know it is ready when the spatula leaves a clean, shiny trail through the chocolate with no visible chips.
Step 6: Chill Until Set, Then Cut for Clean Bars
Pour the melted chocolate over the chilled peanut butter base and smooth it into an even layer with a spatula. Refrigerate for at least 2 hours until fully set. Lift the slab out using the parchment overhang, fold the paper down, and cut into bars of whatever size you prefer. You will hear the graham crackers crunch as the knife goes through, which is exactly what you want.
What Separates Good Peanut Butter Bars from Great Ones
I prefer hand-crushing the graham crackers over buying pre-crushed crumbs. The irregular pieces create a more interesting texture in the finished bar, with some bites giving you a bigger crunch than others.
- Weigh your ingredients when possible. Peanut butter is notoriously difficult to measure by volume accurately. Using a kitchen scale takes the guesswork out entirely.
- Let the butter cool before mixing. Even five minutes of cooling makes the base easier to handle and prevents the mixture from becoming greasy.
- Do not skip the peanut butter in the chocolate topping. It keeps the chocolate layer pliable and prevents it from cracking when cut. This is the detail that separates a clean slice from a shattered one.
- Add optional flavor accents. A teaspoon of vanilla extract or a pinch of cinnamon folded into the base adds depth without changing the recipe’s simplicity.
- Use a warm, dry knife for cutting. Run the blade under hot water, wipe it dry, and cut in one firm downward motion. This gives you sharp, clean edges on every bar.
Serving Suggestions
These bars work at room temperature for about 20 to 30 minutes before the chocolate softens, making them ideal for serving straight from the fridge at gatherings. Cut them into small squares for a dessert platter, or into larger rectangles if you are serving them as a standalone treat.
They pair naturally with a cold glass of milk, which cuts through the richness of the peanut butter base. For a more indulgent presentation, dust the tops lightly with flaky sea salt just before serving to sharpen the contrast between sweet and salty.
Make It Once, Use It All Week
Store peanut butter bars in an airtight container in the refrigerator. They keep well for up to one week without losing texture or flavor. The graham cracker crumbs stay crunchy because the base contains no liquid ingredients that would soften them over time.
For longer storage, these bars freeze well. Wrap individual bars in plastic wrap, place them in a freezer-safe bag, and freeze for up to two months. Thaw in the refrigerator overnight. There is no reheating needed since these are served cold or at room temperature.
Letting them rest in the fridge for even 20 extra minutes beyond the minimum chill time makes a noticeable difference in how cleanly they slice.
Ready to Make Your New Favorite No-Bake Treat
Five ingredients, no oven, and a result that consistently impresses anyone who tries one. These peanut butter bars are the kind of recipe you make once and immediately add to your regular rotation.
Give this one a try the next time you want something that actually satisfies without a full afternoon in the kitchen. The hardest part is waiting the two hours for them to set.
Must-Try Dessert Recipes for Quick Sweet Cravings
- Chocolate peanut butter pretzel cupcakes – Perfect for gatherings, offering a delightful chocolate and peanut butter blend.
- Peanut Butter Crunch Brownies – Ideal for quick sweet fixes, these brownies are a peanut butter lover’s dream.
- Peanut Butter Banana Smoothie – A speedy, nutritious treat for busy mornings.
FAQs
Can I use crunchy peanut butter instead of creamy?
Yes, crunchy peanut butter works well and adds extra texture to the base. The bars will have a slightly more rustic bite, but the structure and flavor remain the same. Avoid natural peanut butter with separated oil unless you stir it very thoroughly first.
What size pan should I use for peanut butter bars?
Either an 8-inch or 9-inch square pan works. The 8-inch pan produces thicker bars, while the 9-inch gives you slightly thinner ones. Both set properly with the same 2-hour chill time.
Can I make these peanut butter bars ahead of time?
These are excellent for making ahead. They keep in the refrigerator for up to one week in an airtight container, and the texture actually improves slightly after the first day as the layers fully bond together.
Why did my chocolate topping crack when I cut the bars?
This usually happens when the peanut butter is left out of the chocolate topping, or when the bars are cut straight from a very cold refrigerator. Let them sit at room temperature for 5 to 10 minutes before cutting, and use a warm dry knife for the cleanest result.
Can I use a different type of chocolate for the topping?
Milk chocolate, semi-sweet, and dark chocolate all work. Milk chocolate gives a sweeter, softer topping. Dark chocolate balances the sweetness of the peanut butter base if you prefer a less sweet bar overall.
Do peanut butter bars need to be refrigerated?
Yes, refrigeration is recommended both for setting and for storage. At room temperature, the chocolate topping softens within 20 to 30 minutes. Keep them chilled until just before serving for the best texture and clean slices.
Essential Kitchen Tools
Making Peanut Butter Bars? Most failed attempts come from using the wrong pan or heat setup — not the recipe itself.

Want to save this recipe?
Want to save this recipe? Enter your email below, and we'll send it straight to your inbox. Plus, receive new recipes every week!

Quick Peanut Butter Bars Recipe
- Total Time: 2 hours 10 minutes
- Yield: 12 servings 1x
Description
Whip up these delicious No Bake Peanut Butter Chocolate Protein Bars in just 10 minutes for a healthy, indulgent treat that delivers 11 grams of protein per bar! These bars combine natural peanut butter, oat flour, and Greek yogurt with a decadent dark chocolate drizzle, offering a perfect balance between indulgence and nutrition. Ideal for post workout snacking or a quick energy boost, they are gluten free, budget friendly, and made entirely from clean ingredients.
Ingredients
- 1 cup unsalted butter, melted and slightly cooled (226g)
- 1½ cups creamy peanut butter, divided (396g)
- 1¾ cups powdered sugar (210g)
- 2 cups graham cracker crumbs (240g)
- 1½ cups semi-sweet chocolate chips or milk chocolate chips (270g)
Instructions
- Prepare an 8-inch or 9-inch square dish by lining it with parchment paper or foil.
- In a large mixing bowl, combine the melted butter with 1¼ cups (330g) of peanut butter. Use a handheld electric mixer to blend on medium speed until the mixture is fully combined. Alternatively, you can whisk it together by hand.
- Incorporate the powdered sugar into the peanut butter mixture. Continue mixing on medium speed until everything is well combined, making sure to scrape down the sides of the bowl as necessary.
- Gently fold in the graham cracker crumbs using a silicone spatula. Transfer the mixture to the prepared dish and spread it into an even layer. Place it in the refrigerator while you prepare the chocolate topping.
- In a medium microwave-safe bowl, mix the chocolate chips with the remaining ¼ cup (66g) of peanut butter. Heat in the microwave at full power in 30 to 40 second intervals, stirring in between, until only a few small pieces of chocolate remain (approximately 2 minutes). Stir until the mixture is completely smooth.
- Pour the chocolate mixture over the peanut butter base and spread it into an even layer. Refrigerate for at least 2 hours to allow the bars to set. Once set, cut into bars and enjoy.
Notes
TECHNIQUE TIP: Ensure the melted butter is slightly cooled before mixing with other ingredients to prevent a runny texture.
STORAGE: Store the Peanut Butter Bars in an airtight container at room temperature for up to 5 days. Serve at room temperature for best flavor.
- Prep Time: 8 minutes
- chill: 2 hours
- Cook Time: 2 minutes
- Category: Dessert
- Cuisine: American
Nutrition
- Serving Size: 6 bars
- Calories: 627 kcal
- Sugar: 35 g
- Sodium: 236 mg
- Fat: 45 g
- Saturated Fat: 20 g
- Unsaturated Fat: 21 g
- Trans Fat: 1 g
- Carbohydrates: 51 g
- Fiber: 4 g
- Protein: 10 g
- Cholesterol: 42 mg

