


Hosting a party and worried your appetizer spread will look like an afterthought? Salami cups solve that problem in under 20 minutes, with zero complicated technique required. These crispy, edible bowls are packed with antipasto fillings and look genuinely impressive on a platter. Each cup comes in at just 55 calories, making them a crowd-pleasing bite that does not weigh anyone down before the main event.
Why This Works Before You Touch a Single Ingredient
The concept is straightforward: beef salami slices, when baked at high heat, release their fat, firm up at the edges, and hold a bowl shape. That natural structure becomes your vessel. No pastry, no crackers, no extra carbs needed.
The filling is antipasto-style, which means you are working with already-flavored, already-marinated ingredients. The assembly is fast because most of the work is done for you by the jar. The real skill here is restraint, and we will cover that in detail below.
What to Avoid Before You Start (Common Mistakes)
Most salami cup failures come down to one of three things. Getting these right before you preheat the oven saves a lot of frustration.
- Using the wrong size salami: This is the single biggest mistake. You need 4-inch diameter slices. Anything smaller shrinks down in the oven to a size that is nearly impossible to fill, and the result looks awkward. Check the package before you buy.
- Oversalting the filling: Beef salami is already quite salty on its own. Piling in marinated mozzarella balls, briny olives, AND marinated peppers without tasting as you go will make the cups almost too salty to eat. Choose your marinated ingredients selectively.
- Filling the cups too early: The crispy shell softens quickly once it contacts wet ingredients. Fill them right before serving, not an hour ahead.
- Skipping the cooling rack: Leaving the baked cups in the muffin tin traps steam underneath and softens the base. Transfer them to a wire rack so air can circulate all around.
Ingredients for Salami Cups Antipasto
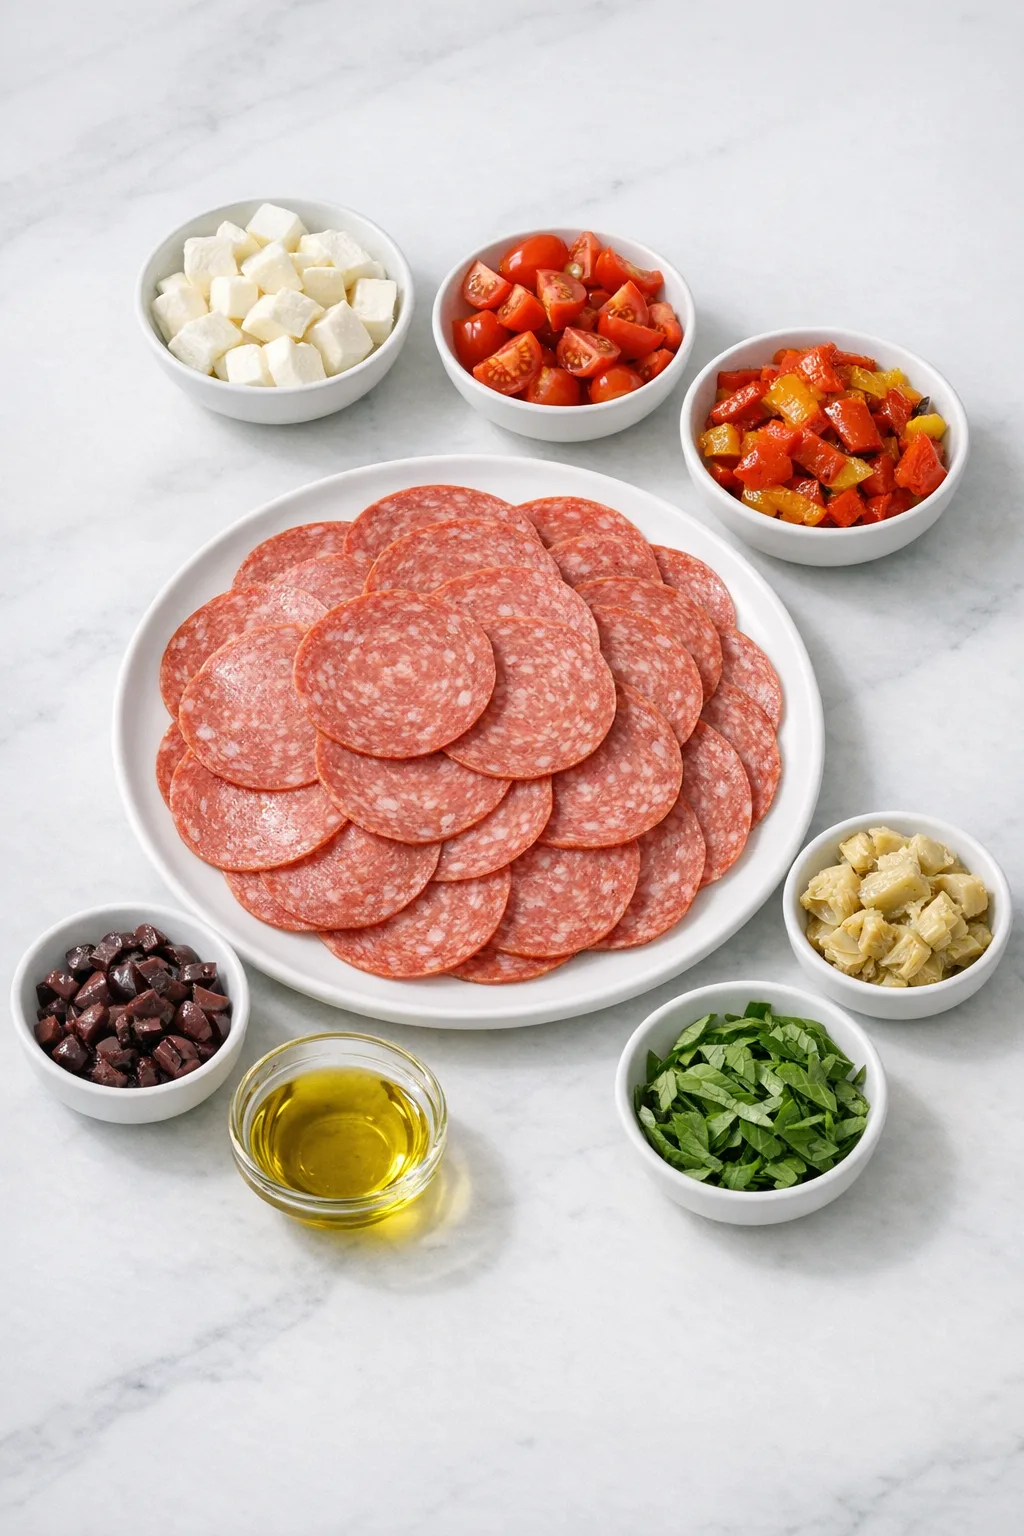
The ingredient list is flexible, but the salami itself is non-negotiable in terms of size. Here is everything you need for 24 cups:
- 24 slices beef salami, large size, 4 inches in diameter (regular or spicy)
- 1/2 cup fresh mozzarella cheese (4 oz), diced. Fresh mozzarella brings a mild, milky creaminess that balances the salty salami. Avoid marinated mozzarella balls here as they add extra brine the cups do not need.
- 1/2 cup cherry tomatoes, quartered
- 1/3 cup marinated bell pepper, well drained and coarsely chopped. Draining thoroughly matters; excess liquid will make the cups soggy within minutes.
- 1/3 cup marinated artichoke hearts, optional, well-drained and coarsely chopped
- 1/4 cup pitted kalamata olives, chopped (optional)
- 1 Tbsp extra virgin olive oil. The olive oil ties the filling together and adds a subtle richness that makes the antipasto taste cohesive rather than like a pile of separate ingredients.
- 1/4 cup fresh basil leaves, thinly sliced
For a flavor variation, a drizzle of balsamic glaze over a caprese-style filling works beautifully. If you want to enhance the flavor further with a dipping element on the side, exploring 3 healthy condiments that pair with antipasto-style bites is worth the detour.
How to Make Salami Cups: Step-by-Step Instructions
Step 1: Shape the Salami Into Cups That Will Actually Hold
Preheat your oven to 400°F. Lay one slice of beef salami over each cup of a standard Muffin Tin and press it down firmly using a small ramekin or the base of a measuring cup. The goal is to create pleats around the sides, those little folds are what give the cup structural integrity once it bakes.
You will know the salami is properly seated when the sides have visible pleats and the base sits flat against the bottom of the tin. One thing to watch: if the salami keeps springing back up, press and hold for a few seconds to let it relax into position.
If you find the cups keep opening up during baking, roll small 1-inch balls of foil and place one inside each cup before it goes into the oven. They act as weights and hold the shape while the salami firms up.
Step 2: Bake Until the Edges Crisp and the Cup Holds Its Shape
Bake at 400°F for 7 to 9 minutes, or until the beef salami is crisp at the edges and holds its shape on its own. The timing depends on how thick your slices are. Very thin salami can go from perfectly crisp to burnt in under a minute, so stay close to the oven.
You will know they are ready when the edges have pulled away slightly from the tin walls and look visibly darker and firm, not floppy. Remove from the oven and let the cups cool in the pan for 5 minutes, then transfer to a wire rack and cool completely before filling.
If you notice oil pooling at the bottom of the muffin cups, line your wire rack with paper towels to absorb the excess grease as the cups cool.
Step 3: Build the Antipasto Filling and Assemble
Combine the diced mozzarella, quartered cherry tomatoes, drained bell pepper, artichoke hearts, kalamata olives, and olive oil in a Mixing Bowl. Gently stir to combine without breaking up the mozzarella. Taste the mixture before filling. If it already tastes salty, hold back on any additional briny ingredients.
Divide the filling evenly between the cooled salami cups. Each cup holds roughly a heaping tablespoon of filling. Garnish with fresh basil just before serving.
The finished cups should look vibrant and full, with the colorful filling sitting just above the rim of the crispy salami bowl. That contrast of glossy filling against the slightly curled, browned edges is exactly what you want.
What Separates a Good Salami Cup from a Great One
A few details make a real difference in the final result.
- Cool completely before filling. Warm salami cups sweat and soften faster. Patience here pays off in texture.
- Drain your marinated ingredients thoroughly. Press them gently in a paper towel if needed. Wet fillings are the enemy of a crispy base.
- Balance your flavors. Aim for a mix of something creamy (mozzarella), something acidic (tomato or bell pepper), and something herby (basil). That balance is what makes each bite feel complete.
- Use a small jar or ramekin to press the salami into the tin. It is faster than using your fingers and creates more uniform pleats, which means more uniform cups.
- Do not skip the wire rack transfer. Air circulation underneath the cups keeps the base crisp while they cool.
Personally, I prefer spicy beef salami here. The heat plays well against the creamy mozzarella and the mild sweetness of the marinated bell pepper. Regular salami works perfectly too, but the spicy version adds a layer that makes the cups feel more interesting.
Salami Cup Filling Variations Worth Trying
The antipasto filling is the classic, but the cups are genuinely versatile. Here are a few combinations worth experimenting with:
- Goat Cheese, Pistachio, and Date: Tangy, sweet, and crunchy all in one bite. The contrast of textures is striking.
- Caprese Style: Fresh mozzarella, cherry tomato, basil, and a drizzle of balsamic glaze with a crack of black pepper.
- Mediterranean: Feta, black olives, cucumber, and a small dollop of tzatziki on top.
- Buffalo Chicken: Shredded chicken tossed in buffalo sauce, topped with blue cheese crumbles and a sliver of celery.
- Sweet and Savory: Cream cheese, honey, chopped walnuts, and a slice of fresh strawberry.
Serving Suggestions
These cups work best arranged on a flat platter or board so guests can see the filling. They are finger food, no utensils needed, which makes them practical for standing-room parties.
Pair them alongside a warm soup course for a more substantial spread. A bowl of Fresh Broccoli Cheese Soup offers a warm, creamy contrast to the cool, crispy cups, and the two together cover both texture and temperature in one pairing.
For a charcuterie-style spread, arrange the cups at the center and surround them with cured meats, crackers, and fresh fruit. They anchor the board visually and give guests something to reach for immediately.
Make-Ahead and Storage
The baked salami cups and the prepared filling can both be stored separately in airtight containers in the refrigerator for up to one day. Keep them apart until you are ready to serve.
Do not fill the cups in advance if you want them to stay crispy. Once the filling goes in, the clock starts on the texture. Assemble right before your guests arrive for the best result.
Freezing is not recommended for this recipe. The texture of the baked salami does not hold up well after thawing, and the filling ingredients lose their freshness.
FAQs
What size salami do I need for salami cups?
You need slices that are 4 inches in diameter. This is non-negotiable. Smaller slices shrink down in the oven and become too small to fill properly. Check the package dimensions before purchasing.
Can I use a different deli meat instead of beef salami?
Yes. Large beef pepperoni, capicola, bresaola, or smoked turkey all work. The key is finding slices that are close to 4 inches wide. Thinner deli meats may need slightly less bake time, so watch them closely after the 6-minute mark.
My cups are not holding their shape. What went wrong?
Two likely causes: the salami needed more time in the oven, or the slices were too thin. Add 1 to 2 more minutes of bake time and watch for the edges to look visibly firm and slightly darker. If the cups still collapse, try the foil ball method described in Step 1.
How far in advance can I make these for a party?
Bake the cups and prepare the filling up to one day ahead. Store them separately in airtight containers in the refrigerator. Fill them right before serving to maintain the crispy texture of the salami shell.
Why are my salami cups greasy?
Beef salami releases fat as it bakes, which is completely normal. Transferring the cups to a paper towel-lined wire rack immediately after baking absorbs the excess grease. Letting them cool in the muffin tin traps the oil underneath and makes the base soggy.
Can I broil the salami instead of baking it?
Yes, broiling works as an alternative if your oven runs cool or you need faster results. Watch them very closely under the broiler since the timing will be shorter and the risk of burning increases significantly. Pull them as soon as the edges look crisp and firm.
Worth Making for Your Next Gathering
The salami cups appetizer recipe solves a real hosting problem: how to put something impressive on the table without spending hours in the kitchen. Ten minutes of prep, seven minutes in the oven, and you have 24 individual, edible cups ready to fill.
The first time I made these, I used regular-sized salami slices from the deli counter without checking the diameter. They came out tiny and nearly impossible to fill. The 4-inch size requirement is not a suggestion.
Give these a try the next time you need an appetizer that earns a reaction. You might find yourself making them on a random Tuesday just because you have the ingredients on hand.
Essential Kitchen Tools
Making Salami Cups? Most failed attempts come from using the wrong pan or heat setup — not the recipe itself.

Want to save this recipe?
Want to save this recipe? Enter your email below, and we'll send it straight to your inbox. Plus, receive new recipes every week!

Beginner-Friendly beef salami Cups
- Total Time: 17 minutes
- Yield: 24 Salami Cups 1x
Ingredients
- 24 slices beef beef salami (the large size, 4 inches in diameter – regular or spicy but be sure it’s 4” wide.)
- 1/2 cup fresh mozzarella cheese ((4 oz) diced)
- 1/2 cup cherry tomatoes (quartered)
- 1/3 cup marinated bell pepper (well drained and coarsely chopped)
- 1/4 cup pitted kalamata olives (chopped, optional)
- 1 Tbsp extra virgin olive oil
- 1/4 cup fresh basil leaves (thinly sliced)
- 1/3 cup marinated artichoke hearts (optional, well-drained, coarsely chopped)
Instructions
- Position each slice of beef beef salami in a standard muffin tin or cupcake pan, pressing them into the cups with a small ramekin or measuring cup to shape them into little bowls. This technique creates pleats that help maintain their form.
- Place in a preheated oven at 400°F and bake for 7-9 minutes until the edges of the beef beef salami are crispy and they hold their shape. Allow to cool in the pan for 5 minutes before transferring to a wire rack to cool completely.
- In a mixing bowl, combine the filling ingredients along with the olive oil and stir gently to mix. Spoon the filling into the cups. If desired, top with fresh basil leaves and serve.
Notes
TECHNIQUE TIP: Monitor the cooking time closely if using very thin beef beef salami to prevent burning.
STORAGE: Store leftover beef salami cups in an airtight container in the refrigerator for up to 2 days.
SUBSTITUTION: Try spicy beef beef salami for a bolder flavor, perfect for those who enjoy a little heat.
- Prep Time: 10 minutes
- Cook Time: 7 minutes
- Category: Appetizer
- Method: Baked
Nutrition
- Calories: 55 kcal
- Sugar: 0.1 g
- Sodium: 278 mg
- Fat: 5 g
- Saturated Fat: 2 g
- Unsaturated Fat: 2.4 g
- Carbohydrates: 1 g
- Fiber: 0.2 g
- Protein: 3 g
- Cholesterol: 9 mg

