


Store-bought pita bread has a way of disappointing you right when you need it most: dry, stiff, and barely holding together around your filling. Making pita bread from scratch sounds intimidating, but the process is genuinely straightforward, and the results are in a completely different league. If you are new to bread baking and want a confidence-building win, this is a solid place to start. For a different kind of beginner-friendly bake, Delicious Buttery Breadsticks take a similar no-fuss approach with a completely different result. But today, we are staying focused on pita: soft, chewy, and puffed up with that signature hollow pocket that makes it so satisfying to tear open.
Why This Works: The Science Behind the Pocket
The pita pocket is not magic. It happens because the dough is rolled thin and placed on a screaming-hot surface. The intense heat creates a rapid burst of steam inside the dough, which separates the layers and inflates the bread in seconds. This is why the oven temperature and the preheated baking surface are non-negotiable parts of the recipe, not optional extras.
Two ingredients do quiet but important work here. The olive oil adds fat to the dough, which keeps the finished pita soft and pliable rather than cracker-like. The small amount of sugar is not there for sweetness. It feeds the yeast during activation, helping it wake up faster and produce a stronger, more reliable rise.
What You Need to Make Pita Bread
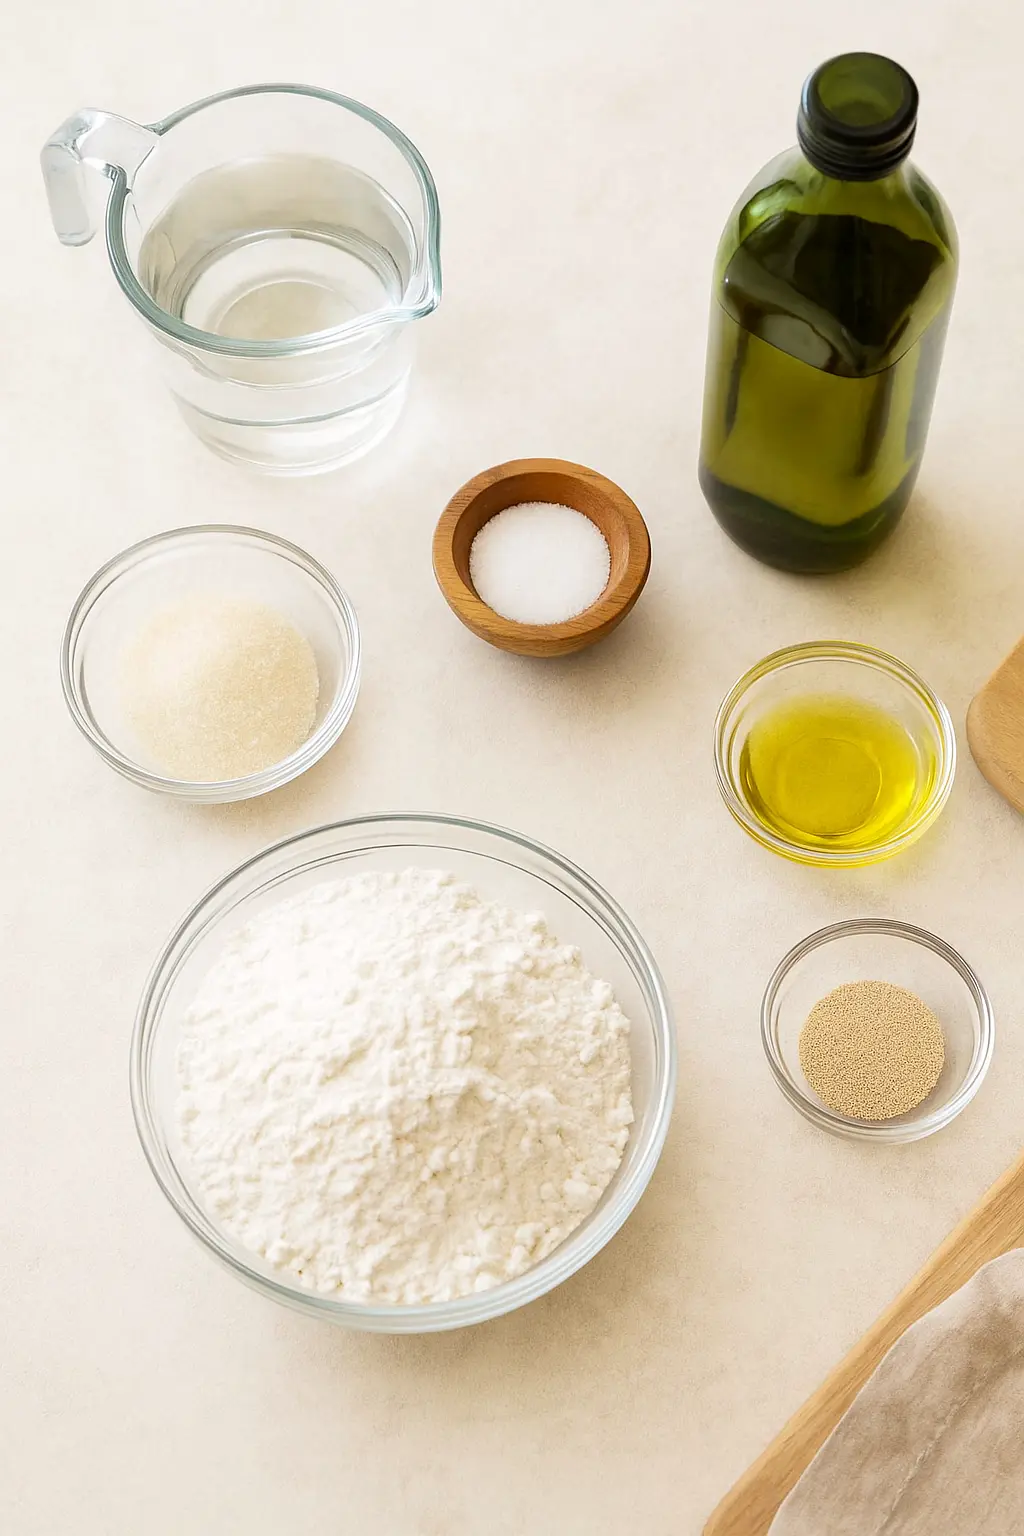
The ingredient list is short and built from pantry staples. Here is everything you need for 8 pitas:
- 1 cup warm water (105 to 110°F / 240mL): Too hot and it kills the yeast; too cold and the yeast stays dormant. Aim for the temperature of a warm bath.
- 1 packet (0.25 oz) active dry yeast (2¼ teaspoons): This is the leavening agent that creates the pocket.
- ½ teaspoon granulated sugar: Feeds the yeast during activation.
- 3 cups all-purpose flour, divided (360g), plus extra for dusting
- 2 tablespoons olive oil: Adds softness and a subtle richness to the finished bread.
- 1 teaspoon salt: Balances the flavor and controls yeast activity during the rise.
No bread flour required. All-purpose flour gives you a tender, chewy texture that works beautifully here. If you want a slightly nuttier flavor, you can swap up to half the flour for whole wheat flour, though the pitas may not puff quite as dramatically.
Why Most Homemade Pita Fails (and How to Fix It)
Before you start mixing, it helps to know where things typically go wrong. These are the most common reasons homemade pita does not puff or turns out tough:
- Skipping the yeast proof: If your yeast does not bubble and foam after 15 minutes, it is inactive. Do not proceed. Start over with fresh yeast, or your pitas will be flat and dense.
- Rolling the dough too thick: Pitas need to be rolled to a 6-inch circle. Thicker dough does not generate enough internal steam to puff properly.
- A cold baking surface: The stone, heavy baking sheet, or cast-iron skillet must be fully preheated at 475°F before the dough goes in. A lukewarm surface produces flat, pale bread instead of a dramatic puff.
- Over-flouring the work surface: A light dusting is all you need. Too much flour dries out the dough and creates a tough, crumbly texture.
- Skipping the rest periods: The two 10-minute rests are not filler. They allow the gluten to relax, making the dough easier to roll and the final texture more tender.
Step-by-Step Instructions
Step 1: Activate the Yeast and Build Your Starter
In the bowl of a stand mixer fitted with the dough hook, stir together the warm water, yeast, and sugar until well combined. Whisk in ½ cup of flour until smooth. Let the mixture stand, uncovered, in a warm, draft-free place for about 15 minutes.
You will know it is ready when the surface is visibly bubbly and the mixture has grown noticeably in volume. It should smell faintly yeasty and slightly sweet. If nothing happens after 15 minutes, your yeast may be expired or your water was too hot. Start the activation step again with fresh yeast before continuing.
Step 2: Bring the Dough Together Without Overworking It
Stir in the olive oil, salt, and remaining 2½ cups of flour until a shaggy, rough dough forms. With the mixer on low, knead the dough for 3 minutes. Cover with a towel and let it rest for 10 minutes.
The dough will look rough and uneven at this stage, and that is completely normal. One thing to watch: if the dough is climbing up the hook and not being kneaded, stop the mixer and push it back down before continuing. You can also mix this by hand with a wooden spoon if you do not have a stand mixer.
Step 3: Knead to a Smooth, Elastic Finish
Knead again until a smooth and elastic dough forms, about 2 minutes more. Place the dough in a lightly greased large bowl. Cover with a damp tea towel or plastic wrap and let it rise in a warm, draft-free place until doubled in size, about 1 hour.
Press a floured finger gently into the dough. When it is ready, the indentation should spring back slowly but not completely. If it snaps back immediately, give it more time. I find that placing the covered bowl near a slightly warm oven works well on cooler days when the kitchen is drafty.
Step 4: Preheat Your Baking Surface to Get the Pocket Right
Set an oven rack in the lowest position of the oven and place a pizza stone, heavy baking sheet, or large cast-iron skillet on it. Preheat the oven to 475°F.
The surface needs to be fully saturated with heat before the pitas go in. Give it at least 30 minutes of preheating time alongside the oven. For anyone who has struggled with uneven browning or flat pitas, the technique behind getting a consistent bake is the same principle explored in this Delicious Homemade French Bread Pizza Recipe, where a hot surface is what drives the crust.
Step 5: Divide, Shape, and Let the Dough Rest Again
Punch down the risen dough and turn it out onto a lightly floured surface. Divide into 8 equal pieces and shape each into a ball. Cover with a towel and let the dough balls rest for 10 minutes.
To divide evenly, halve the dough, then halve each piece again, then halve those. To shape into balls, tuck the edges underneath, place your cupped hand over the top, and make small circular motions against the work surface. The dough should feel soft and slightly tacky, not sticky or stiff.
Step 6: Roll and Bake Until the Pitas Puff
On a lightly floured surface, roll each dough ball into a 6-inch circle. Working one or two at a time, place the dough circles on the hot stone. Bake until puffed, about 2 minutes, then flip and continue baking until pale and puffed, about 2 minutes more. Repeat with the remaining dough. Serve warm or at room temperature.
Watch through the oven window: the pita will start to balloon up dramatically within the first 90 seconds. That puff is the steam pocket forming. When you pull them out, they will look fully inflated. They will deflate slightly as they cool, and that is normal. The pocket remains inside.
What Separates a Good Pita from a Great One
- Use a flat rolling pin: A tapered French-style pin makes it harder to get an even 6-inch circle. A straight, flat pin gives you more control and a more uniform thickness.
- Work in pairs: Roll two circles out, bake them, and while they bake, roll the next two. The timing works out almost perfectly.
- Do not skip the second knead: After the 10-minute rest, the gluten relaxes enough that the dough becomes genuinely smooth and elastic. If the mixer is not quite getting there, a minute or two of hand kneading finishes the job.
- Eat them fresh: Pita bread is at its absolute best within minutes of coming out of the oven. Warm, slightly crispy on the outside, chewy and soft inside. That texture is simply not replicable from a store shelf.
Serving Suggestions
Fresh pita bread is one of the most versatile things you can have on the table. Stuff them with grilled chicken, roasted vegetables, or a simple cucumber and tomato salad with a drizzle of olive oil. They also work beautifully as a scoop for hummus or baba ganoush, where the soft, chewy texture holds up without tearing.
For a more substantial spread, pita pairs naturally with layered dishes built around chickpeas, yogurt, and warm spices. Unlike the crispy flatbreads used in some dishes, this soft pita soaks up sauces without falling apart, which makes it a natural fit alongside an Easy Fatteh Recipe, where the bread plays a structural role in the dish rather than just a side.
You can also cut the baked pitas into wedges, brush them lightly with olive oil, and toast them in the oven for homemade pita chips. They hold their crunch for hours.
Make It Once, Use It All Week
Pita bread stores well and reheats easily, which makes a batch worth the effort even on a busy week. Once fully cooled, store the pitas in an airtight bag or container at room temperature for up to 2 days, or refrigerate for up to 5 days.
For longer storage, freeze them in a single layer first, then transfer to a zip-lock bag. They keep well in the freezer for up to 3 months. To reheat, wrap a pita in a damp paper towel and microwave for 20 to 30 seconds. It will come out soft and pliable, almost like it just came out of the oven. Alternatively, place it directly on a dry skillet over medium heat for about 30 seconds per side. You will hear a faint sizzle and the surface will warm to a soft, slightly toasted finish.
Ready to Bake Your First Batch?
Homemade pita bread removes the biggest frustration of store-bought: that stale, cardboard quality that makes even good fillings feel underwhelming. This recipe gives you bread that is genuinely soft, chewy, and fresh, with a real pocket that holds together.
Give this one a try on a weekend morning when you have a little time to let the dough rise. The process is slower than opening a bag, but the moment you pull a puffed pita off that hot stone, you will understand immediately why people keep making this from scratch.
FAQs
Why did my pita bread not puff up?
The most common reason is a baking surface that was not hot enough. The stone or baking sheet needs to preheat at 475°F for at least 30 minutes before the dough goes in. Also check that your dough was rolled to a 6-inch circle and no thicker, since thicker dough does not generate enough steam to separate the layers.
Can I make pita bread without a stand mixer?
Yes. Stir the dough together with a wooden spoon until it forms a shaggy mass, then knead by hand on a lightly floured surface. The total hand-kneading time is about 5 minutes across two sessions. The dough is ready when it feels smooth, slightly tacky, and springs back slowly when poked.
How do I know if my yeast is still active?
After combining the warm water, yeast, sugar, and ½ cup of flour, let the mixture sit for 15 minutes. It should be visibly bubbly and have increased in volume. If the surface looks flat and unchanged after 15 minutes, the yeast is likely expired and the batch should not continue.
Can I use whole wheat flour for pita bread?
You can substitute up to half the all-purpose flour with whole wheat flour. The pitas will have a slightly denser texture and a nuttier flavor, and they may not puff as dramatically. Using more than half whole wheat flour tends to produce a heavier dough that is harder to roll thin enough for a good pocket.
How many calories are in one homemade pita?
Each pita contains approximately 203 kcal, with 36g of carbohydrates, 5g of protein, and 4g of fat. The recipe makes 8 pitas from the full batch.
Can I cook pita bread on the stovetop instead of the oven?
A dry cast-iron skillet over high heat works well as an alternative. Heat the skillet until it is very hot, then cook each rolled circle for about 1 to 2 minutes per side. The pita may not puff as dramatically as it does in the oven, but it will still develop a soft interior and lightly charred spots on the surface.
Essential Kitchen Tools
Making Pita Bread? Most failed attempts come from using the wrong pan or heat setup — not the recipe itself.

Beginner-Friendly Pita Bread Recipe
- Total Time: 2 hours 11 minutes
- Yield: 8 pitas 1x
Description
Master the Art of Homemade Pita Bread: A Foolproof Step-by-Step Guide to the Perfect Middle Eastern Flatbread
Ingredients
- 1 cup warm water (105 to 110F) (240mL)
- 1 (0.25-oz.) packet active dry yeast (2¼ teaspoons)
- ½ teaspoon granulated sugar
- 3 cups all-purpose flour (divided, plus additional for dusting (360g))
- 2 tablespoons olive oil
- 1 teaspoon salt
Instructions
- Combine the warm water, yeast, and sugar in the bowl of a stand mixer equipped with a dough hook, mixing until well blended. Incorporate ½ cup of flour until the mixture is smooth. Allow it to sit uncovered in a warm, draft-free area until it becomes bubbly, which should take about 15 minutes.
- Add the olive oil, salt, and the remaining 2½ cups of flour, stirring until a shaggy dough is formed. With the mixer set to low, knead the dough for 3 minutes. Cover it with a towel and let it rest for 10 minutes. (Alternatively, you can mix with a wooden spoon and knead by hand.)
- Knead the dough again until it reaches a smooth and elastic consistency, which should take an additional 2 minutes. Transfer the dough to a large bowl that has been lightly greased. Cover it with a damp tea towel or plastic wrap and let it rise in a warm, draft-free location until it has doubled in size, approximately 1 hour.
- Position an oven rack in the lowest setting and place a pizza stone, heavy baking sheet, or large cast-iron skillet inside. Preheat the oven to 475F.
- Deflate the risen dough and transfer it to a lightly floured surface. Cut it into 8 equal portions and shape each into a ball. Cover the balls with a towel and allow them to rest for 10 minutes.
- On a floured surface, roll each ball into a circle measuring 6 inches in diameter. Working with one or two at a time, place the dough circles onto the hot stone; bake until they puff up, which should take about 2 minutes. Flip them over and continue baking until they are pale and puffed, for another 2 minutes. Repeat this process with the remaining dough. Serve them warm or at room temperature.
Notes
TECHNIQUE TIP: Allow the dough to rest until it doubles in size for a perfect rise.
STORAGE: Store baked pita bread in an airtight container at room temperature for up to 3 days. Warm before serving for best texture.
- Prep Time: 35 minutes
- Cook Time: 16 minutes
- Category: bread
- Cuisine: Mediterranean
Nutrition
- Serving Size: 8 pitas
- Calories: 203 kcal
- Sugar: 0.4 g
- Sodium: 293 mg
- Fat: 4 g
- Saturated Fat: 1 g
- Unsaturated Fat: 4 g
- Carbohydrates: 36 g
- Fiber: 1 g
- Protein: 5 g
