


Homemade oat milk sounds straightforward until you pour yourself a glass and it has the texture of watered-down porridge. That slimy, starchy result is the number one reason people give up and go back to the expensive carton. After testing more than six different batches, Lisa Bryan cracked the code on making oat milk that is genuinely smooth, creamy, and worth the five minutes it takes to prepare. The result is a lightly sweet, velvety milk with just 47 calories per serving, made from ingredients you probably already have.
Ingredients for Homemade Oat Milk
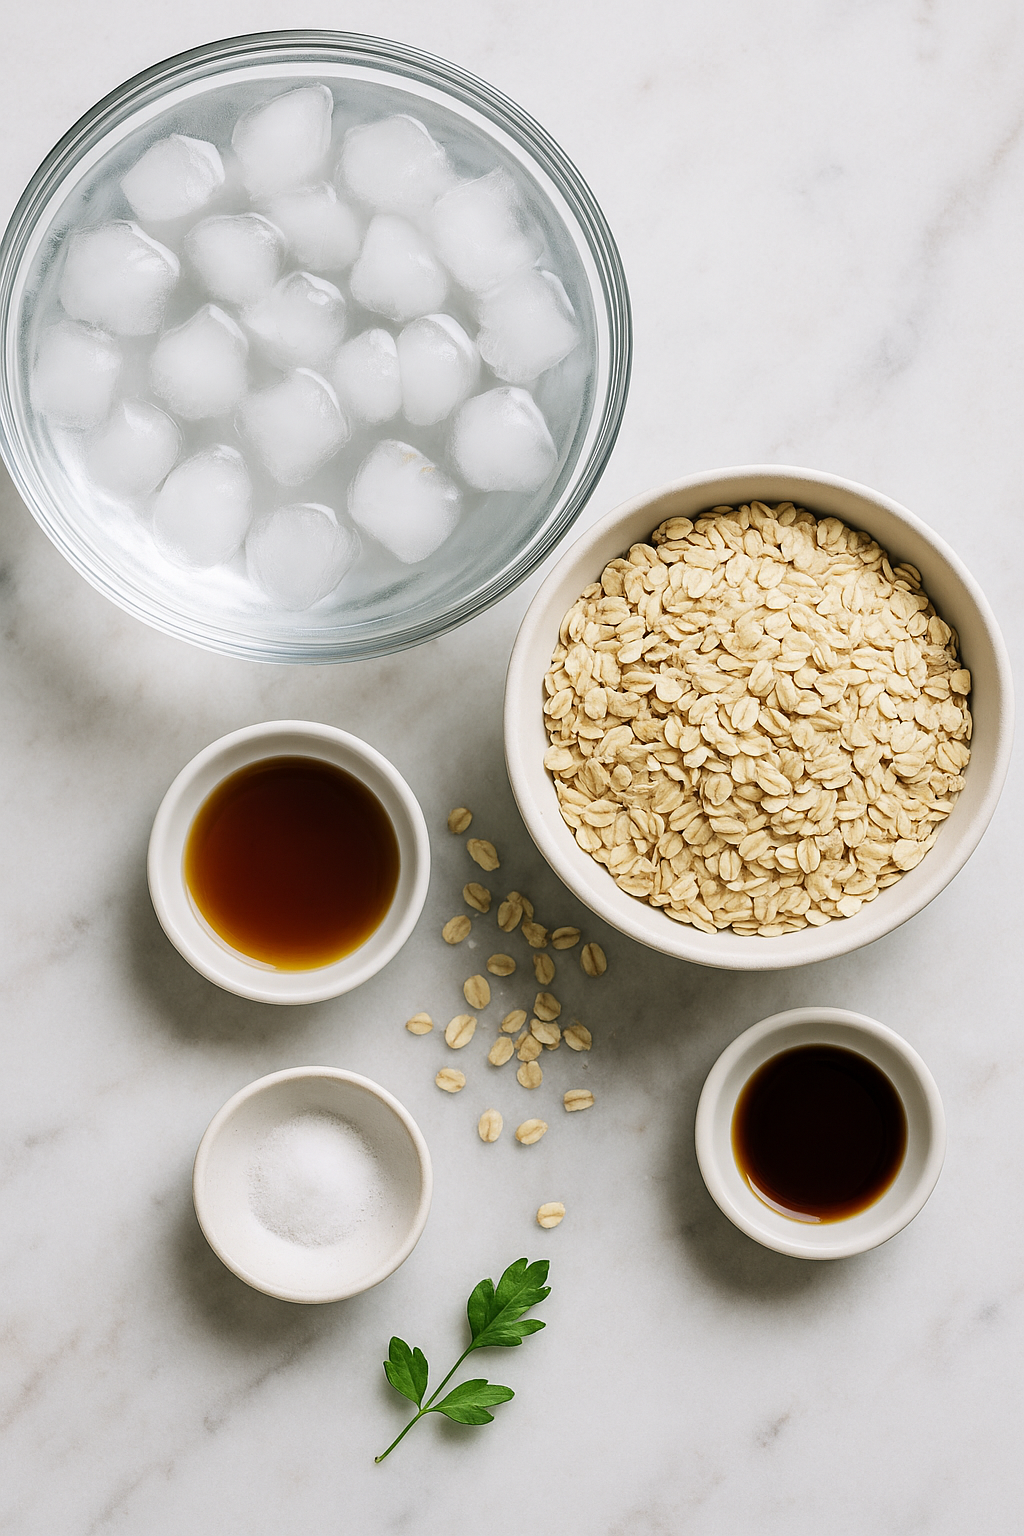
The ingredient list is refreshingly short. Every quantity below comes directly from the tested recipe, so resist the urge to eyeball things, especially the water-to-oat ratio.
- 1 cup rolled oats (old-fashioned, not quick oats or steel cut)
- 4 cups ice cold water
- 1 to 2 tablespoons maple syrup (optional, for sweetness)
- 1 teaspoon vanilla extract (optional)
- Pinch of salt
Why rolled oats specifically? Quick oats are over-processed and release starch faster, which is exactly what creates slime. Steel cut oats sit at the other extreme and do not break down enough to produce a creamy result. Rolled oats hit the sweet spot.
Why ice cold water? Heat activates the starch in oats. Cold water keeps those starches from becoming gummy during blending. Think of what happens when you make oatmeal with hot water and you will understand the science immediately.
For a naturally sweeter batch, honey works as a substitute for maple syrup. If you want completely unsweetened oat milk, skip the sweetener and vanilla entirely.
How to Make Non-Slimy Oat Milk: Step-by-Step
Step 1: Add Everything to the Blender
Pour the 4 cups of ice cold water into a blender, then add 1 cup of rolled oats. If you are using maple syrup, vanilla, and salt, add those now too.
The water should look completely clear and feel genuinely cold when you touch the outside of the blender. If your tap water is not cold enough, swap one cup of water for ice cubes.
If your blender feels warm from a previous use, rinse it with cold water before starting. Residual heat from the motor is enough to make a difference.
Step 2: Blend for 20 to 30 Seconds Only
Blend on high for no more than 30 seconds. The mixture will turn a pale, creamy white and you will hear the sound shift from a rough churn to a smoother hum as the oats break down.
Stop there. The friction from a high-powered blender generates heat, and the longer you run it, the warmer the mixture gets. Warm oats equal slimy milk, every single time.
If your oat milk still looks watery after 30 seconds, do not keep blending. The straining step will clarify the texture.
Step 3: Strain Through a Nut Milk Bag
Place a nut milk bag over a large mixing bowl and pour the blended mixture through it slowly. A nut milk bag with a tight weave is non-negotiable here. Cheesecloth and standard strainers have too-open a weave and will let sediment through, leaving you with grainy milk.
Gently squeeze the bag to release the milk, but stop before you feel real resistance. Over-squeezing forces starchy compounds from the oat pulp back into your milk. You want the milk, not the paste hiding inside the pulp.
For the smoothest result, pour the strained milk back through the bag a second time. It takes an extra minute and makes a noticeable difference in texture.
Step 4: Store in the Fridge
Transfer the finished oat milk to a sealed glass jar or airtight container and refrigerate immediately. It will keep fresh for up to one week, which is slightly longer than most homemade nut milks.
Do not be alarmed when you open the fridge and find the milk has separated into a watery layer and a thicker layer. That is completely normal without stabilizers. A quick stir or shake before pouring brings it back together.
The Secret Enzyme Trick for the Least Slimy Oat Milk
If you want to go even further, there is one more method worth knowing. Commercial brands like Oatly use an enzymatic process to break down oat starches before production. You can replicate a version of this at home using digestive enzyme capsules.
Here is how it works:
- Add 1 cup of rolled oats to a bowl and cover with enough water to submerge them by about an inch or two.
- Open two digestive enzyme capsules and stir the contents into the bowl.
- Let the oats soak for 15 minutes. The enzyme doing the heavy lifting here is amylase, which specifically breaks down starches into smaller sugar molecules.
- Strain the soaked oats through a sieve over the sink and rinse them well under running water to remove residual starch.
- Transfer the rinsed oats to your blender with 4 cups of ice cold water, vanilla, and maple syrup, then blend for 20 to 30 seconds.
- Strain through a nut milk bag as usual.
The trade-off is real: this version is noticeably less slimy but also thinner, closer to skim milk in consistency. If you prefer a creamier result, try reducing the water to 3 cups in this enzyme batch. I personally prefer the standard method for everyday use and save the enzyme version for when I want something lighter in a smoothie.
Expert Tips for the Best Oat Milk
- Buy certified organic, gluten-free rolled oats. Commercial oats are frequently processed in facilities shared with wheat, and non-organic oats have been found to contain glyphosate residue. It matters more here than in baked goods because you are consuming the oat directly.
- Never soak oats before the standard method. Soaking without enzymes makes the oats more starchy before they even hit the blender, which is the opposite of what you want.
- Use a high-powered blender. A weak blender may require longer run time to break down the oats, which introduces heat. If your blender is underpowered, blend in two short bursts with a 10-second pause between them.
- Do not use a food processor. The blade geometry is wrong for this and the seal is rarely tight enough to prevent leaks with liquid.
- Chill your glass jar before storing. Pouring warm-ish milk into a cold jar helps drop the temperature faster and preserves freshness longer.
How to Use Homemade Oat Milk
Homemade oat milk works beautifully in cold applications. Pour it over granola and you get a clean, lightly sweet milk that does not overpower the toppings. Blend it into a smoothie and it adds body without the heaviness of full-fat coconut milk.
It also works well in baked goods like muffins, pancakes, and quick breads, where the mild oat flavor blends right in. Use it anywhere a recipe calls for a neutral plant-based milk.
One honest note: homemade oat milk does not froth well for hot lattes the way store-bought versions do. Commercial oat milk contains added oils and stabilizers that create that barista-style foam. Without those additives, the milk will thicken slightly when heated but will not froth. For cold brew, iced lattes, or overnight oats, it is excellent.
Common Mistakes to Avoid
- Using warm or room temperature water. This is the single biggest cause of slimy oat milk. Cold water is not a suggestion, it is the mechanism that keeps starch from activating.
- Blending too long. Even 10 extra seconds past the 30-second mark can warm the mixture enough to change the texture. Set a timer.
- Squeezing the nut milk bag too hard. It feels like you are leaving milk behind, but firm squeezing pushes starchy paste through the weave. Gentle pressure is enough.
- Using cheesecloth. The weave is too loose. Sediment passes through freely and the result is grainy, not smooth.
- Skipping the double strain. The first pass removes most of the oat pulp. The second pass catches the fine particles that make the milk feel chalky. It takes 60 seconds and is worth it.
Storage Tips for Homemade Oat Milk
Store finished oat milk in a sealed glass container in the refrigerator for up to one week. Glass is preferable to plastic because it does not absorb odors and keeps the milk tasting clean.
The milk will separate in the fridge. This is normal and expected without emulsifiers. Shake or stir before each use and it comes right back together. There is no need to re-blend.
Oat milk does not freeze well. The texture becomes grainy and watery after thawing, so make only what you will use within the week.
Make a Fresh Batch Whenever You Need It
Once you realize that a batch of smooth, fresh oat milk takes about 10 minutes from start to finish, the expensive carton becomes a lot less appealing. The cold water trick, the short blend time, and the gentle straining are all it takes to get a result that genuinely rivals what you find on store shelves, without the additives, oils, or mystery thickeners. Give it a try this week and taste the difference for yourself.
Must Try Recipes
- Strawberry Milkshake — A delicious and refreshing drink that pairs well with homemade oat milk.
- Berry Baked Oatmeal — Perfect for a wholesome breakfast alongside your oat milk.
- Healthy Banana Bread with Oat Flour — A great snack to enjoy with a glass of oat milk.
Frequently Asked Questions
Why does my homemade oat milk taste slimy even after following the recipe?
The most likely cause is water temperature or blend time. If your water was not genuinely cold or if you blended past 30 seconds, the oat starches activate and create that gluey texture. Try again with ice cold water and set a timer to stop blending at exactly 25 seconds.
Can I use quick oats instead of rolled oats?
Quick oats are more heavily processed and release starch much faster during blending, which makes the sliminess problem significantly worse. Rolled oats are the right choice for a smooth, drinkable result.
How long does homemade oat milk last in the fridge?
Up to one week in a sealed container. You will notice it separates between uses, which is completely normal. A quick stir before pouring is all it needs.
Do I need to soak the oats before making oat milk?
For the standard method, no. Soaking without enzymes actually increases sliminess by softening the oats and releasing more starch before blending. Skip the soak unless you are using the digestive enzyme method described above.
Can I make oat milk without a nut milk bag?
A thin, tightly woven dish towel can work in a pinch. Avoid cheesecloth and standard mesh strainers because the weave is too open and sediment passes straight through, leaving you with grainy milk instead of a smooth pour.
Why is my oat milk too watery?
The 1 cup oats to 4 cups water ratio produces a lighter milk by design. If you want a creamier result, reduce the water to 3 cups on your next batch. Alternatively, make sure you are not over-squeezing the nut milk bag, which can dilute the milk with excess liquid from the pulp.
Tools That Make Oat Milk Actually Work
Most failed attempts come down to the wrong equipment. These are the exact tools that get you the right texture, heat, and result every time.

Want to save this recipe?
Want to save this recipe? Enter your email below, and we'll send it straight to your inbox. Plus, receive new recipes every week!

Additive-Free Oat Milk Recipe
- Total Time: 10 minutes
- Yield: 8 servings 1x
- Diet: Vegetarian
Description
Learn how to make oat milk in a blender (not slimy) with just oats and water! Want to take it a step further? Add a digestive enzyme for the least slimy oat milk. Watch the video below!
Ingredients
- 1 cup rolled oats
- 4 cups ice cold water
- 1 to 2 tablespoon maple syrup
- 1 teaspoon vanilla extract
- pinch of salt
Instructions
- Add oats, water, and any additional sweeteners to a high-powered blender. Blend for 20 to 30 seconds. Make sure to not over-blend.
- Strain the oat milk mixture by pouring through a nut milk bag or thin towel over a large mixing bowl or pitcher. If you’d like, you can double strain the mixture to make sure all the sediment is removed.
- Transfer the oat milk to a sealed container and store in the fridge.
Notes
Use ice cold water to prevent sliminess. Double strain for a smoother texture. Store in a sealed container in the fridge for up to 5 days.
- Prep Time: 10 minutes
- Category: Drinks
- Method: No-Bake
- Cuisine: American
Nutrition
- Serving Size: 8
- Calories: 47 kcal
- Sugar: 2 g
- Sodium: 1 mg
- Fat: 1 g
- Saturated Fat: 0.1 g
- Unsaturated Fat: 0.4 g
- Trans Fat: 0g
- Carbohydrates: 9 g
- Fiber: 1 g
- Protein: 1 g
- Cholesterol: 0mg

