


Baking bread from scratch feels intimidating until you realize most of the work happens while you sleep.
These Sourdough Dinner Rolls follow that exact approach. Mix the dough in the evening, let it ferment overnight, then shape, proof, and bake the next day to golden perfection.
The result is a pan of soft, pull-apart rolls with cloud-like centers and a lightly crisp bottom. Each roll has about 162 calories and 5 grams of protein, making them as satisfying as they are simple.
With a short ingredient list and no commercial yeast, this recipe keeps things easy. Your active sourdough starter does all the work, delivering rich flavor and perfect texture every time.
Why This Recipe Works Before You Touch a Single Ingredient
The secret to fluffy sourdough dinner rolls is not a special technique. It is time and an active starter. The long overnight bulk fermentation allows the sourdough cultures to break down the gluten slowly, which creates a more tender crumb and a deeper, subtly tangy flavor you simply cannot rush.
Bread flour plays a key role here too. Its higher protein content builds stronger gluten strands, which trap more gas during fermentation and give the rolls better lift. All-purpose flour works in a pinch, but the rolls will be slightly less tall and a touch less pillowy. I prefer bread flour every single time for this recipe.
One thing to watch before you even start: your starter must be active, bubbly, and at least doubled in size after its last feeding. An immature or sluggish starter is the number one reason sourdough rolls fail to rise properly. Feed it about four hours before you begin mixing.
Ingredients for Sourdough Dinner Rolls
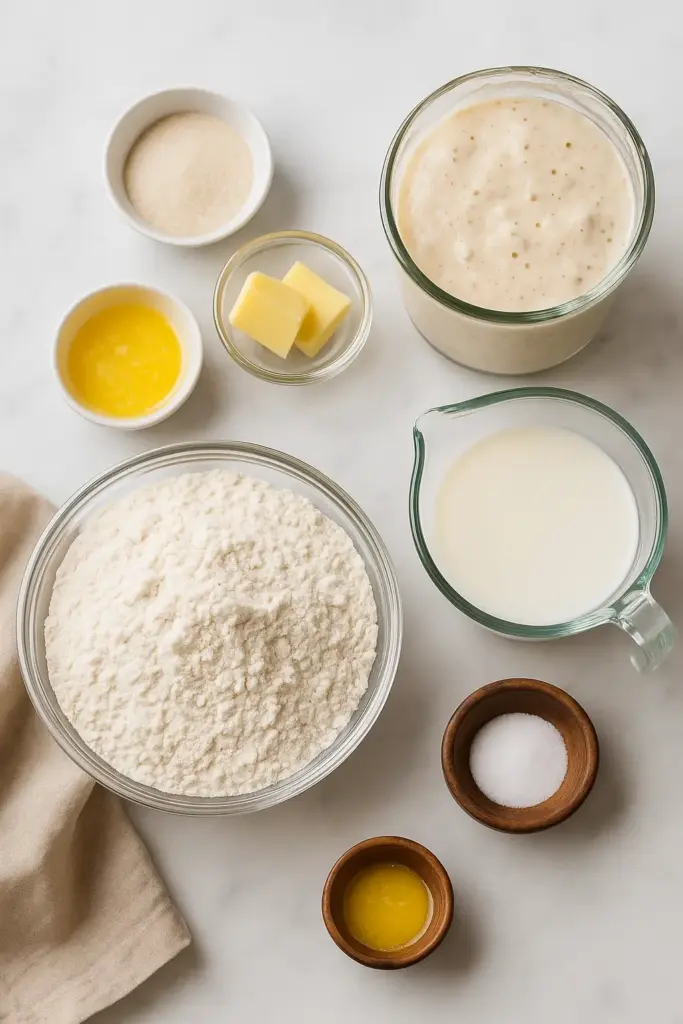
This recipe makes 12 rolls. Every quantity below comes directly from the recipe.
- 2 Tbsp unsalted butter, melted, plus more to brush the pan
- 1 cup whole milk, room temperature
- 2 Tbsp granulated sugar
- 1 tsp fine sea salt
- 3 cups bread flour (or all-purpose flour)
- ½ cup active sourdough starter
- 1 tsp salted butter, to brush over rolls after baking
The sugar here does double duty: it feeds the sourdough cultures during fermentation and contributes to that beautiful golden-brown color on top. The salt balances the subtle sweetness and strengthens the dough structure. Do not skip either one.
Whole milk adds richness and moisture that keeps the crumb soft. Almond milk works as a substitute if needed, though the rolls may be slightly less tender.
How to Make Fluffy Sourdough Dinner Rolls: Step-by-Step
Step 1: Combine the Wet Ingredients for a Flavorful Base
In the bowl of a stand mixer or a large mixing bowl, add the room temperature milk, melted butter, sugar, and salt. Stir until the sugar is fully dissolved. The mixture should look smooth and slightly glossy, with no sugar granules visible at the bottom of the bowl.
Step 2: Build the Dough and Let the Gluten Relax
Add the flour and active sourdough starter to the bowl. Mix together using the paddle attachment or a firm spatula until the dough is just combined. It will look shaggy and rough at this stage, and that is completely fine.
Cover the bowl with a damp kitchen towel and let it rest for 30 minutes. This rest period allows the gluten to hydrate and relax, which makes kneading significantly easier and produces a smoother final dough. If you skip this step, the dough will fight you during kneading.
Step 3: Knead Until the Dough Feels Smooth and Alive
Switch to the dough hook attachment and knead on speed 2 for 10 to 12 minutes, until the dough is smooth, soft, and slightly tacky but not sticky. If kneading by hand, expect 8 to 10 minutes of firm, rhythmic work on a clean surface.
You will know the dough is ready when it pulls cleanly away from the sides of the bowl and springs back slowly when you press a finger into it. If the dough tears rather than stretches, keep kneading for another 2 minutes.
Step 4: Ferment Overnight for Maximum Flavor and Rise
Transfer the dough to a lightly buttered bowl, cover with a damp kitchen towel, and leave it on the counter overnight for 8 to 12 hours. The dough should nearly double in size by morning. You will notice it looks puffier, slightly domed, and feels airy when you gently press the surface.
If your kitchen runs cold, place the bowl in the oven with just the light on. The gentle warmth speeds things up without overheating the dough. Keep the temperature below 100°F to avoid exhausting the starter cultures.
Step 5: Shape Each Roll for Better Oven Spring
Turn the dough out onto a clean work surface and divide it into 12 equal pieces using a bench scraper or knife. Each piece should weigh approximately 65g if you want to be precise.
Shape each piece by pinching the sides together underneath, then cupping your hand loosely around the ball and rolling it in a circular motion over the surface. The motion feels similar to scrubbing a small circle on your counter. This tightens the outer skin of the dough, seals the seam on the bottom, and gives each roll better spring in the oven. The goal is for the dimple on the bottom to almost close up completely.
Step 6: Proof the Rolls Until Visibly Puffed
Arrange the shaped rolls in a generously buttered 9×13 glass baking dish, spacing them evenly. Cover with a damp tea towel and proof until roughly doubled in size: about 2 hours in a warm spot (80 to 90°F), or 3 to 4 hours at room temperature.
As they proof, the rolls will grow into each other. That is intentional. It is what creates those beautiful pull-apart edges. If you want to make them ahead, cover the dish with oiled plastic wrap at this stage and refrigerate for 8 to 24 hours. Remove from the fridge 3 to 5 hours before baking to bring to room temperature and finish proofing.
Step 7: Bake to Golden and Brush with Butter Immediately
Preheat the oven to 375°F. Place the rolls in the top third of the oven and bake for 25 to 30 minutes, until the tops are deep golden brown and the internal temperature reads 190°F. Positioning them in the upper third encourages even browning on top without over-crisping the bottoms.
The moment they come out of the oven, brush generously with salted butter. The butter melts into the hot surface instantly, giving the rolls a glossy sheen and a light, savory finish. No egg wash needed before baking. The color they develop on their own is genuinely better.
What Separates Good Sourdough Rolls from Great Ones
- Use an active starter at its peak. Feed it 4 hours before mixing. It should be bubbly, doubled, and smell pleasantly tangy, not overly sour or flat.
- Do not rush the bulk fermentation. The slow overnight rise develops flavor and creates a more open, tender crumb. Speed proofing in a warm oven is fine for the second proof, but the first proof benefits from patience.
- Roll the dough balls on a bare surface. A lightly floured surface reduces friction, which actually prevents proper surface tension from forming. You want a little grip between the dough and the counter.
- Check internal temperature, not just color. Golden tops can appear before the centers are fully baked. Pull them at 190°F for a perfectly set, fluffy interior.
- Score the rolls optionally before baking. A shallow slash on top lets steam escape in a controlled way and can give the rolls a slightly more artisan look.
Serving These Rolls Beyond the Bread Basket
These rolls are genuinely versatile. Brush them with garlic butter straight from the oven and serve alongside a bowl of tomato soup or beef stew for a cozy weeknight dinner. The slightly tangy flavor of the sourdough pairs especially well with rich, savory broths.
For holiday meals, the make-ahead option is a genuine lifesaver. Shape the rolls the night before, refrigerate, and bake fresh the day of. They come out tasting like you spent all day in the kitchen.
You can also use them as slider buns. Split them horizontally and pile on cheeseburger fillings or pulled pork. The soft, pillowy texture holds up surprisingly well without falling apart.
Why Most Homemade Sourdough Rolls Fall Flat (and How to Fix It)
- Starter was not active enough. If the rolls barely rise, the starter is likely the culprit. It must be bubbly and at least doubled after feeding before you use it. A starter that smells flat or has not risen is not ready.
- Dough was not kneaded long enough. Under-kneaded dough produces dense, gummy rolls. The dough should feel smooth and elastic, not rough or sticky, before the first proof.
- Rolls were shaped too loosely. Loose shaping means poor surface tension, which leads to flat, spreading rolls rather than tall, round ones. Roll each piece firmly until the seam nearly closes.
- Second proof was cut short. Rolls that go into the oven before they have doubled will not have the airy, pull-apart texture you are after. When in doubt, give them another 30 minutes.
- Oven temperature was off. An oven that runs cool produces pale, dense rolls. Use an oven thermometer to verify your actual temperature before baking.
Make It Once, Use It All Week
Once the rolls are fully cooled, store them in a resealable bag at room temperature for up to 2 days. Refrigeration is not recommended as it tends to dry them out and make the crumb tough.
For longer storage, freeze the rolls the same day they are baked. Let them cool completely, then place in a freezer bag with as much air removed as possible. Frozen rolls reheated in a 350°F oven for 7 to 10 minutes taste remarkably fresh. You can also microwave individual rolls for a few seconds with a damp paper towel draped over them to retain moisture.
Letting a frozen roll sit at room temperature for 20 minutes before reheating makes a noticeable difference in how evenly the center warms through.
These Rolls Are Worth the Wait
Sourdough baking asks for patience, and this recipe rewards it fully. The overnight fermentation does the heavy lifting while you sleep, and the actual hands-on time is minimal. What you get in return is a pan of pull-apart rolls with a flavor and texture that store-bought bread simply cannot match.
Give these a try the next time you have a dinner worth celebrating. You might find yourself making them for ordinary Tuesday nights too.
Must Try Recipes
- Savor Homemade Pizza Roll-Ups: A Culinary Adventure Awaiting You — Perfect for a fun appetizer to complement your dinner rolls.
- 10 Minute Ultimate Dinner Olio Recipe – Quick and Easy Meal — A quick dish that pairs well with the fresh rolls.
- Sourdough Chocolate Chip Cookies: Easy Soft & Chewy Recipe — End your meal with a sweet, chewy delight.
FAQs
Can I make sourdough dinner rolls ahead of time?
Yes, and the make-ahead option is one of the best features of this recipe. After shaping the rolls and placing them in the buttered baking dish, cover with oiled plastic wrap and refrigerate for 8 to 24 hours. Remove them 3 to 5 hours before baking to allow them to come to room temperature and finish proofing until visibly puffed.
What does an active sourdough starter look like when it is ready?
A ready starter is bubbly throughout, has at least doubled in size since its last feeding, and smells pleasantly tangy. Feed it about 4 hours before you plan to mix the dough. If it has not risen or shows no bubbles, it needs more time or a fresh feeding before use.
Can I use all-purpose flour instead of bread flour for sourdough dinner rolls with active starter?
All-purpose flour works, and the rolls will still taste great. The difference is noticeable in height and texture: bread flour produces taller, fluffier rolls because of its higher protein content. If all-purpose is what you have, use it without worry, just expect a slightly denser crumb.
How do I know when the rolls are fully baked?
The tops should be deep golden brown and the internal temperature should reach 190°F when measured with an instant-read thermometer. Color alone can be misleading since the tops can brown before the centers are fully set. The thermometer reading is the most reliable indicator.
Can I freeze sourdough dinner rolls after baking?
Freezing baked rolls works well. Cool them completely, then freeze in a sealed bag with air removed. Reheat at 350°F for 7 to 10 minutes or microwave briefly with a damp paper towel over the top. Freezing on the same day they are baked preserves the best texture and flavor.
Why do my sourdough dinner rolls come out dense?
Dense rolls are almost always caused by one of three things: an under-active starter, insufficient kneading, or a second proof that was cut too short. Check that your starter is bubbly and doubled before using it, knead until the dough is smooth and springs back when poked, and let the shaped rolls proof until they have visibly doubled in the baking dish.
Essential Kitchen Tools
Making Sourdough Dinner Rolls? Most failed attempts come from using the wrong pan or heat setup — not the recipe itself.

Want to save this recipe?
Want to save this recipe? Enter your email below, and we'll send it straight to your inbox. Plus, receive new recipes every week!

Beginner-Friendly Sourdough Dinner Rolls Recipe
- Total Time: 10 hours 45 minutes
- Yield: 12 rolls 1x
Ingredients
- 2 Tbsp unsalted butter, melted, plus more for brushing the pan
- 1 cup whole milk, at room temperature
- 2 Tbsp granulated sugar
- 1 tsp fine sea salt
- 3 cups bread flour, or all-purpose flour
- ½ cup active sourdough starter
- 1 tsp salted butter, for brushing over the rolls
Instructions
- In a stand mixer bowl or large mixing bowl, combine the milk, melted butter, sugar, and salt, stirring until the sugar is dissolved.
- Incorporate the flour and active sourdough starter, mixing with a paddle attachment or a sturdy spatula until the mixture is well combined. Cover with a damp kitchen towel and let it rest for 30 minutes to relax the gluten. Knead using the dough hook on speed 2 for 10-12 minutes until the dough is smooth and soft, or knead by hand for 8-10 minutes.
- Transfer the dough to a greased mixing bowl, cover with a damp kitchen towel, and let it rise on the counter overnight for 8-12 hours, until it has nearly doubled in size.
- Divide the dough into 12 equal pieces, approximately 65g each, using a bench scraper or knife. Shape each piece into a ball by pinching the edges together, then cup your hand around each ball and roll it on a clean, smooth surface to tighten the shape, sealing the seam underneath.
- Arrange the rolls in a buttered 9×13 glass baking dish, cover with a damp tea towel, and let them proof until they have roughly doubled in size, which should take about 2 hours in a warm environment (80-90°F), or 3-4 hours at room temperature. You can prepare them ahead of time at this stage.
- Preheat the oven to 375°F. Bake the rolls in the top third of the oven for 25-30 minutes, or until they are golden brown on top and the internal temperature reaches 190°F. Once out of the oven, brush the warm rolls with melted butter before serving.
Notes
TECHNIQUE TIP: For the best texture, let the dough rise overnight at room temperature.
STORAGE: Store rolls in an airtight container for up to 3 days. Reheat in oven for a fresh taste.
MAKE-AHEAD: Shape rolls, cover, and refrigerate for up to 24 hours. Allow 3-5 hours for rolls to proof before baking.
- Prep Time: 15 minutes
- Cook Time: 30 minutes
- Category: Bread
- Method: Baked
- Cuisine: American
Nutrition
- Calories: 162 kcal
- Sugar: 3 g
- Sodium: 205 mg
- Fat: 3 g
- Saturated Fat: 2 g
- Unsaturated Fat: 1.3 g
- Trans Fat: 0.1 g
- Carbohydrates: 28 g
- Fiber: 1 g
- Protein: 5 g
- Cholesterol: 8 mg

