


Sourdough discard pancakes solve one of the most frustrating parts of maintaining a starter: watching perfectly good discard go straight into the trash. If you bake sourdough regularly, that half-cup of unfed starter sitting in your fridge deserves better than the bin. While sourdough discard crackers use a thin, crispy approach to the same ingredient, these pancakes go in the opposite direction entirely, building a thick, bubbly batter that rises into something soft, spongy, and deeply satisfying. The tangy flavor from the discard pairs with instant yeast for a lift that regular buttermilk pancakes simply cannot replicate.
Why This Recipe Works Differently Than Most Pancakes
Most pancake recipes rely on baking powder or baking soda for their rise. That leavening is fast but shallow. Here, instant yeast and sourdough discard work together over a longer fermentation window, creating a batter that nearly doubles in volume and develops a texture that is genuinely closer to a soft doughnut than a standard flapjack.
The buttermilk adds tenderness and a subtle tang that complements the sourdough. The oil, rather than melted butter, keeps the crumb moist without weighing it down. These are not accidental choices. Each ingredient has a specific job, and skipping or swapping carelessly will change the result.
Ingredients for Sourdough Discard Pancakes
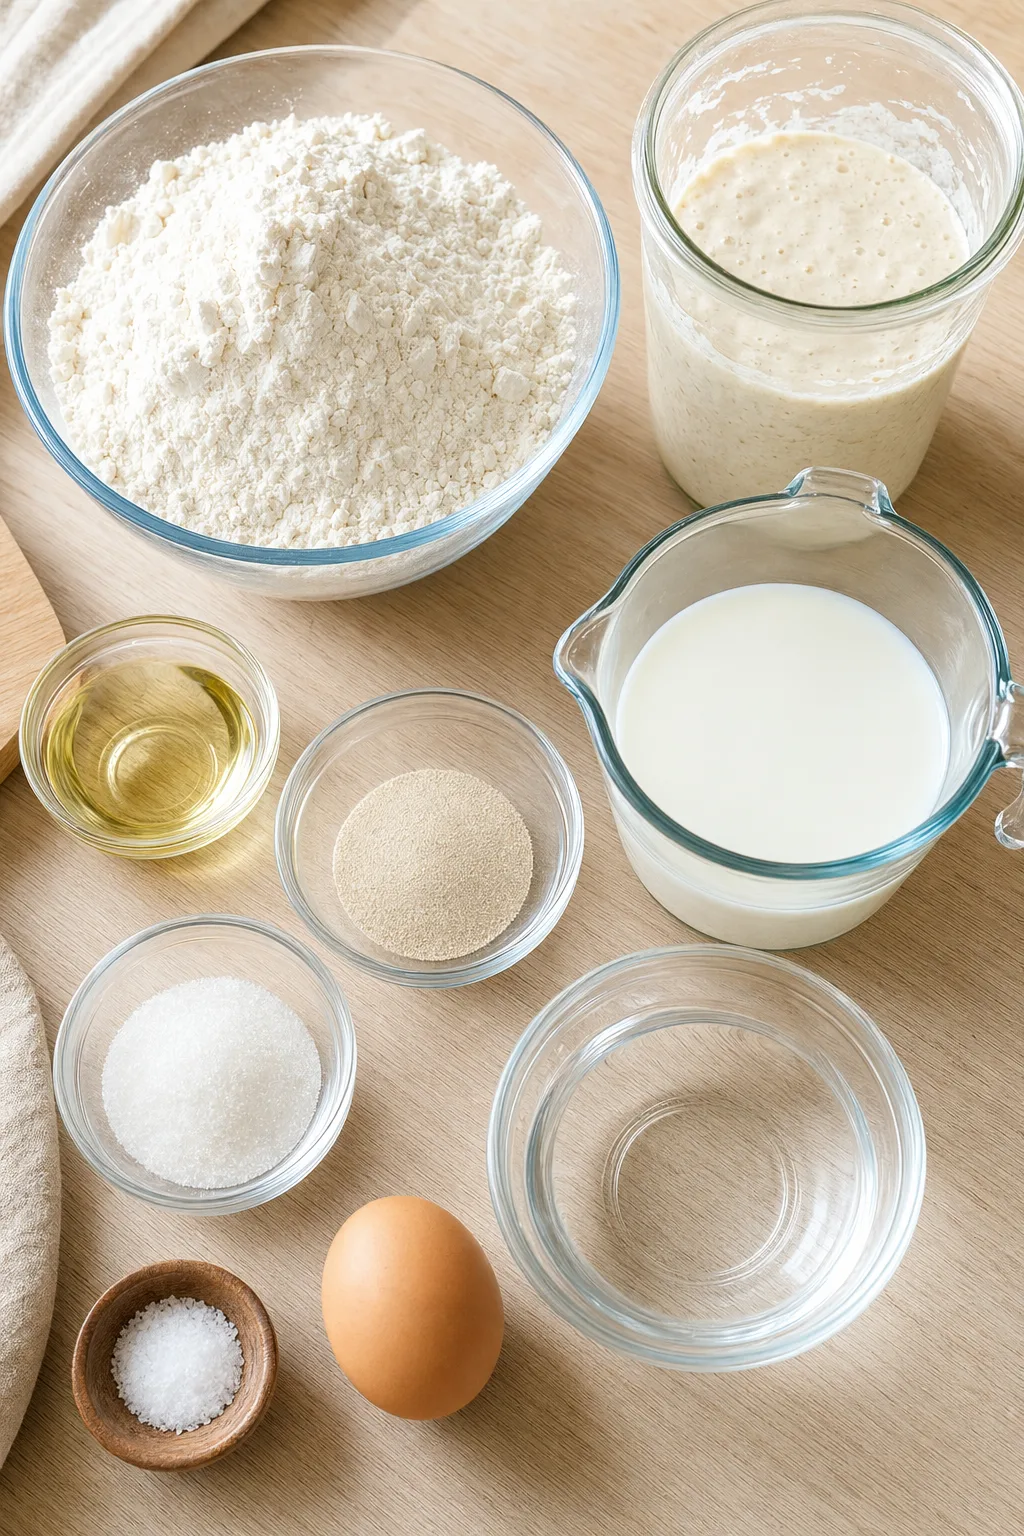
All quantities below are from the tested recipe and yield 6 servings.
- 1 cup warm water (115°F) — warm enough to activate the yeast without killing it
- 1 cup low-fat buttermilk — cold or room temperature both work
- 100 grams sourdough discard (about 1/2 cup) — active starter also works; room temperature speeds up the rise
- 1 large egg, room temperature
- 2 Tbsp extra light olive oil (or vegetable oil), plus more for the pan
- 3 Tbsp granulated sugar
- 1 1/2 tsp instant yeast (or rapid-rise yeast)
- 1 1/4 tsp fine sea salt
- 2 2/3 cups all-purpose flour (330 grams, measured correctly)
On the flour: Measuring by weight (330 grams) is the most reliable method here. Too much flour produces a dense, heavy pancake that never quite puffs the way it should. If you only have a cup measure, spoon the flour in and level it off rather than scooping directly from the bag.
On the sourdough discard: It does not need to be active or recently fed. The instant yeast handles the primary rise. The discard contributes flavor and a slight fermented tang that you will not get from a plain yeast batter.
What to Avoid Before You Even Start Cooking
The single most common failure with this recipe happens before the pan ever heats up. Overheating the water is the quiet culprit. Water above 120°F will begin to damage the yeast, and water that is too cool will slow the rise dramatically. Aim for 115°F and use a thermometer if you have one.
The second issue is flour measurement. A packed cup of flour can add 30 to 40 grams more than intended, pushing the batter toward a thick, doughy consistency rather than the smooth, pourable cake-batter texture you are looking for. Weigh it when possible.
Third: do not rush the fermentation. The batter needs time to develop. A batter that has not fully risen will produce flat, dense pancakes with none of the spongy interior that makes this recipe worth making.
Step-by-Step Instructions
Step 1: Combine the Wet Ingredients Into a Unified Base
In a large mixing bowl, whisk together the warm water, buttermilk, sourdough discard, egg, oil, sugar, instant yeast, and salt until well combined. A helpful trick: place the bowl on a kitchen scale, zero it out, and weigh the discard directly into the bowl. It saves a dish and keeps the measurement accurate.
You will know this step is complete when the discard is fully broken up and no streaks remain. The mixture will look slightly frothy from the yeast. One thing to watch: if your discard is cold from the fridge, it may clump slightly at first. Keep whisking and it will incorporate.
Step 2: Build the Batter to a Smooth, Pourable Consistency
Add the flour one cup at a time, using a whisk to fully incorporate each addition before adding more. Continue whisking until the batter is smooth and reaches a cake-batter consistency, thick enough to pour but not stiff.
If the batter looks lumpy after the final cup of flour, keep whisking. The lumps will smooth out with another 30 to 60 seconds of mixing. If the batter feels unusually thick and stiff, your flour was likely over-measured. Add a tablespoon of warm water at a time until the consistency loosens to something pourable.
Step 3: Let the Batter Ferment Until Doubled and Bubbly
Cover the bowl with plastic wrap and let the batter rise at room temperature for 1 1/2 to 2 hours. If you want to speed things up, place the bowl in a warm environment around 100°F, such as an oven with only the light turned on. At that temperature, the batter should double in about 1 hour.
Do not let the temperature exceed 100°F. Above that threshold, the yeast begins to deactivate, and the batter will not rise properly. You will know the fermentation is complete when the batter has visibly doubled in size and the surface looks puffy, airy, and covered in small bubbles. This is also a good moment to consider what else your starter can do: the same fermentation principle behind this batter is what makes sourdough cinnamon rolls so light and layered.
Step 4: Cook Each Pancake to a Golden, Crisp-Edged Finish
Set a large non-stick skillet over medium heat and add enough oil to generously coat the bottom. Once the oil shimmers, spoon the batter into the pan. A trigger-release ice cream scoop gives you even, consistent rounds without the mess.
Cook for about 1 to 1 1/2 minutes per side. Watch the surface: when bubbles form and begin to pop, leaving small open holes behind, that is your cue to flip. Flipping too early results in a loose, unset top that will collapse. If the edges are browning too fast before the bubbles appear, reduce the heat slightly and add a splash more oil. Add fresh oil after each flip to maintain those crispy edges.
Step 5: Transfer and Serve While Still Warm
Once both sides are golden brown at the edges, transfer the pancakes to a wire rack or serving platter. Serve warm. A wire rack keeps the bottoms from steaming and going soft while you finish the remaining batches.
What Separates a Good Sourdough Pancake from a Great One
- Use room-temperature ingredients. A room-temperature egg and starter help the batter rise faster and more evenly. Cold ingredients slow the yeast activity and can add 30 or more minutes to your fermentation time.
- Keep the pan well-oiled throughout. The crispy edges that make these pancakes so satisfying come from a consistently oiled surface. Do not wait until the pancakes stick to add more oil. Add it between every batch.
- Do not deflate the batter. Once the batter has risen, handle it gently. Aggressive stirring before cooking will knock out the air bubbles you spent two hours building.
- Check your yeast before you start. Old or expired yeast will not give you the rise you need. If you are unsure, proof a small amount in warm water with a pinch of sugar before beginning. It should foam within 10 minutes.
- Watch the heat, not the clock. Stove temperatures vary. Medium heat on one burner may behave like medium-high on another. The bubbles on the surface are a more reliable indicator than any timer.
Serving Suggestions
These pancakes have a mild tang that pairs well with both sweet and slightly acidic toppings. A drizzle of honey with fresh raspberries and blueberries is the combination shown in the video, and it works beautifully. The fruit cuts through the richness and makes the whole plate feel bright.
Sour cream and jam is another combination worth trying. The cool creaminess of the sour cream against the warm, spongy pancake is genuinely satisfying in a way that maple syrup alone is not. Other toppings that work well include strawberry sauce, sautéed apples, whipped cream with mini chocolate chips, or sliced bananas with chopped pecans.
For a lighter pancake with a citrus profile, lemon ricotta pancakes offer a different texture and a brighter flavor if you want variety across a brunch spread.
Make It Once, Use It All Week
These pancakes reheat remarkably well, which makes them worth baking in a full batch even if you are only feeding two people.
Refrigerator: Once cooled to room temperature, cover and store in the fridge for up to one week.
Freezer: Let the pancakes cool completely, then arrange them in a single layer on a baking sheet and freeze for 30 minutes. Transfer to a freezer bag. They keep well in the freezer and reheat without losing their texture.
Reheating: Pop them in a toaster or warm them in a skillet over medium-low heat. The toaster is the better option if you want that slightly crisp exterior back. You will know they are ready when the edges feel firm and the surface looks slightly glossy again, almost like they just came off the pan.
I personally prefer the toaster method over the microwave. The microwave softens them evenly but loses the edge texture entirely. The toaster brings back something close to the original.
Worth Every Minute of the Wait
The fermentation step asks for patience, and that is the honest trade-off here. But the result is a pancake with a texture that a quick baking-powder batter simply cannot produce.
Give this one a try on a morning when you have a little time and a jar of discard waiting in the fridge. The batter comes together in under 15 minutes, and the rest takes care of itself. Once you taste that spongy, golden interior, the two-hour wait will feel like the easiest part of the whole process.
FAQs
Can I use active sourdough starter instead of discard?
Yes. The recipe works with either active starter or discard. Active starter may speed up the fermentation slightly since it has more live culture activity. The flavor will be similar either way because the instant yeast is doing most of the leavening work here.
What if my batter did not rise after two hours?
The most likely cause is inactive yeast. Check the expiration date on your yeast package. Also confirm your water temperature was around 115°F. Water that is too hot kills yeast, and water that is too cold slows it significantly. If the batter still looks flat after two hours, the yeast may need to be replaced before your next batch.
Can I make the batter the night before?
You can mix the batter and refrigerate it overnight before cooking. The cold slows the yeast activity rather than stopping it, so the batter will continue to ferment slowly. Let it come closer to room temperature before cooking, about 30 minutes on the counter, so the pancakes cook evenly.
How do I know when to flip the pancakes?
Watch the surface of the batter in the pan. When small bubbles form and begin to pop, leaving open holes behind, the bottom is set and ready to flip. This typically takes about 1 to 1 1/2 minutes on medium heat. Flipping before the bubbles appear risks a loose, uncooked top that collapses when turned.
Can I make these without sourdough discard?
Yes. Omit the discard and reduce the sugar to 2 tablespoons. Keep everything else in the recipe exactly the same. The result is a yeast-leavened pancake without the sourdough tang, which is still a very good pancake, just a different one.
Why are my sourdough discard pancakes coming out dense?
Dense pancakes usually point to one of three issues: too much flour, under-fermented batter, or deflated batter from over-stirring before cooking. Weigh your flour if possible (330 grams), make sure the batter has fully doubled before cooking, and scoop gently rather than stirring the risen batter down before portioning.
Essential Kitchen Tools
Making Sourdough Discard Pancakes? Most failed attempts come from using the wrong pan or heat setup — not the recipe itself.

Want to save this recipe?
Want to save this recipe? Enter your email below, and we'll send it straight to your inbox. Plus, receive new recipes every week!

Foolproof Sourdough Discard Pancakes Recipe
- Total Time: 2 hours 17 minutes
- Yield: 6 servings 1x
Ingredients
- 1 cup warm water (115°F)
- 1 cup low fat buttermilk
- 100 grams sourdough discard (100gr = 1/2 cup), or active sourdough starter, preferably room temperature
- 1 large egg, brought to room temperature
- 2 Tbsp extra light olive oil, or vegetable oil, plus more for the pan
- 3 Tbsp granulated sugar
- 1 ½ tsp instant yeast, or rapid rise yeast
- 1 ¼ tsp fine sea salt
- 2 ⅔ cups all-purpose flour, measured correctly (330 grams)
Instructions
- In a large bowl, combine the water, buttermilk, sourdough starter (or discard), egg, oil, sugar, yeast, and salt, whisking until everything is well mixed.
- Gradually incorporate the flour, adding one cup at a time and whisking to blend thoroughly before adding more. Continue until the batter achieves a smooth, cake-like consistency.
- Cover the bowl with plastic wrap and allow the batter to rise at room temperature for 1 ½ to 2 hours, or in a warm area (around 100°F) for 1 hour. The batter should double in size and become bubbly and airy.
- Heat a large non-stick skillet over medium heat and drizzle in enough oil to lightly coat the bottom. Once the oil is hot, spoon the batter into the skillet. A trigger release ice cream scoop is useful for even portioning. Cook for approximately 1 to 1 ½ minutes on each side or until the edges turn golden brown. Add more oil as necessary after flipping. If the pancakes brown too quickly, lower the heat.
- After both sides are golden at the edges, transfer the pancakes to a wire rack or serving platter. Serve while warm.
Notes
TECHNIQUE TIP: Use a room-temperature starter to speed up the rising time of the pancake batter.
STORAGE: Store leftover pancakes in an airtight container in the fridge for up to 3 days or freeze them for longer storage.
SUBSTITUTION: If out of buttermilk, use a mix of milk and lemon juice as a substitute to maintain the tangy flavor.
- Prep Time: 10 minutes
- Cook Time: 7 minutes
- Category: Breakfast
- Cuisine: American
Nutrition
- Calories: 318 kcal
- Sugar: 8 g
- Sodium: 559 mg
- Fat: 7 g
- Saturated Fat: 1 g
- Unsaturated Fat: 5 g
- Trans Fat: 0.003 g
- Carbohydrates: 55 g
- Fiber: 2 g
- Protein: 10 g
- Cholesterol: 29 mg

