


Making a sourdough starter feels like one of those things that belongs to serious bakers with inherited jars and mysterious rituals. The truth is, most people give up before they start because the process looks complicated from the outside. This sourdough starter recipe strips it down to exactly what it is: flour, water, and a week of patience. With just those two ingredients and a consistent daily routine, you will have a living, bubbling starter ready to make real Sourdough Bread at home.
Why Most Homemade Sourdough Starters Fail (Before You Begin)
The biggest mistake beginners make is trying to speed things up. Putting your jar near a heat source, using warm tap water, or skipping a feeding day because nothing seems to be happening are the fastest ways to exhaust your yeast before it ever gets strong.
The second most common problem is using the wrong water. Chlorine in tap water actively works against yeast growth. If filtered or spring water is not available, leave a jug of tap water on the counter for a full day and the chlorine will dissipate naturally.
One thing to watch: if you see pink, orange, or any unusual discoloration in your starter at any point, that is a sign of contamination, not fermentation. Discard everything, sanitize your jar and utensils thoroughly, and start fresh.
What You Need Before Day 1
The equipment list is short, but two items genuinely change the experience. A digital kitchen scale removes all the guesswork from measurements and makes the daily discard-and-feed math effortless. A clear glass jar, either a quart mason jar or a 3/4 quart Weck jar, lets you watch the starter rise and fall without opening it.
I personally prefer the Weck jar because it weighs exactly 400 grams without the lid, which makes calculating how much starter remains after discarding completely straightforward. It also comes with a loose-fitting lid, which is important because your starter needs to breathe.
A rubber band placed at the level of your starter after each feeding gives you a clear visual reference for growth. A silicone spatula makes scraping down the sides much easier and keeps cleanup fast.
Ingredients for Your Sourdough Starter
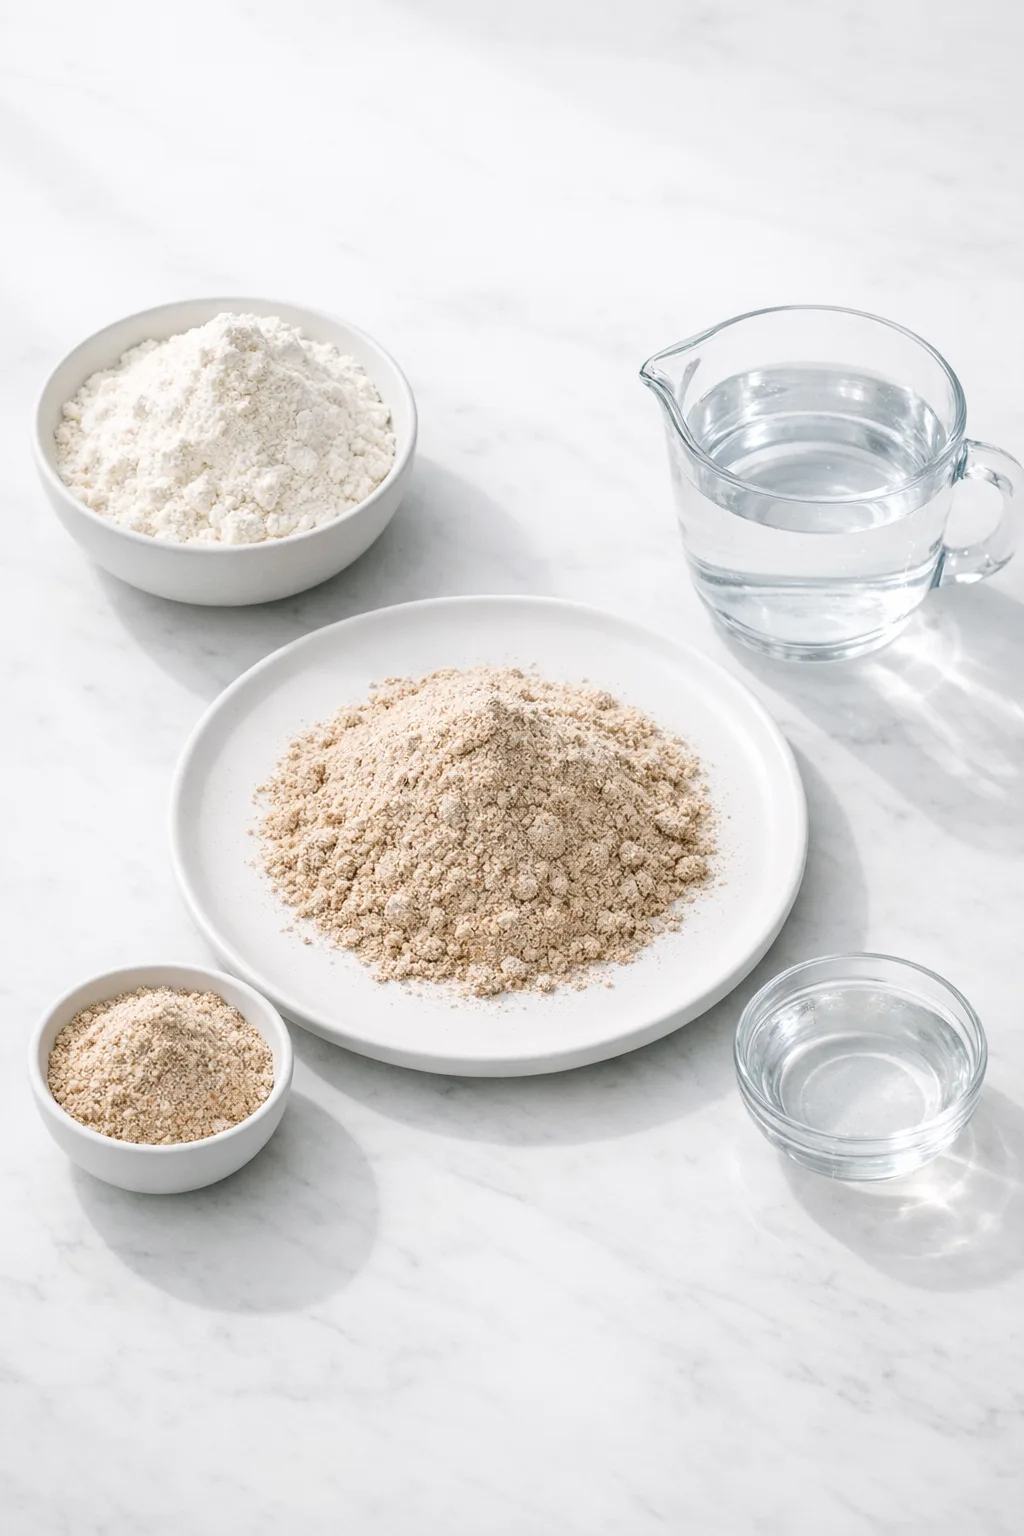
Only two ingredients are needed, but the type of each one matters more than most people realize.
- 100g Whole Grain Rye Flour or Whole Wheat Flour (preferably organic, 100g = 3/4 cup) — used only on Day 1 to establish the starter
- 500g All-Purpose Flour (preferably organic, avoid bleached flour) — used from Day 3 onward to feed and maintain the starter
- 1 quart filtered water or spring water (room temperature) — used throughout the entire process
Why These Specific Flours
Whole grain rye and whole wheat flour still contain the bran and germ that refined flour has had processed out. That means more natural wild yeast and bacteria are present in the grain itself, giving your starter a much stronger foundation from the very first day. Testing with all-purpose flour from the start can add significant time before you see any bubbling activity.
All-purpose flour takes over from Day 3 because it is cheaper, widely available, and provides a consistent, clean food source for the yeast population you have already established. Bleached flour is worth avoiding because the chemical treatment can interfere with yeast activity.
The 7-Day Sourdough Starter Feeding Schedule
Day 1: Establish the Base Culture
Before adding anything, weigh your empty jar and write that number on the jar with a permanent marker. This makes every future discard calculation instant. Add 100 grams (3/4 cup) whole wheat or rye flour and 100 grams (1/2 cup) room temperature filtered water directly into the jar.
Stir thoroughly with a fork until no dry flour remains. The mixture will be very thick, almost like a dense paste, and that is completely expected, especially with rye flour. Scrape down the sides with a spatula, place a rubber band at the level of the mixture, cover loosely, and leave at room temperature for 24 hours. Write the start date on the jar.
If your house runs cool, use lukewarm water, but keep it below 85°F. Cold water slows growth significantly, and water that is too warm can damage the yeast you are trying to cultivate.
Day 2: Hold Steady and Observe
Nothing is happening yet, and that is normal. You may see a few tiny bubbles or the mixture may look identical to yesterday. Either way, leave it alone for another full 24 hours. Resist the urge to add anything or stir it.
The ideal room temperature for growing a starter is between 70 and 75°F. Avoid placing the jar in a warm oven to speed things up. That approach tends to cause a rapid false rise that exhausts the yeast before a stable culture can form.
Day 3: First Feeding After Visible Bubbles Appear
By day three, you should see some bubbling activity and the starter may have risen slightly above the rubber band. Remove and discard half of the starter directly into the trash, not the drain, to avoid plumbing issues. You should have approximately 100 grams (1/2 cup) of starter remaining in the jar.
Now switch to all-purpose flour. Add 100 grams (3/4 cup) all-purpose flour and 100 grams (1/2 cup) room temperature water. Stir thoroughly until no dry bits remain, scrape down the sides, adjust the rubber band to the new level, cover loosely, and rest for another 24 hours.
If you do not see visible bubbles yet, discard and feed anyway on schedule. Some environments simply take a little longer, and staying consistent with the feeding schedule matters more than waiting for perfect signs of activity.
Day 4: Feed Through the Slowdown
You should see clear growth above the rubber band and plenty of bubbles throughout the mixture. Discard all but 100 grams of starter, then feed with 100 grams (3/4 cup) all-purpose flour and 100 grams (1/2 cup) room temperature water. Stir well, scrape the sides, cover loosely, and rest for 24 hours.
Note: in testing this recipe multiple times, the starter sometimes appears to slow down or stall on day 4 for no obvious reason. This is sometimes called a false start and it is completely normal. Keep feeding on schedule and it will recover.
Day 5: Build Momentum
Growth should be visible and consistent. Keep 100 grams of starter in the jar, discard the rest, and feed again with 100 grams (3/4 cup) all-purpose flour and 100 grams (1/2 cup) room temperature water. Stir thoroughly, scrape down the sides, cover loosely, and rest for 24 hours.
You will notice the mixture loosens up noticeably compared to the first few days. That is the yeast breaking down the gluten structure, and it means things are moving in the right direction.
Days 6 and 7: Watch for the Double
Discard all but 100 grams of starter and feed with 100 grams (3/4 cup) all-purpose flour and 100 grams (1/2 cup) room temperature water. Stir thoroughly, scrape down the sides, cover loosely, and rest until the starter has more than doubled in volume.
By day 7, a healthy starter should be visibly airy, domed on top, and full of bubbles both on the surface and throughout the mixture. The smell should be pleasantly sour, almost like fresh bread or mild brewing yeast. That aroma is one of the clearest signs that fermentation is working correctly.
Testing Readiness: The Float and the Peak
A ready starter peaks between 4 and 6 hours after feeding and begins to recede after 12 hours. To check whether it has enough rising power, drop a small dollop into a bowl of water. A floating starter is active and strong enough to leaven bread, while one that sinks needs a few more days of regular feeding.
Reaching day 7 without a fully active starter is completely normal. Flour type, water quality, and room temperature can all slow the process. Stay consistent with feedings and the starter will strengthen over time.
How to Maintain Your Starter Long-Term
Once your starter passes the float test, maintenance depends on how often you bake.
- Frequent bakers: Store at room temperature. Discard and feed every 24 hours. When you need starter for a recipe, feed it and use it when it reaches its peak, around 4 to 6 hours after feeding.
- Casual bakers (weekly): Store in the refrigerator. Once a week, discard all but 100 grams, feed with 100 grams flour and 100 grams water, then let it rest at room temperature for 1 to 2 hours before returning it to the fridge. When baking, remove the starter from the fridge the night before, bring to room temperature, discard and feed, then use it at its peak.
Going on vacation? The fridge is your friend. A well-established starter can rest in the refrigerator for a week or more without any harm, as long as you feed it when you return.
Once your starter is mature, the discard you remove during each feeding does not have to go to waste. The discard from an established starter works well in recipes like Sourdough Discard Pancakes, where the mild tang adds flavor without needing a fully active rise.
What Separates a Good Starter from a Great One
- Consistency beats perfection. Feeding your starter at the same time each day, even roughly, produces a more predictable and reliable culture than irregular feeding at random intervals.
- Room temperature is the single biggest variable. The ideal range is 70 to 75°F. A cooler kitchen will slow growth, and a warmer one can cause the starter to peak and crash too quickly between feedings.
- Do not tighten the lid. Pressure buildup inside a sealed jar can cause problems and prevents the gases produced by fermentation from escaping naturally.
- Wipe the rim after each feeding. Dried starter on the rim can cause the lid to stick and seal the jar, which cuts off airflow.
- Trust the timeline. The first time I tried to rush this process by placing the jar near the stove for warmth, the starter rose dramatically in 24 hours and then completely stalled. Starting over from scratch taught me more about patience than any recipe instruction ever could.
What to Do With Your Starter Beyond Bread
A mature starter opens up a wide range of baking projects. The most obvious is a classic sourdough loaf, and the fermentation science behind this starter is the same principle that drives the rise and flavor in Sourdough Pizza Dough, which uses the starter differently in terms of hydration and timing but relies on the same active culture you have just built. Pancakes, waffles, crackers, and pretzels are all within reach once your starter is established and maintained.
Sourdough Starter Storage Tips
Room temperature storage requires daily feeding. Refrigerator storage requires weekly feeding. Both methods work well, and the right choice depends entirely on your baking frequency.
You can also dry your starter completely if you need to pause for an extended period. Spread a thin layer on parchment paper, let it dry fully at room temperature, then crumble it and store in an airtight container. To revive it, rehydrate with equal parts flour and water and resume the feeding schedule.
FAQs
How do I know my sourdough starter is ready to use?
A ready starter more than doubles in volume within 4 to 6 hours of feeding and begins to recede after 12 hours. It should smell pleasantly sour, have a domed top, and float when a small amount is dropped into water. All three signals together give you the most reliable confirmation.
What is the best flour for a sourdough starter?
Whole grain rye flour or whole wheat flour works best for establishing the starter on Day 1 because the bran and germ provide more natural wild yeast. From Day 3 onward, unbleached all-purpose flour is used for feeding because it is consistent and widely available. Avoid bleached flour throughout the process.
My starter is not rising after day 7. What should I do?
Keep feeding it on the same schedule. Some starters take 10 days or more depending on the flour, water quality, and room temperature. Check that your water is filtered or dechlorinated, your kitchen is between 70 and 75°F, and you are discarding and feeding consistently every 24 hours. Adding a feeding or two of whole wheat flour can give a sluggish starter a boost.
Why do I have to discard starter every day?
Discarding keeps the population of yeast and bacteria at a manageable size so that the fresh flour you add each day can actually feed them. Without discarding, the starter becomes too acidic too quickly and the yeast population gets overwhelmed. Once your starter is mature, that discard can go into Sourdough Discard Pancakes or crackers rather than the trash.
Can I use tap water for my sourdough starter?
Chlorinated tap water can slow or inhibit yeast growth. Filtered water or spring water is the better choice. If neither is available, fill a jug with tap water and leave it uncovered on the counter for 24 hours. The chlorine will dissipate and the water will also come to room temperature, which is an added benefit.
What does a healthy sourdough starter smell like?
A healthy starter smells sour and slightly yeasty, similar to the aroma of fresh sourdough bread or mild beer. A sharp, unpleasant smell like nail polish remover can indicate the starter is hungry and needs feeding. A truly foul or rotten smell, or any visible mold, means it is time to discard and start over.
Start Your Starter This Week
A week of consistent feeding is all that stands between you and a living culture that can leaven bread, pancakes, pizza, and more for years to come. The process is forgiving, the ingredients cost almost nothing, and the result is something genuinely satisfying to maintain.
Give this one a go when you have a week at home and can check in daily. Once that starter is bubbling and doubling reliably, you will find yourself looking for every excuse to bake with it.
Essential Kitchen Tools
Making Sourdough Starter? Most failed attempts come from using the wrong pan or heat setup — not the recipe itself.

Want to save this recipe?
Want to save this recipe? Enter your email below, and we'll send it straight to your inbox. Plus, receive new recipes every week!

Beginner-Friendly Sourdough Starter Recipe
- Total Time: 7 days
- Yield: 7 1x
Description
Ingredients
Ingredients for creating a sourdough starter:
- 100 g Whole Grain Rye Flour or Whole Wheat Flour (preferably organic (100g = 3/4 cup))
- 500 g All-purpose flour – preferably organic and avoiding bleached flour (used to maintain and feed the starter)
- 1 qt filtered water or spring water is even better* (room temperature)
Instructions
Day 1 Make your Starter
- Begin by noting the weight of your jar in grams prior to adding any ingredients, and mark the jar with the starting date for easier tracking.
- Incorporate 100 grams (3/4 cup) of whole wheat or rye flour along with 100 grams (1/2 cup) of water. Mix thoroughly with a fork until it reaches a very thick consistency, using a spatula to scrape down the sides. Cover the jar loosely and allow it to rest at room temperature for 24 hours. Use a rubber band around the jar to indicate the growth of your starter, and label it with a date for tracking purposes.
Day 2: No Changes Noted
- At this point, you may not observe any changes. Tiny bubbles might appear, or it may look the same. Allow it to rest for another 24 hours.
Day 3 (stage 2) Visible Growth and Bubbles in Jar
- Remove and discard half of the starter to prevent plumbing issues, ensuring you retain 100 grams (1/2 cup) of starter. Add 100 grams (3/4 cup) of all-purpose flour and 100 grams (1/2 cup) of room temperature water. Stir well, scrape down the jar’s sides, cover loosely, and let it rest at room temperature for another 24 hours.
Day 4 (72 Hours into the process): See a lot of bubbles
- Discard all but 100 grams of the starter. Mix in 100 grams (3/4 cup) of all-purpose flour and 100 grams (1/2 cup) of room-temperature water. Stir thoroughly, scrape down the sides of the jar, cover loosely, and allow it to rest for 24 hours. Note: In some tests, the starter may slow its growth on day 4 for no clear reason. If this occurs, continue feeding it as it will recover.
Day 5: Visible growth and bubbles.
- Remove and discard all but 100 grams of the starter. Add 100 grams (3/4 cup) of all-purpose flour and 100 grams (1/2 cup) of room-temperature water. Mix well, scrape down the sides of the jar, cover loosely, and let it rest for 24 hours.
Day 6-7: Your starter may double or more
- Remove and discard all but 100 grams of the starter. Incorporate 100 grams (3/4 cup) of all-purpose flour and 100 grams (1/2 cup) of room-temperature water. Stir thoroughly, scrape down the sides of the jar, cover loosely, and rest until the volume has more than doubled.
Testing Your Starter
- When the starter is ready, it should peak within 4-6 hours and start to recede after 12 hours. It should have a pleasant sour smell. To test, drop a bit of starter into a bowl of water. If it floats, it’s ready for use in recipes. If the starter isn’t ready by day 7, continue feeding it according to this schedule, as it may take longer depending on various factors such as the flour used and environmental conditions.
How to Maintain your starter
- For frequent bakers: Keep the starter at room temperature, discarding and feeding it every 24 hours. To use, feed the starter and wait for it to reach its peak in 4-6 hours before removing the portion needed for your recipe.
- For casual bakers (weekly): Store the starter in the fridge. Once a week, discard and feed it, then allow it to rest at room temperature for 1 to 2 hours before returning it to the fridge. If you plan to bake, take the starter out of the fridge and let it reach room temperature overnight. Discard and feed it. When the starter peaks, remove the portion required for your recipe, then feed and refrigerate.
Notes
TECHNIQUE TIP: Feed your starter consistently at the same time each day to maintain its growth.
STORAGE: For casual bakers, store the starter in the fridge, feeding it weekly to keep it active.
SUBSTITUTION: Use filtered or spring water to avoid chlorine, which can hinder yeast growth.
- Category: Bread
- Method: Baked
- Cuisine: American

